
2022.06-08
Consolidated: uCloud
Year 2023 - Period: June | July | August
Version: Update tags 5.3-b56 and 1.0-account90
Introduction
This uCloud Platform release is an essential communication tool to the disclosure work and diffusion of news about the product, innovations generated in the development area.
The release, in addition to being an informative material with relevant content about the deliveries of one or more increments in the application, aims to provide results for the customers’ investments, obtain an opinion and report the progress, whether it is enhancement, improvement or corrections. It really offers proper visibility in the product development process.
News
The news or the launches of this period about the uCloud platform covers the seven (7) new implementations, the thirteen (13) improvements made in the Cloud category due to the demand in adapting to changes in these providers, forty (40) global enhancements of the uCloud platform and the thirty-four (34) corrective actions, nine (9) being related to the clouds, ten (10) related to the uCloudOPS and fifteen (15) related to Billing.
Topics to be described in this document:
New implementations;
Adequations to public and private clouds;
Enhancement of the uCloud platform;
Corrective actions.
New Implementations
This topic introduces the new seven implementations and inserts detailed information about each of them directly from the uCloud Usage Manual, hosted on the Ustore’s repository/wiki.
1. Budget :
Budget is a consumption-based report created with the objective to define a total budget for a certain period (nominated Gap), whether it is monthly, quarterly, semiannual or annual. This report based on consumption, in addition to defining a total budget, allows its visualization with Budgets cost breakdowns.
It corresponds to a new implementation on the uCloud Portal, defined by a consumption-based report that aims to pin the total budget for a period and enables the cost forecasts.
Accessing the Budget
To access the Budget submenu on the uCloud portal, the user must click on the Administration menu, and then click on the Contracts submenu. On the screen below, it is displayed the list of all the existing contracts.

When selecting the desired contract from the list, a new screen with the contract details is shown. The contract detail screen can be considered one of the largest screens on the uCloud platform, it delivers seventeen different types of data, displaying the cards:
1.General;
2.Price categories;
3.Price of resources;
4.Budgets;
5.Primary contract;
6.Administrators;
7.Invoices Rules;
8.Alerts Policies;
9.Contract Quota;
10.Company data;
11.Virtual Datacenters granted;
12.Users;
13.Groups;
14.Invoices data;
Contract Permission Profiles and its Permissions;
16.Products;
Invoice Profile per Container.
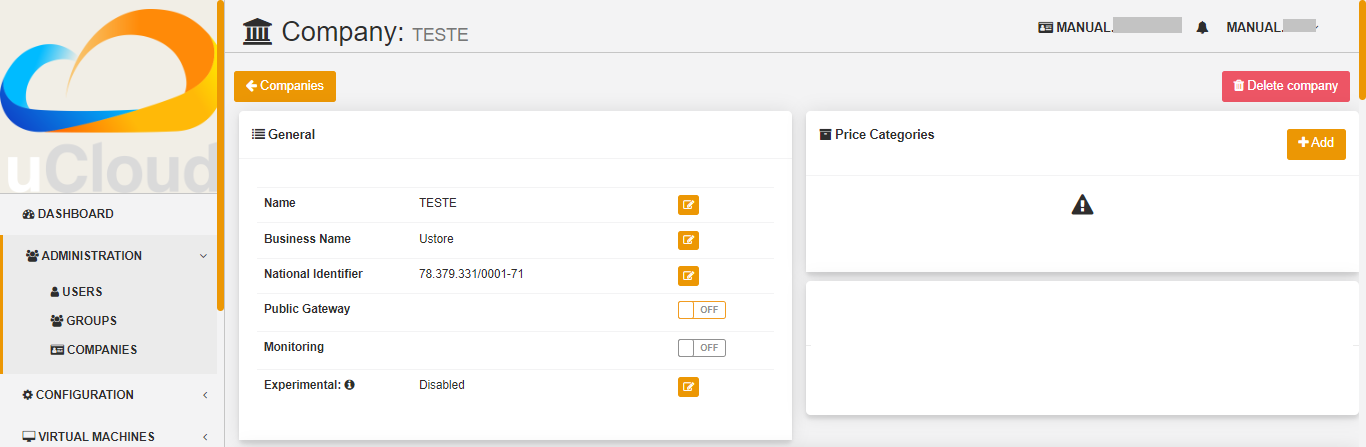
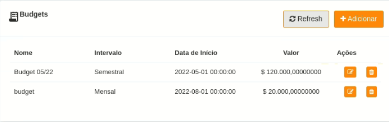
On this detailed contract screen, the user must use the scroll bar and browse until they find the fourth card named Budget shown below:

The Budget card displays two buttons, REFRESH and +Add.
Atenção
 In this image example, the Budgets have not yet been created, so it is blank, with the attention symbol.
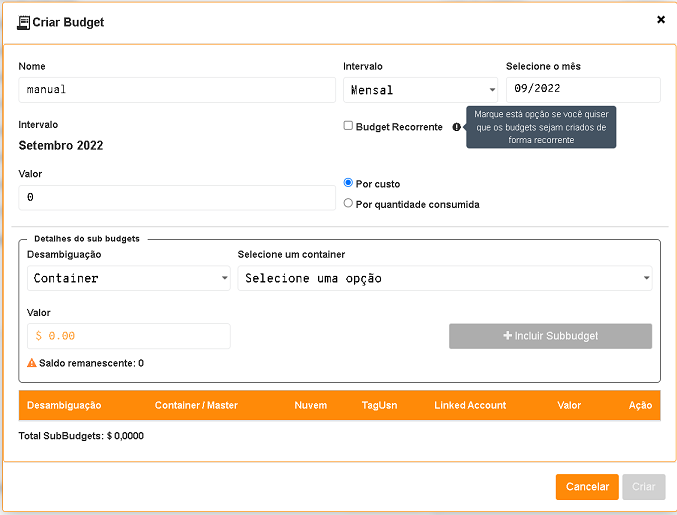
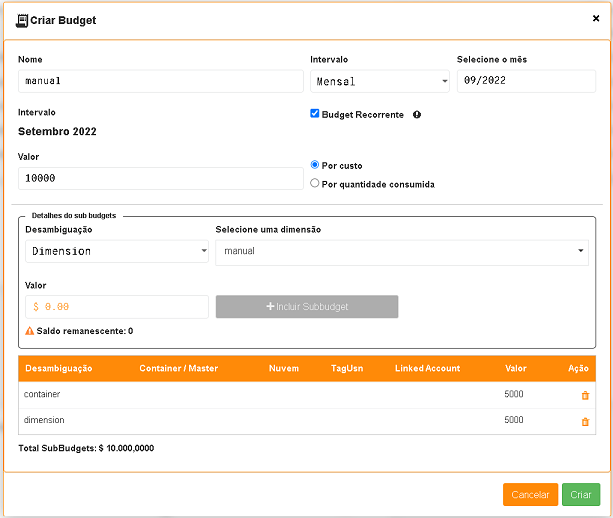
Clicking on the + Add button, the «Create Budget» modal is presented, and from that point on, the user starts the first creation.
Creating Budget and Sub Budget
The “Create Budget“ modal, displays the blanks: name, gap, month, checkbox to select whether the report is recurring, the amount per cost or per consumed quantity.
Then, the sub budgets details are shown, such as: disambiguation, container selection, value and the +Include Subbudget, Cancel and Create buttons.
Importante
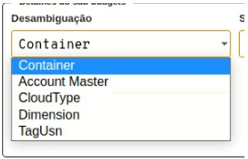
 The disambiguation is responsible for the sub budget purpose, so, by clicking on the checkbox, the user visualizes and can filter one of the five types of existing elements: Account Master - Container - Cloud Type - Dimension - TagUsn.
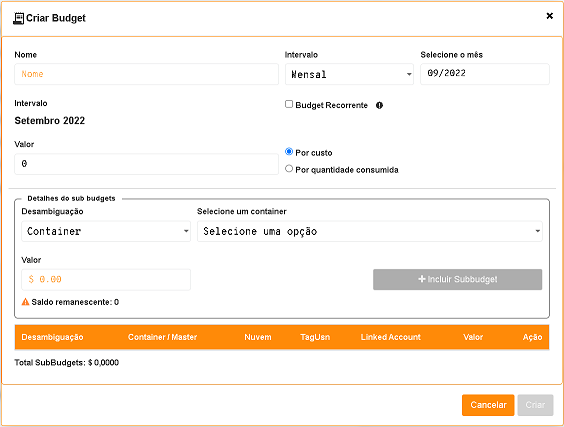
After clicking on the +Add button, the Budget creation screen is presented according to the picture above, on which the user must fill in all the blanks and configure the generation of the consumption-based report.
Name: Space regarding to the Budget name.
Gap: Is presented as a dropdown menu, this blank is responsible for the desired period for creating the report (monthly, quarterly, semi-annual or annual).
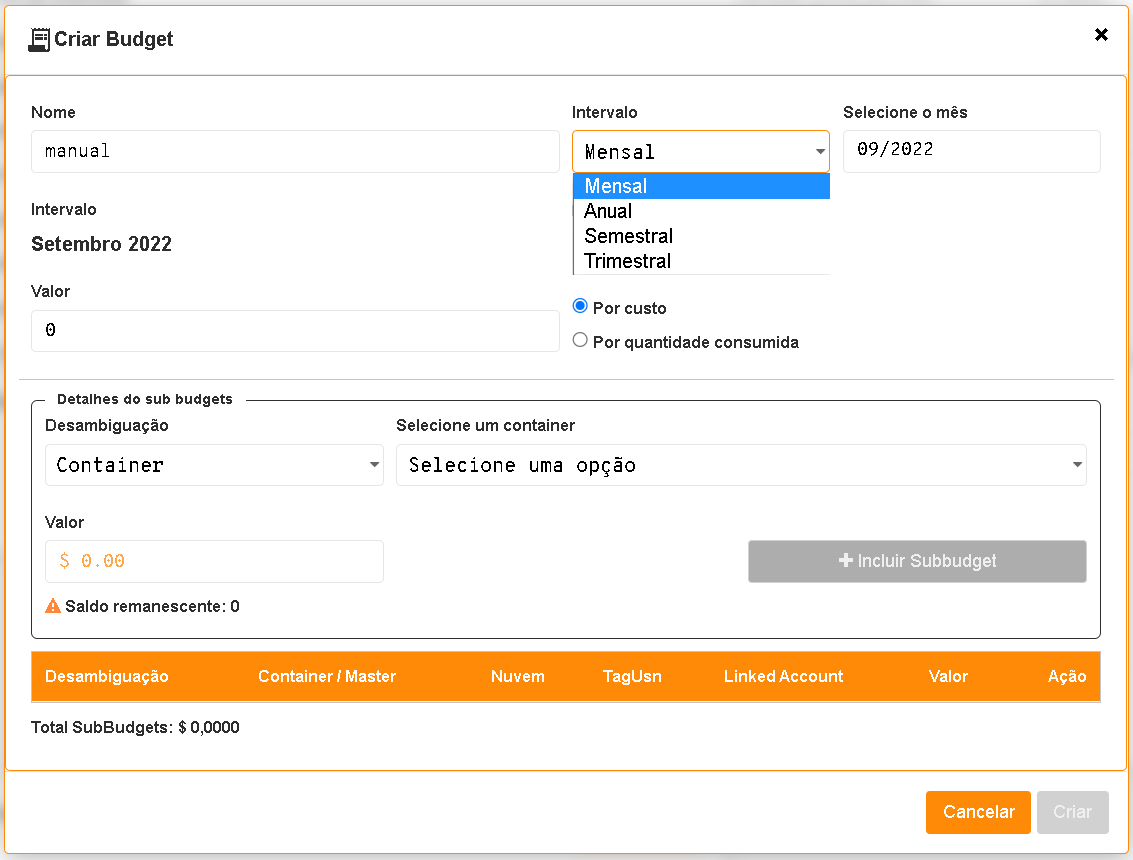
In the process of creating and configuring the Budget, the user has the option to select on the platform the “Gap” that intends to generate the report. The screens corresponding to the four types of gaps allowed in this creation are detailed below.
Quarterly Gap
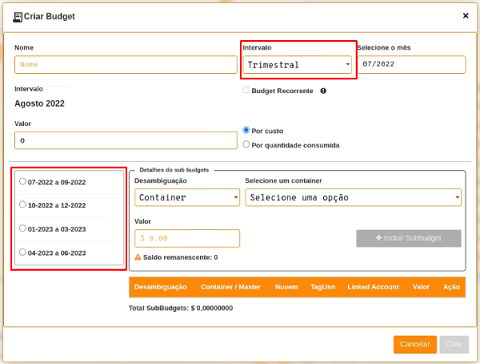
When looking at the figure above, on the blank “Gap” is necessary to click on the “Quarterly” option, as a result the interface presents a checkbox with four period options, located next to the “Sub budgets details” card. The user must select according to the quarter that they wish to generate the report.
The application allows the user to choose any of the available quarters within the period of one year, always starting from the chosen month, located in the “Select the month” blank.
Semiannual Gap
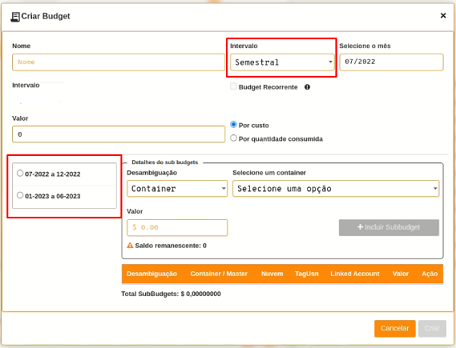
On the “Gap” dropdown menu, when selecting the “Semiannual” option, the card regarding the period presented as semi annuals gaps shows next to the sub budget details, in a checkbox format.
The application generates two alternatives with the semesters available within the period of one year. Starting from the chosen month, located in the “Select the month” blank.
Annual Gap
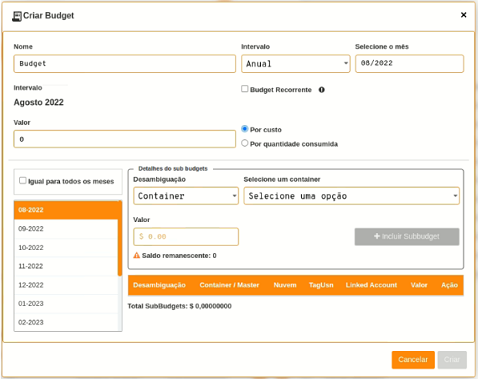
When selecting the annual gap, a list appears with all the months corresponding to the period of one year, from the selected month in the blank “Select the month”.
Allows to create a sub budget for each month of the year, manually or by checking the option “same for all months”.
When including a sub budget, it is added for all months, remembering that the Budget value refers to the year.
Atenção
Creating sub budgets for all the months of the year, the sum must be limited to the total amount of the budget.
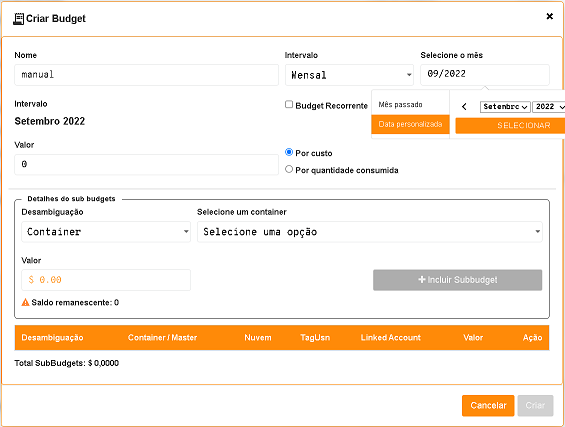
Monthly Gap
The Monthly Gap screen is shown as the process continues to fill in the fields on the “Create Budget” screen. For the monthly interval, the report includes the chosen month.
In the sequence below, the user must complete the remaining blanks, finishing this creation Budget modal.
Select the month: In this blank, the user must fill in the month and year desired to set as the initial date of the report, or select a custom date.
Recurring Budget: Responsible for the activation, or not, of the continuous report.
This function enables the automated creation.
For example:
Next month another budget will be created, if the quarterly and semiannual will be created a month later of the last month of the period.
Value: Field referring to the report value.
In this space, the user must fill in the blank of Value with the amount available for the budget, and select if this value is per cost or per quantity consumed.
Per cost or per quantity consumed: Checkbox responsible for indicating which Budget unit is used as reference to show the report on screen, per cost (value in BRL) or per quantity consumed (value in amount of resources). These options are located on the right side of the value filling blank.
After filling in these data, the blanks about sub budget details must be completed. For that, the user must select which type of Disambiguation is desired on the report, if it is of Container, Account Master, CloudType, Dimension or TagUsn.
Nota
 Is possible to insert the sub budgets to our main Budget, limiting the rule that its value of this has to be equal to the sum of the values of its sub budgets. In case the value represents a higher or lower number, the budget creation button remains disabled and the “remaining balance” differs from 0.

Having selected the type of Disambiguation, the next step is filling in the value of sub budgets, on the “Sub Budgets Details” card.
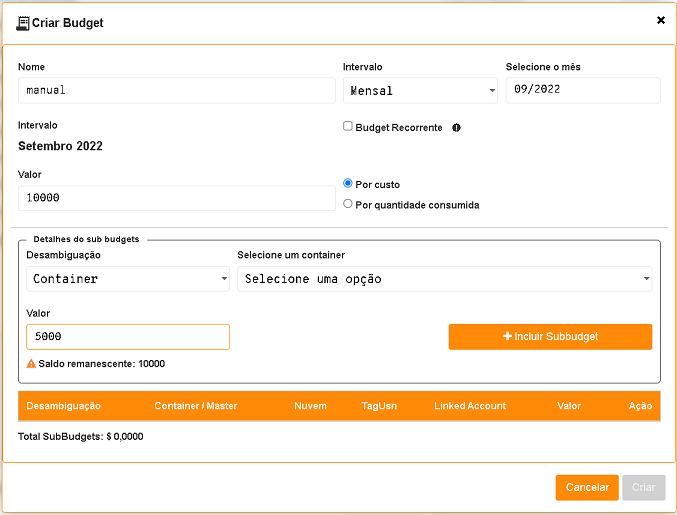
On this step, the sub budget amount must be filled in, and when the desired amount is entered, the remaining balance is shown below the value blank.
After completing the data, the user must click on the button Include Subbudget, to finish the inclusion. As a result of the operation, the screen displays the list of the sub budget included according to the image below:
Importante
The remaining balance corresponds to the value that indicates the remaining balance of the budget, equals the value of the budget subtracted by the sum of the value of all sub budgets. The Create Budget button remains disabled if the remaining balance is different from zero.

To create the second Budget, the user must follow the steps detailed above, in the cycle of the first Budget creation. Follow until the the “Sub Budgets Details” section that is presented below:
In this flow, to detail the sub budget with a distinct disambiguation, just select a different type from the one used previously, and when clicking on “Dimension”, the blank next to it remains available for selecting a certain dimension.
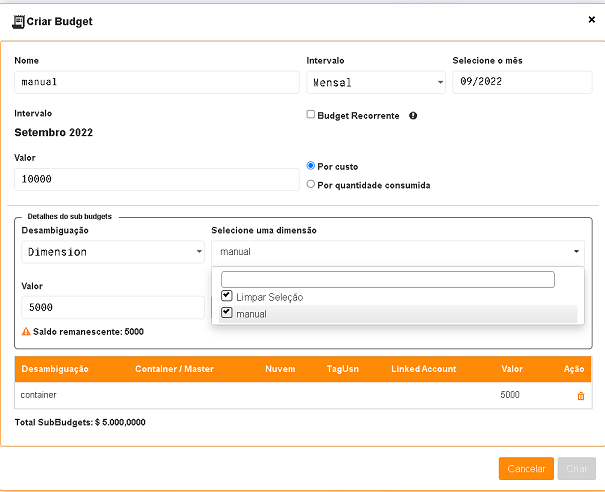
When filling in the desired value, it is necessary to observe the amount available in the “Remaining Balance” area, located below the “Value” space. After completing it, just press the Add Subdbudget button next to the “Value” box, so that the disambiguation sub budget of the “Dimension” type created joins the disambiguation sub budget of the “Container” type that was generated previously.
Both shown in the list below:
To finish the process of Budgets and sub budgets creation, just click on the Create button located in the lower right corner of the screen.
Editing Budget
To edit a “Budget”, the user just needs to access the Administration menu, and then click on the Contracts submenu, the platform displays a list of all the existing contracts.
In it, the user must click on the contract related to the budget that they wish to edit. The screen loaded presents the details of this contract, being necessary to use the scroll bar and browse until the fourth Budget card is found.
On this card are displayed five columns: Name, Gap, Start Date, Value and Actions.
The “Actions” column allows the user to carry out two executions represented by the Edit and Delete icons.
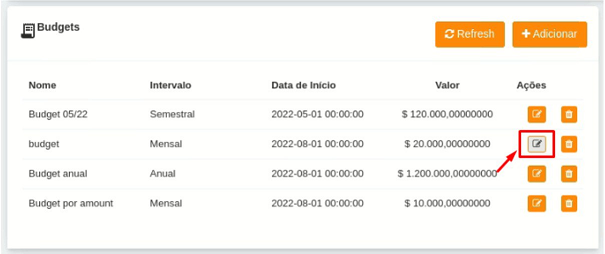
When clicking the Edit button on the chosen Budget, the edition modal is presented with all the information previously filled in.
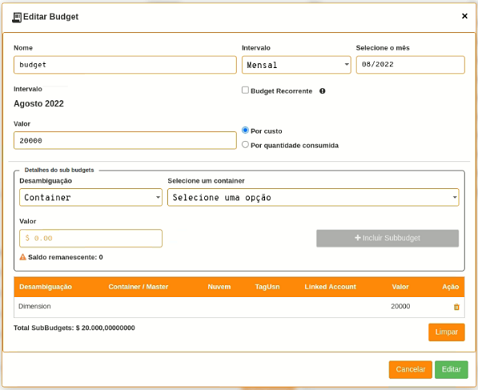
On this screen it is possible to change the name, month, value, if the budget is per cost or per quantity consumed, and it also makes it possible to make changes to sub budgets. Noting that there is a gap limitation, after the creation of a budget it is impossible to alter it.
Importante
In summary, the sub budgets are not altered, it is necessary to remove and add the new Budget.
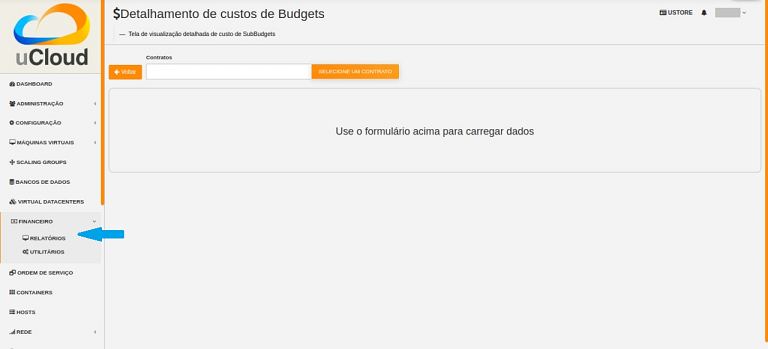
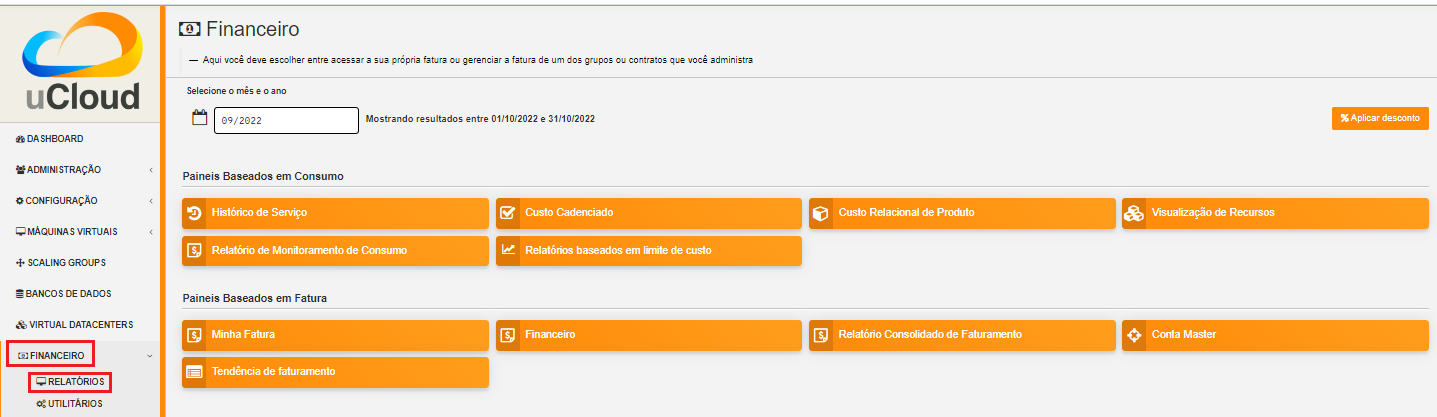
Visualizing the Budget Cost Report
To visualize the Budget Cost Report, the user must click on the Billing menu, and then click on the Reports submenu. This visualization allows the user the possibility to stay informed about the cost forecasts in detail.
In this flow, the Billing screen is presented, in this interface it is possible to choose between accessing the invoice itself or managing it, one of the groups or contracts administered by the logged-in user.
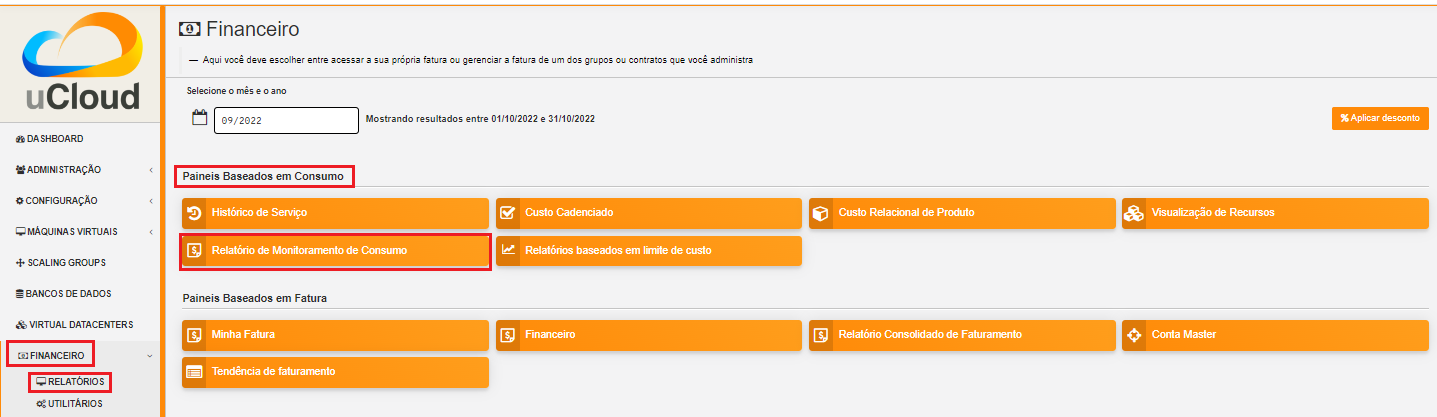
It is necessary to select the desired period, month and year, to show the results based on these dates. In the sequence, two classes of panels based on consumption and invoice are exhibited.
The first topic “Consumption-Based Panels” group seven types of reports:
Service History ;
Cadence Cost;
Product Relational Cost;
Resource View;
Budgets Costs;
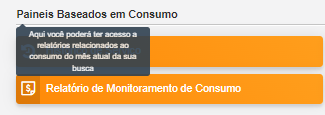
Consumption Monitoring Report;
Report based on Cost Limit.
The second topic “Invoice-Panels Based” brings together five types of panels:
My Invoice;
Financial;
Consolidated Invoicing Report;
Master Account;
Invoicing Trend.
To have access to the Budgets Cost Report, the user must press on the Budget Costs option, evidenced on the screen below:

On the “Budget Costs Detail” screen, the user must select a contract, when clicking on the intended contract is possible to visualize the following screen:
When clicking on “Period” the calendar icon is displayed by the platform, in which the user must select the desired month or months. Finally, click on search.
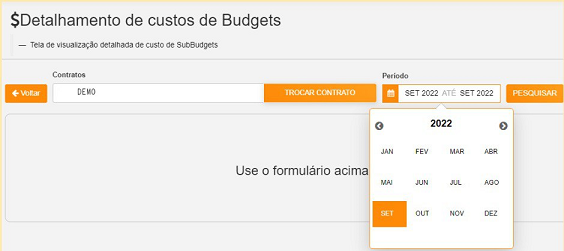
At the end of the period selection, as a result of the search, the system filters all the budgets within the given period.
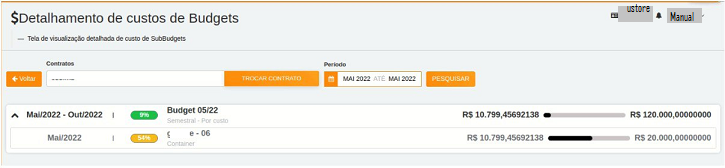
When viewing the Budgets list, the following information about them is displayed on the screen:
Period;
Amount consumed by the sub budgets in percentage.
Name;
Gap;
Type: Per cost or per quantity consumed;
Consumed value by its sub budgets.
Consumption bar;
Value allocated value to the budget.
When clicking on the Budget to visualize the sub budgets, the interface delivers the necessary information for the user to understand the costs, that are:
Period;
Amount that the disambiguation consumes from the value allocated to the sub budget in percentage.
Name;
Disambiguation type;
Disambiguation consumed value;
Consumption bar;
Value allocated to the sub budget.
Nota
When choosing a budget that has a quarterly, semiannual or annual gap, the platform exhibits only the sub budgets for the selected period. In this option, the platform understands that it is about an incomplete period of this Budget. To display all months, the full budget period must be chosen.
2. Contract-level branding customization :
The Multicloud portal branding is allowed through the personalization defined by contract. The user customer can select the characteristics of their brand (Company) represented in the Multicloud portal, such as colors, logo, among others.
3. Dimension :
Dimension is a new implementation of the uCloud platform, and was created to group tags of different nomenclature, but that are part of the same context, that are tagged in distinct clouds. That way, it avoids equal resources being tagged differently.
For this, logical operations and a filter were elaborated, with the intention of identifying in Billing which resources belong to a certain dimension. To better understand the two points that build this concept, observe the following examples:
It unifies a set of Tags that are different, but have the same meaning/role.
For example:
product: ETC
Product: eTc
producT: CTE
It is noticeable that the Tags above express the same thing, although they differ in their written manners. It is important to remember that these can be applied in different clouds, but in the same resources, where they should behave equally.
Thus, when unifying this group of Tags in a dimension, it is possible to identify all the resources that are within that context, and that way have a new way of visualizing the Reports, Budget and Forecast.
Creates logical expressions.
For example:
product: EFG & department: IT
In the example above, the expression represents that this dimension desires all resources to have the Tags: “product: EFG & department:IT”. This expression is considered simple, nonetheless, something more complex can be built from what has been implemented.
Creating a Dimension
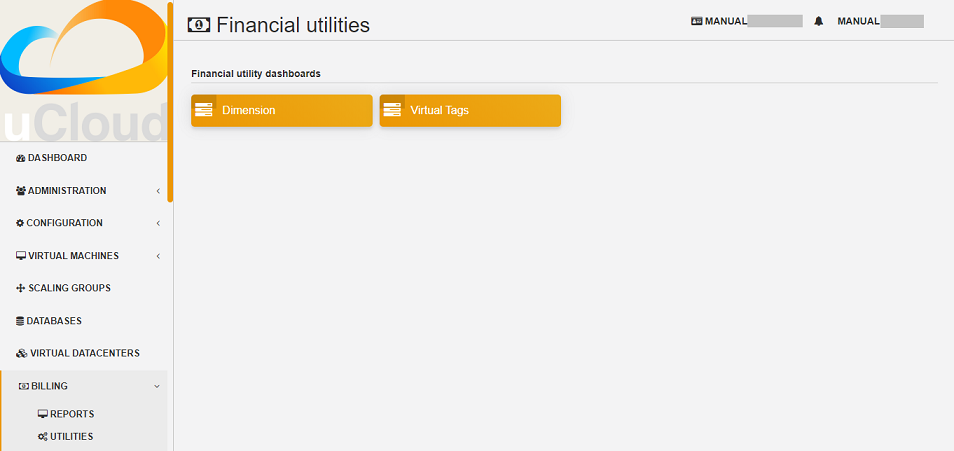
To create a dimension, the user must click on the Financial menu, and then on the Utilities submenu, that displays two options presented on the next image:
Dimension;
Virtual Tags.
When selecting the “Dimension” option, the listing of dimensions generated previously is presented, as demonstrated in the figure below:
In case this is the first dimension to be created by the user, no list is displayed on the screen, as shown in the next image:
On the superior left side of the screen, the Create Dimension button is presented, which the user must press to start the creation process.
After clicking, the initial screen to create a “Dimension” is presented, as shown in the next figure:
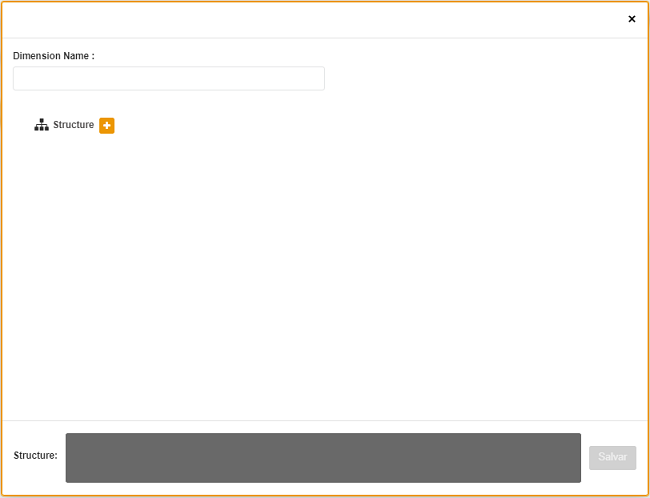
To better understand the function of each blank, observe the detailing of these below:
Dimension name: In this blank, the user must fill in the name of the dimension to be saved.
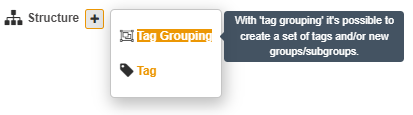
Structure +: This button presents two options that the user can apply in the structure of their “Dimension”.Tag Grouping;
Tag.
Atenção
It is important to highlight that this structure must be a logical expression thought previously. Therefore, to group tags is necessary to put them in a group first.
Structure: Corresponds to a block at the end of the screen, where the user has a better visualization of the structure that is being assembled.
Savebutton: After completing the data, the user must press on theSavebutton so they are not lost.
Creating a Tag Grouping
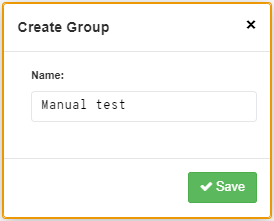
After filling in the “Dimension” name, the user must create a group for its structure. When hovering the mouse cursor over the “Tag Grouping” option, appears the following message:
When selected, the group creation modal is shown, where the name of the group of Tags must be filled in and then saved.
Once the action is performed, below the ”Structure +” function, the name of the created group appears, and beside it there are two action buttons:
Plus symbol “+” to create other group(s) or add Tag(s);
Trash bin icon to delete the created group.
Next to these icons, the following information appears :
Atenção
It is important to note that in case the “Dimension” construction does not match the conditions presented in the message, the “Save” button is unavailable for activation.
In the image below, it is also possible to notice that in the Structure function, at the bottom part of the screen, the group is represented by ( ).

Creating Tag
By clicking on the plus icon + next to the created group and positioning the mouse cursor over the Tag option, the next message is shown:

When clicking on Tag, the Tag creation modal is presented:
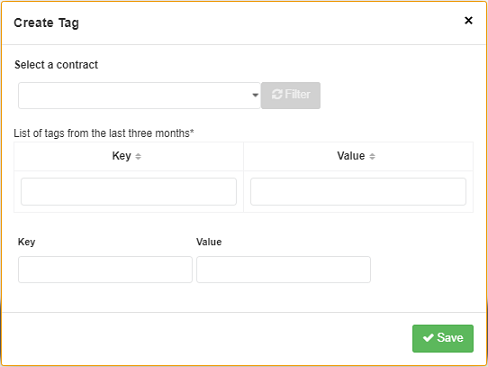
The first step for the user is to select one of the companies listed in the dropdown menu.
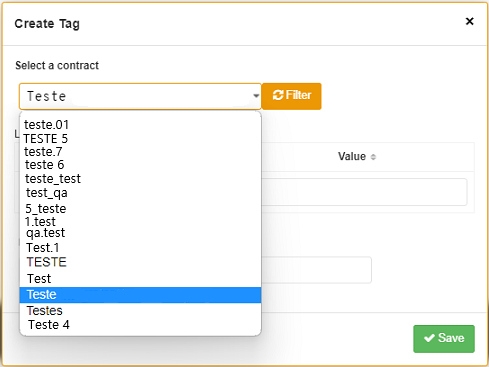
After selecting the desired company, the Filter button, next to the dropdown menu, is available for activation, as exemplified in the image below:

In case the company already has existing Tags, a list of Tags with the keys and values of the last three months is exhibited. The screen displays the number of pages below the listing and the information retrieved in blocks of 10, 25, 50 or 100 lines.
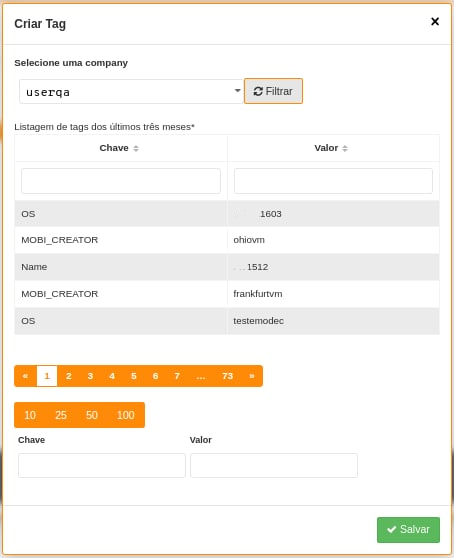
The user must select the desired Tag, shown in the list, and the Keys and Tag Value created are automatically displayed.

When finishing filling the modal, the user must click on the Save button on the inferior right corner of the screen.

If a company does not have Tags and the user wants to create them, just type the Key and Value on the last blanks, as demonstrated on the image above, leaving the central blanks empty.
Once this is done, the “Dimension” screen creation should be displayed as follows:

It can be seen, from the image above, that the “Dimension” has a hierarchy system, where first there is a group inserted in the structure, and only after the creation of the group do the Tags follow.
After the initialization of the process of creating a “Dimension”, it is necessary to add the other Tags of the same context to be part of the group.
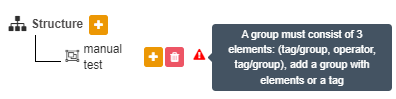
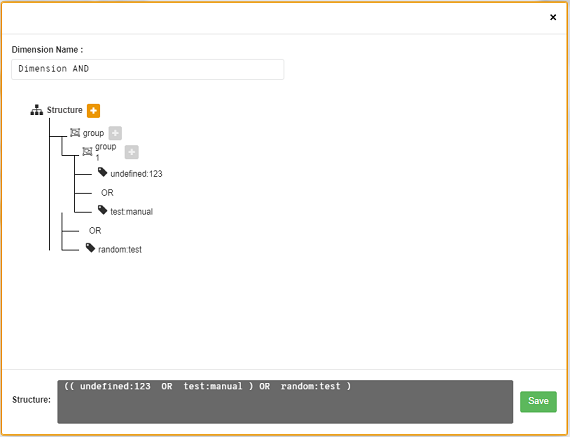
To do so, the user must click on the plus sign “+” next to the Structure, which shows two logical operators </> OR and </> AND.
Using the logical operator
Logical operators are a part of the programming language, and they are used for the purpose of creating true and false expressions. These are intended to join two divergent expressions and elaborate a more complex conditional expression.

To better understand their application, information about the two operators used in the creation of “Dimension” is detailed below.
</> OR: In an expression, if only one of them is true, it is considered entirely true, and is executed.
</> AND: In an expression, if one of them is false, it is considered entirely false, and is not executed.
To better understand its usage, the user must follow the creation process.
Resting the mouse cursor on the operator option </> OR, the following message is displayed:
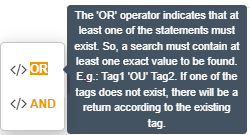
That is, even if one of the Tags is non-existent, the action is still performed only with the existing Tag.
When hovering the mouse over the </> AND operator, the following message is presented:
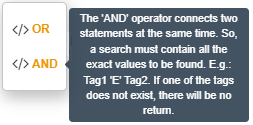
That is, when searching for Tags, if only one of the Tags does not exist, the action is interrupted.
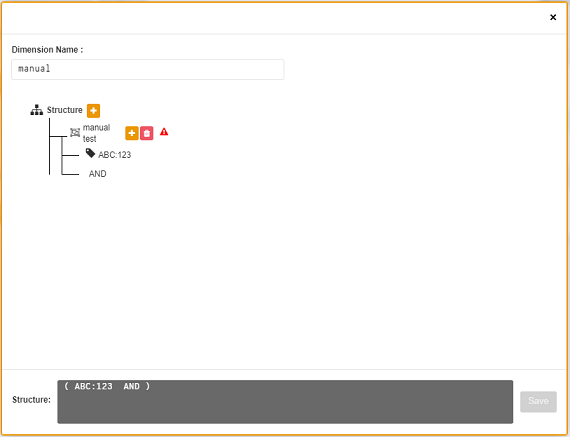
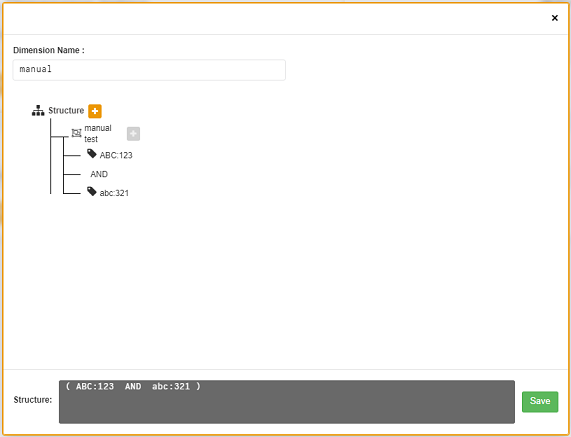
In this example, the operator “AND” was selected and the confirmation of the action is presented when both structures are changed:
When finishing this first process of Tag creation, the user must create the second Tag, repeating the creation flow detailed above.
At the end of this step, the final structure of a dimension is displayed, and to store it, simply click on the Save button, located in the lower right corner of the screen, as presented in the image below:
Upon completion of this action, the saved “Dimension” is shown in the dimension listing.
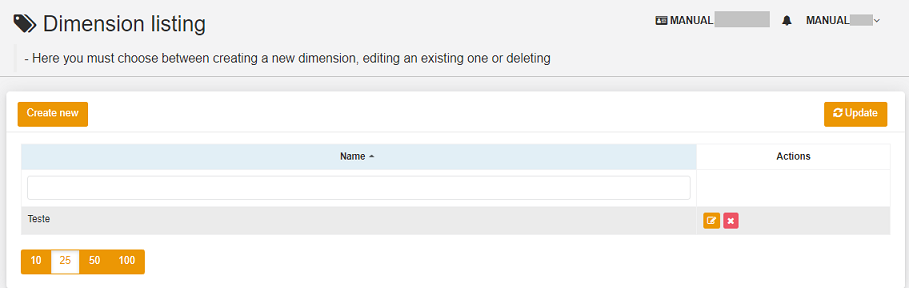
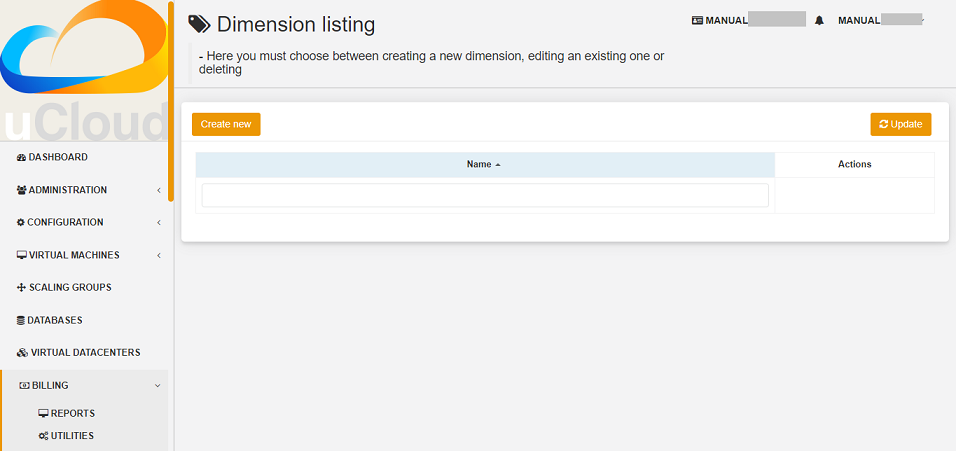
Listing Dimension
To list a newly created “Dimension”, usually the screen exhibits the listing. When consulting the “Listing Dimension” screen, if it does not update automatically, the user must click on the Refresh button in the superior right corner of the screen.
Then, the screen shows a list that must present the created “Dimension”, as displayed on the figure below:
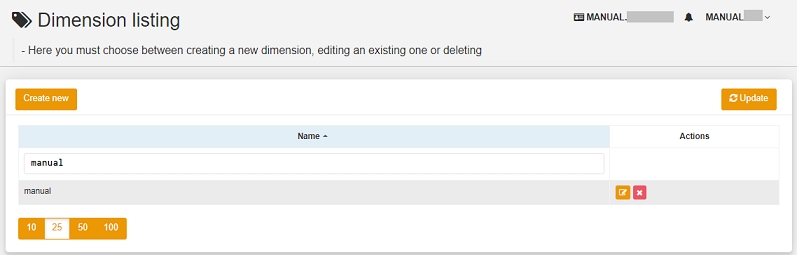
The screen above “List of Dimensions” shows the contract name superior, the symbol of the “Tasks” functionality and the name of the logged-in user in the superior right corner.
On this screen, the user can opt between creating a new dimension, editing an existing dimension or deleting a created dimension. It presents the two buttons that allow to Create Dimension or Refresh the list of dimensions.
In this list, the columns of “Name” and “Actions” are presented, the information can be personalized and retrieved by clicking on the blocks of 10, 25, 50 or 100 lines. The “Actions” column allows the Edit and Delete operations.
Editing a Dimension
To edit a Dimension, the user simply clicks on the Edit button in the “Actions” column in the “Dimension” list, as detailed below:
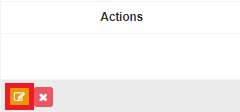
Doing this, the screen with the assembled and finished structure is displayed, as exemplified below. This example, using a new dimension, contains Groups and multiple Tags.
When looking at the figure above, observe the trash can icon. That is, the user has the possibility to create other groups and add more Tags, as well as delete them.
It is also possible to realize that for each action performed, the Structure, located at the bottom of the page, is modified.
For the alteration to be confirmed, it is necessary for the user to press the Save button, next to the Structure function, located in the lower right corner of the page.
Where “Dimension” is used
Currently, this implementation groups Tags and gathers them in the “Dimension” created, facilitating the categorized visualization in other functionalities of the platform.
Furthermore, the “Dimension” is used in the modal “Create Budget” included in the card named “Sub Budget Details” in disambiguation .
4. Import and Export of service offerings in (XML + YAML) :
In this new functionality it is possible to import and export the same offer from any cloud, as long as it is linked to the uCloud Portal. Before, it was possible to import and export files in JSON format, so the options to import and export files were also in XML and YAML formats. [tag 5.3-b43 10aug]
5. Importing Google Credentials in AWS Secret Manager :
Secret Manager is a repository where the information that only the user has access to is stored. To import this user’s Google credential data, the action must be done through uCloud so they are transferred from the hidden AWS repository. [tag 5.3-b16 28jul]
6. Account Level Permissions :
This new functionality optimizes a user’s permission process. In account-level permission mode, the user can perform actions from the permission profile created for them, whether it is basic or advanced. This user has the power to administer several contracts linked to an account, according to the permissions granted to them.
7. Consumption Monitoring Report (CRM) :
The Consumption Monitoring Report (v1) is a new functionality of the uCloud portal, which deals with the invoicing tracking and complete spending detail, categorized by Clouds (for example: AWS and AZURE) Contracts and Resources.
In this document, different types of indexes are generated, which can be tables, reports and graphs, for each type of class (Resource, Contract and Cloud). These are titled in topics as:
Invoicing History;
Invoice per Contract/Project;
Major Variations on this Invoice and
Detailing TOP 3 Contract per Cloud.
Atenção
Each of those categories is separated and organized from the highest to the lowest consumption.
In addition, the Consumption Monitoring Report (v1), briefly named CMR.v1, compares the expenses of the current month with the previous month, providing the company with the necessary information to be able to evaluate the disbursement and have an efficient control of possible drops or increase in consumption.
Accessing CMR.v1
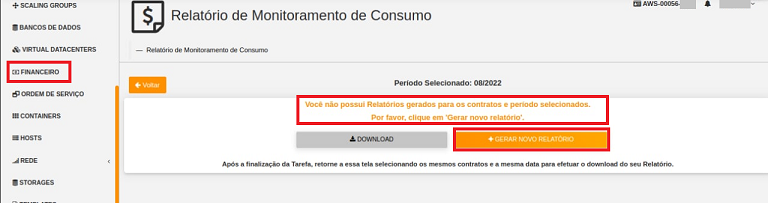
To generate the Consumption Monitoring Report (v1) on the uCloud portal, the user must access the Billing menu, identified in the lower left corner. And then, click on the Reports submenu.
The screen below presents all the options related to accessing and managing invoices for groups or contracts that the user administers.
When clicking on the Reports submenu, the topic “Consumption-Based Panel” provides access to reports related to consumption for the current month typed on the search by the user.
It groups seven types of reports, one of them is the Consumption Monitoring Report - CMR.v1.
By clicking on this option, the user can generate the desired document.
Creating CMR.v1
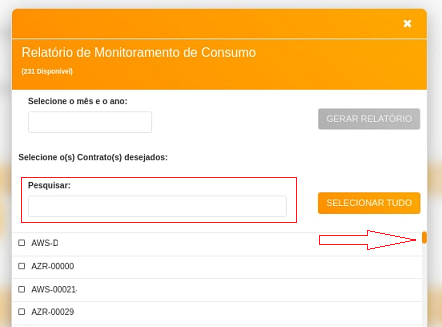
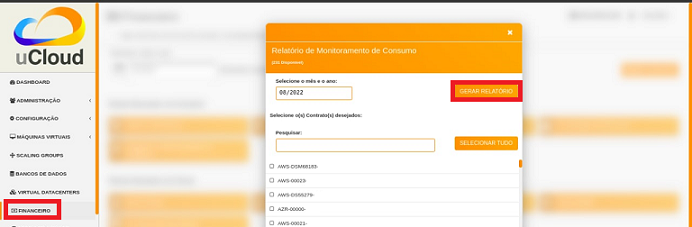
After clicking on Consumption Monitoring Reports (v1) - CMR.v1, a new screen opens, in which the user can select the month and year they desire to visualize, in addition to filtering the intended contracts.
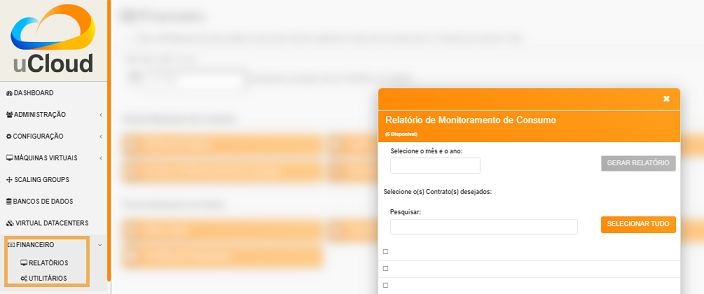
In this same modal, two buttons are displayed:
GENERATE REPORTRemains available for activation when at least one contract is selected.SELECT ALLRefers to the contracts filter. There it is possible to note the scroll and search bar.
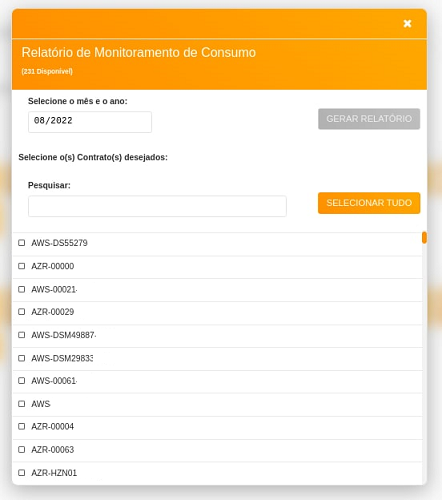
The scroll bar, located on the right side, helps the user to navigate through the modal in search for the desired contract. The search bar facilitates the search, the user just needs to type the initial letters of the contract.
After clicking on Generate Report, a new screen opens, showing the month selected by the user and the DOWNLOAD and GENERATE NEW REPORT buttons.
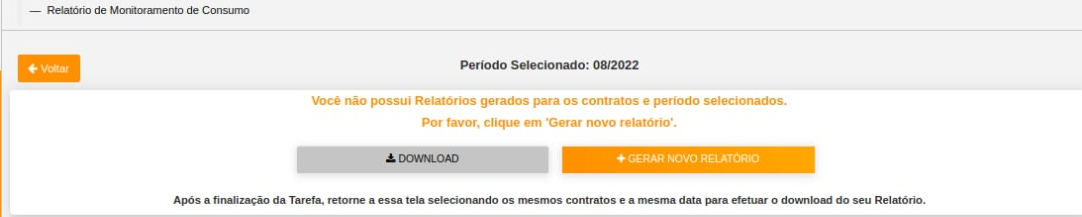
The DOWNLOAD button is only unlocked when the data is compiled on the platform and it makes available the report for the period and the selected contract.
In the example of the following screen, the platform informs that the “user does not have reports generated for the contracts and period selected” and asks the user to click on GENERATE NEW REPORT.
To download the file, the user just needs to click on the referred button.
In case there is no data, the reports become unavailable for the selected month, the DOWNLOAD button appears inactive (gray color) and the platform issues the message mentioned in the previous example and printed on the image above.
When there is data to be published on the period selected by the user, the platform informs that the report is in process of compiling the data.
Following the status on the Task Menu
In the flow of creating the CMR.v1, the platform presents two types of situations, according to the user profile that is logged into the platform. The task status at the top of the screen differs, for each type of user, a procedure is described in the sequence:
Case 1:
Admin user: When opening the Tasks functionalities, it must be observed the “Pending Approvals” tab, which presents the columns: Operation, user, details, progress, start date, duration, status and actions.
Case 2:
User user: When creating the report, the user must request the administrator of their contract to carry out the approval of the requested task.
Procedure:
In the “Actions” column located on the “Pending Approvals” tab the admin user of the contract must approve the action to “Generate Report”. In case of the “User user”, they must request the administrator of the contract to carry out or not the approval of the task.
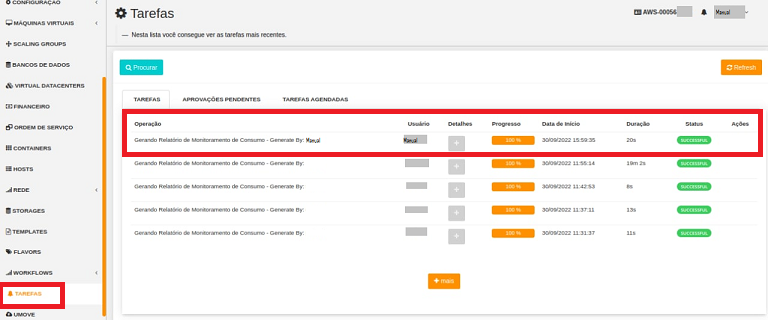
Next, they must wait for the “Status” to be updated, that can be: Running, Failed or Success.
After successfully creating the new report, the data was compiled on the uCloud platform.
Enabling the CMR.v1’s download
When creating a new report successfully, the user must repeat the flow to download it once the data is compiled on the uCloud platform.
In the sequence, it is necessary to select again, the same period and contracts that the user intends to search for previously created information.
At this point, the user must observe if the GENERATE REPORT button is enabled (orange color), if so, it means that the flow to download the CMR.v1 continues, the data is previously prepared and can be extracted in the report format.
In the course of this procedure, the platform presents the unlocking of the DOWNLOAD button, displaying it in green, according to the following image.
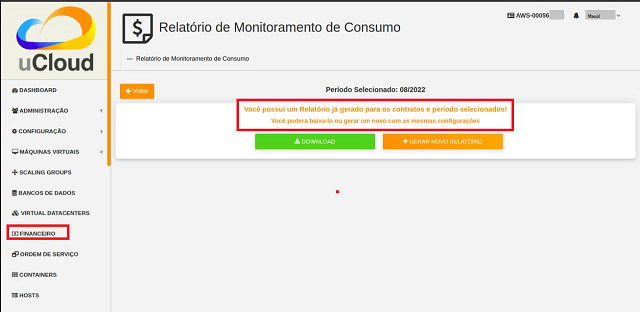
The user must check the message the platform presents: “Report generated for the contracts and selected period. They can download it or generate a new one with the same settings”.
At the end of this sequence of activities, to download the desired CMR.v1 file, the user must click on the DOWNLOAD button.
Viewing CMR.v1
After generating and downloading the Consumption Monitoring Reports (v1) - CMR.v1, an example is presented and described:
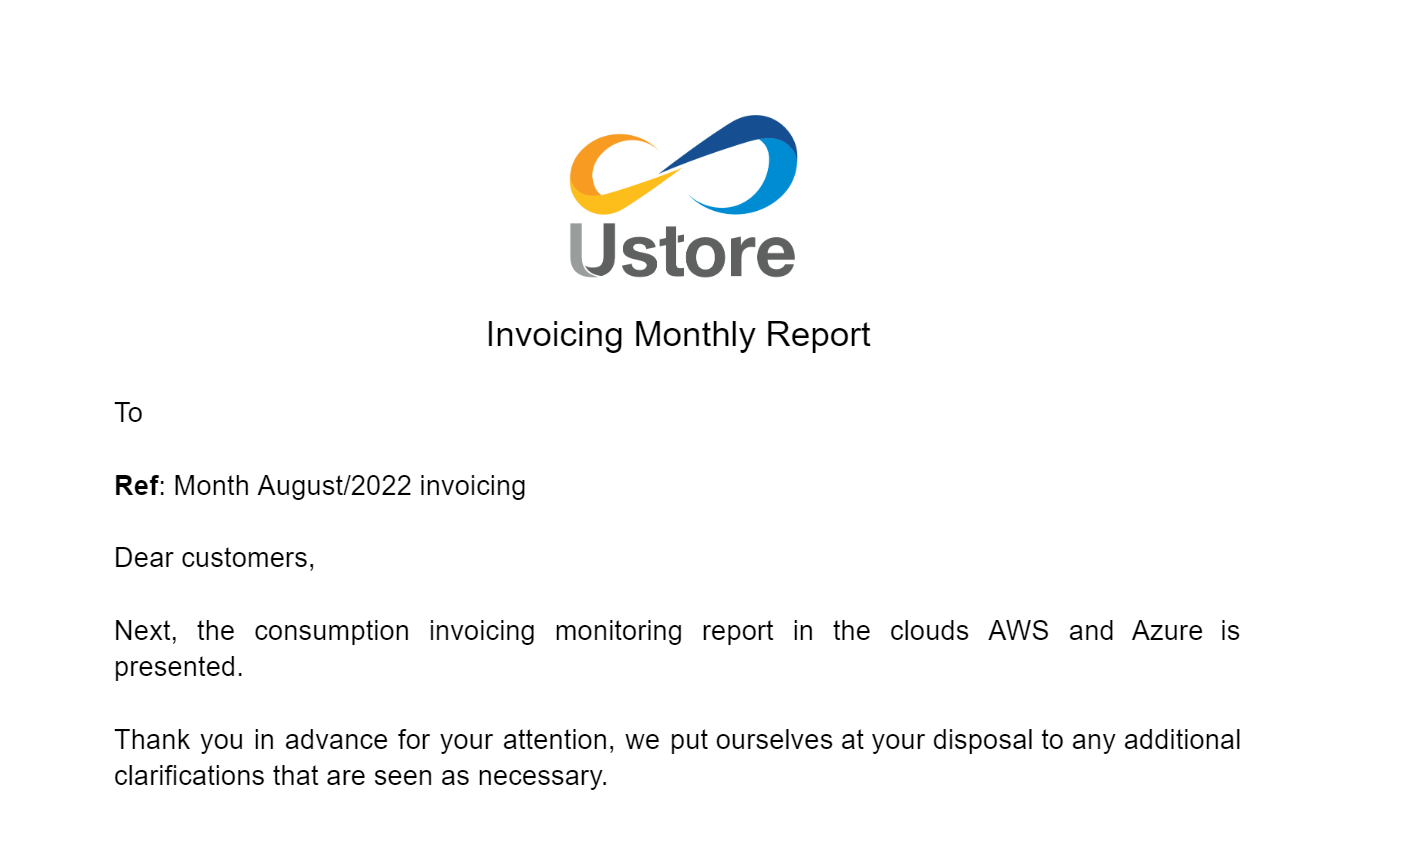
Front Cover
The document has a cover, which contains the following information:
Name of the company;
Invoicing Date;
Standardized text on the invoicing of consumptions in the clouds.
According to the picture shown below:
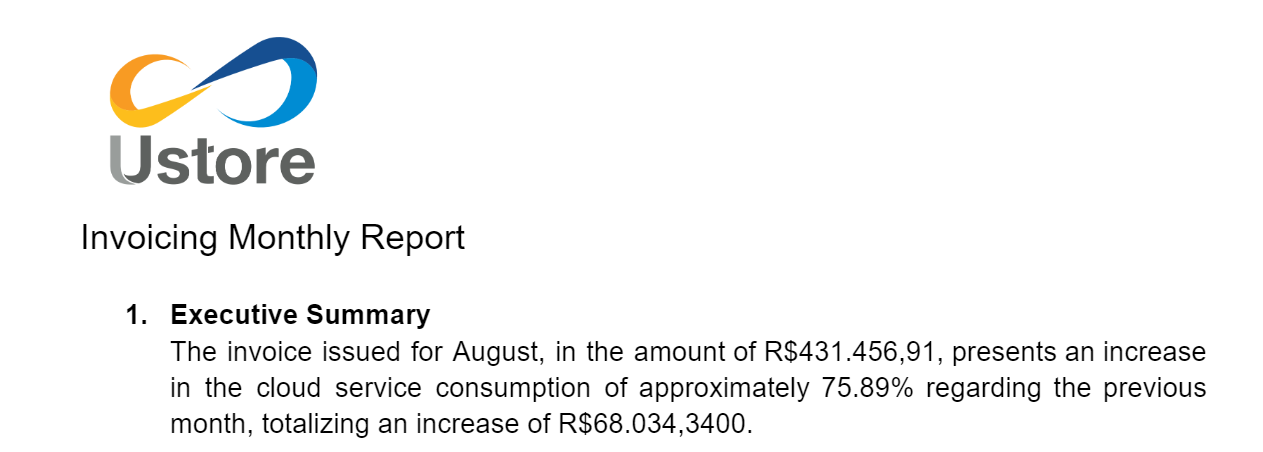
1 - Executive Summary
In the Executive Summary, an explicative text is presented, describing the variation of the values and the percentage that occurred in the current month’s invoice in comparison to the previous month, as shown in the example:
1.1 - Invoicing History
Right after the executive summary, there is the Invoicing History, that presents a table with the period selected by the user, in which the value of the desired cloud in Reais (BRL) and Cloud Service Unit (Unidade de Serviço de Nuvem - USN -, in Portuguese) is shown , and the rate of change in percentage of the previous month as well as the current month.
Atenção
Cloud Service Unit (USN), is a pricing model for cloud services, assigned to companies that are associated with the government spheres.
Importante
USN aims to establish itself as a predictable, linear and flexible method to obtain a specific amount to be charged for cloud computational services.
Nota
The USN metric consists of establishing a specific reference value for each type of cloud service, according to the individual metric associated with the resource consumption.
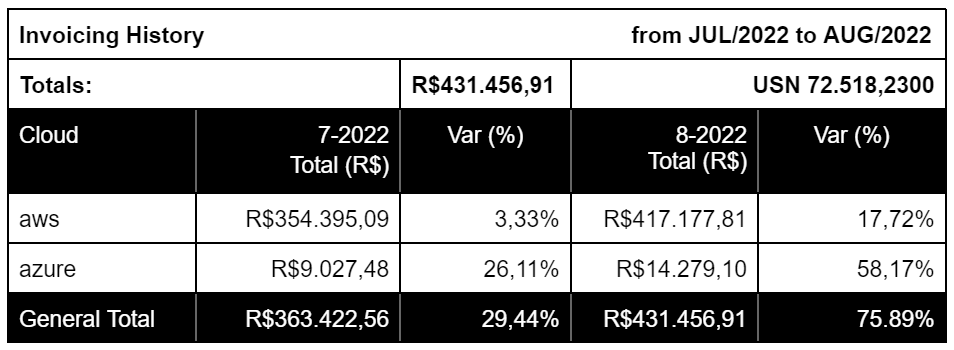
According to the example above, the expenses of the current month are compared with the expenses of the previous month, showing if there was an increase or decrease in consumption for each specific contract, it also exhibits the percentage and possible variations from the previous month to the current month.
In addition, this part of the implementation exposes a basic rule: only the 5 biggest expenses are specified, that is, the contracts that had the highest consumption during the current month are disclosed, together with the values of each one separately.
This rule is intended to keep the document more compact, avoiding to extend it, according to the examples below:
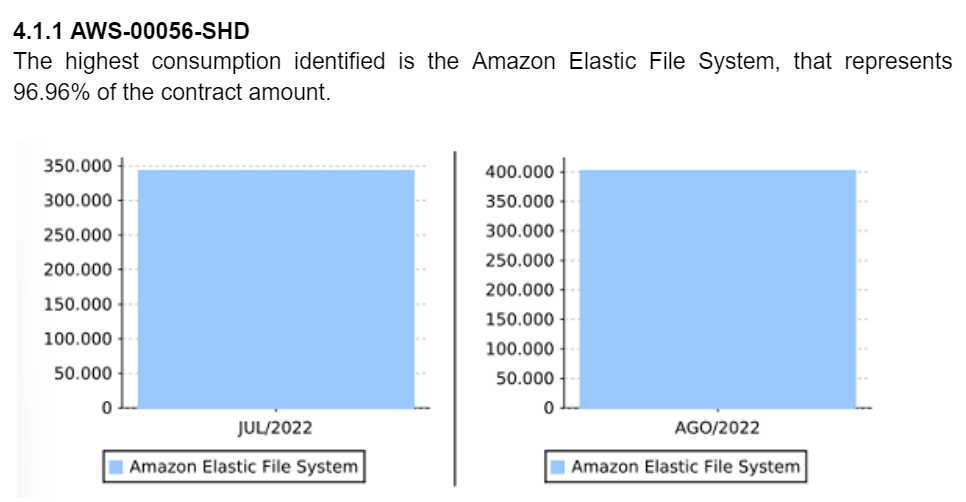
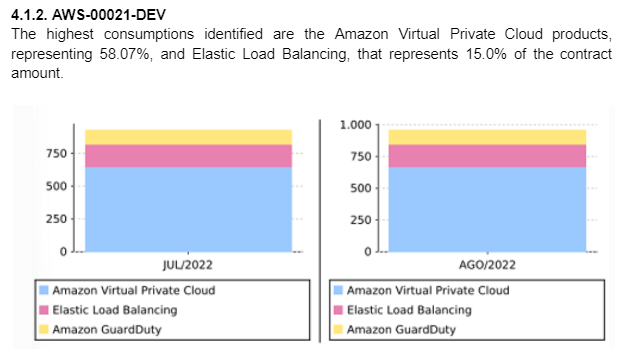
First AWS cloud example:
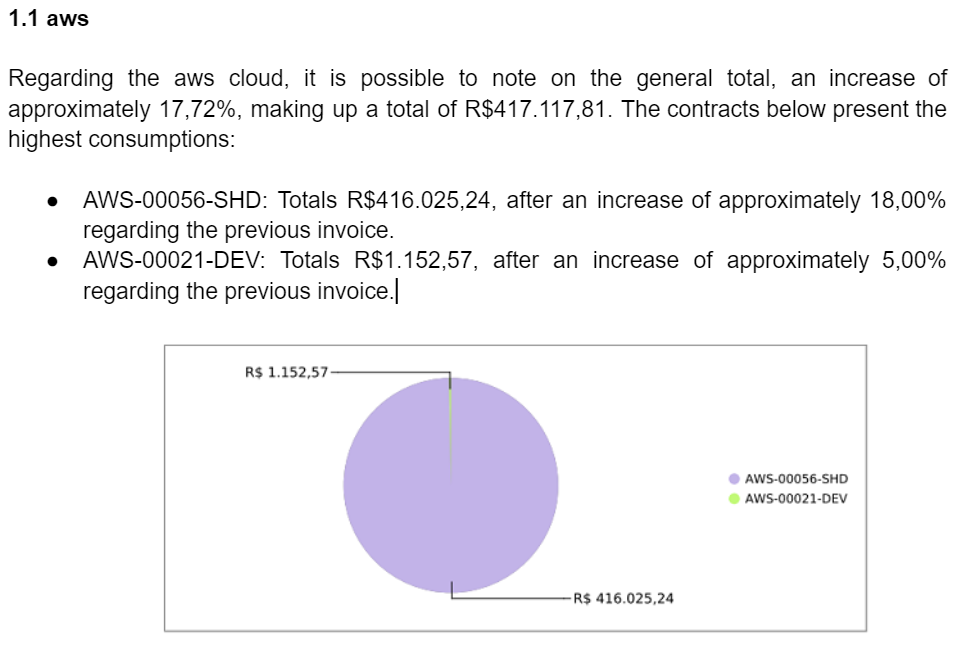
For the sake of completeness and better visualization, this part of the document also generates a pie chart, containing the same information as the expenses of the table illustratively, separating the contracts by colors for better comprehension by the user.
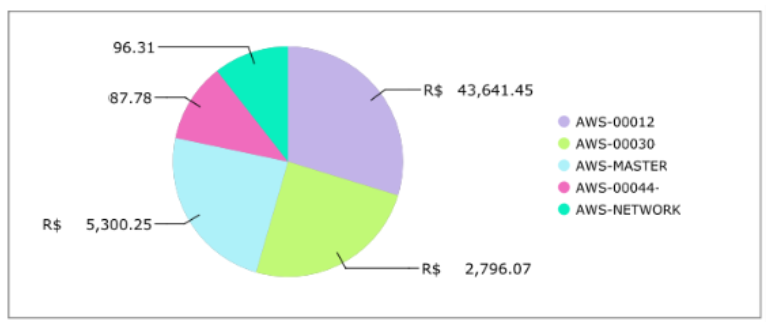
Second example of AWS cloud pie chart:
Nota
In case of more than one cloud, the report follows the same pattern of presentation and information.
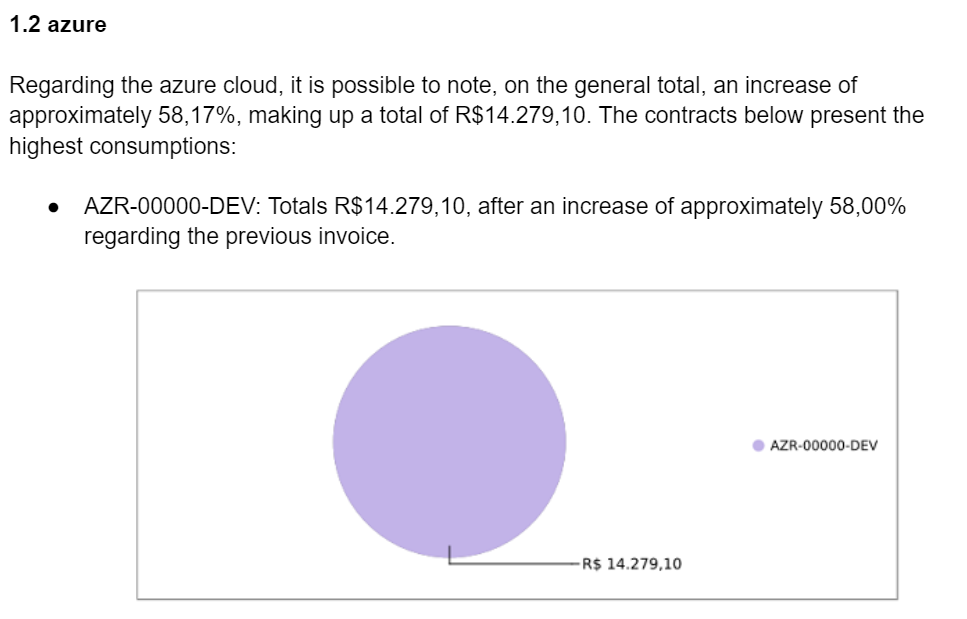
Third Azure cloud example:
2 - Invoice per Contract/Project
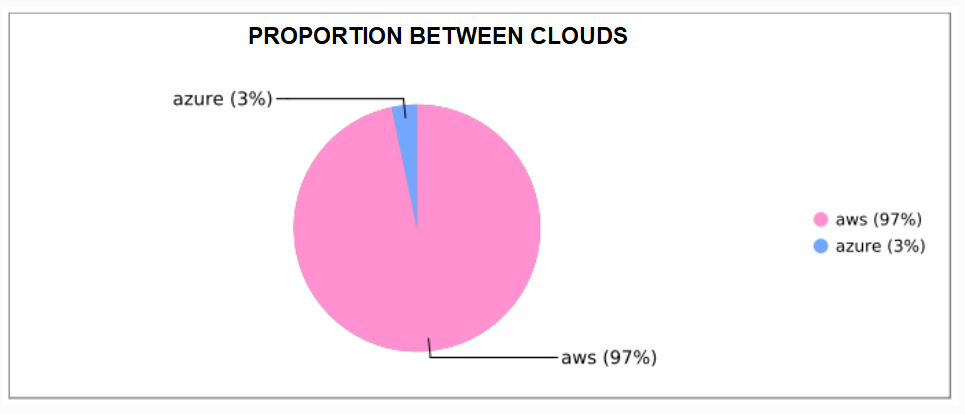
In the Invoice per Contract/Project, the general expenses of the contracts of each cloud is first informed, as shown in the executive summary, with their values in BRL and USN.
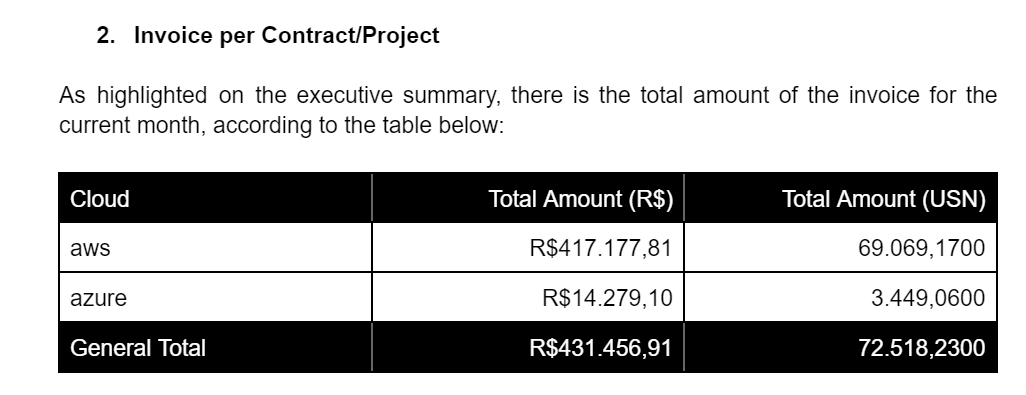
Following the table, a graph is presented containing the proportion of these consumptions in percentages, as shown below:
As in the Invoicing History, in the Invoicing per Contract/Project, a graph is also generated for complementation and better visualization of the user, containing the same information of the expanses of the table illustratively, demonstrating the proportion of expenses per cloud.
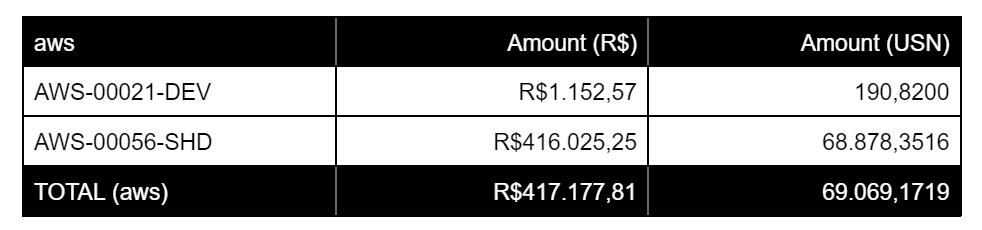
After the chart, the following image exposes and specifies all contracts for each cloud (in addition to the top five displayed in the invoicing history), with the most recent projects being highlighted.
The example in the table below details the costs of the cloud, its contracts, and totals the value, presented in BRL and USN.

Nota
Note that in case of more than one cloud, the report follows the same pattern of presentation and information.
3 - Major Variations in this Invoice
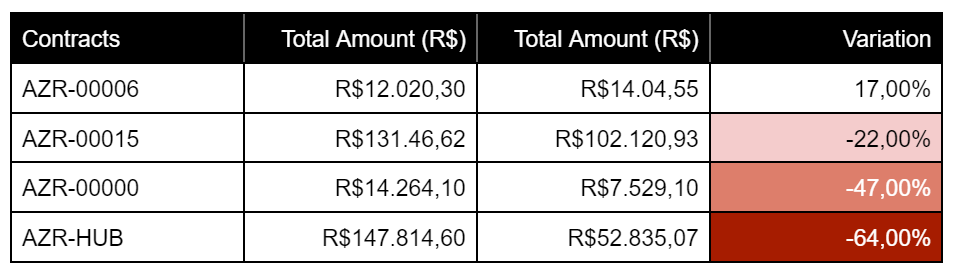
In the “Major Variations on this Invoice» are presented in a table, all the variations of the contracts of the month of each specific provider, comparing the value of the previous month with the value of the current month, showing the variation of its total value in percentage, thus, this part of the document is a complementation to the “Invoice per Contract/Project”.
This table takes into account only the most relevant variations, with a cut containing, first, those greater than or equal to fifteen percent (>=15%), and therefore, those less than or equal to negative fifteen percent (<= -15%). Here’s, the example:
Positive variations (>=15%) are highlighted in a bluish tone, in the same way that the negative variations (<= -15%) are highlighted in a reddish tone.
It is possible to notice that the greater the variation, the darker the tone.
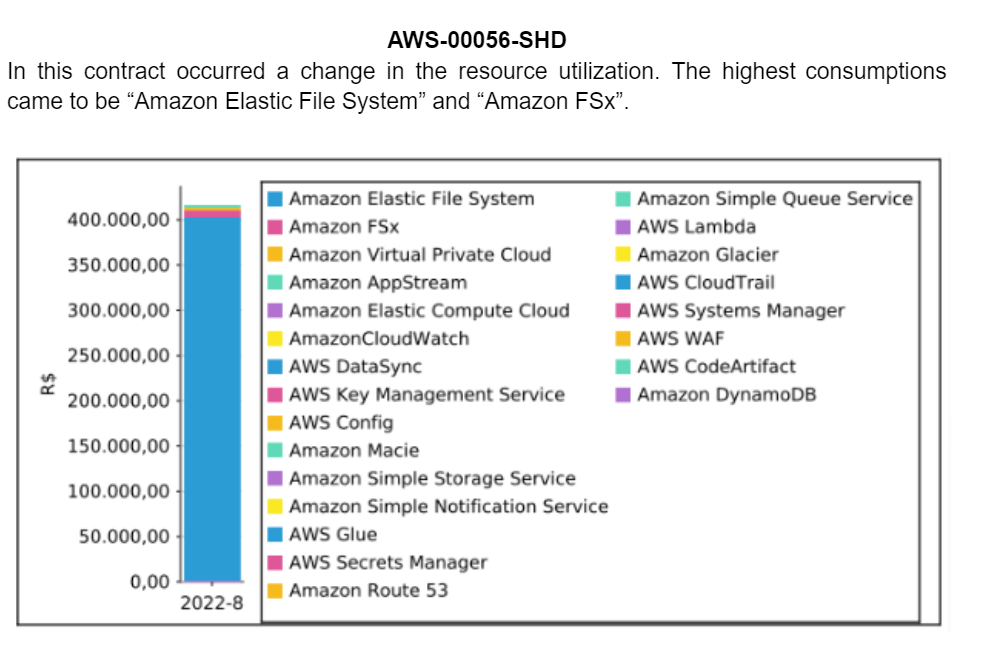
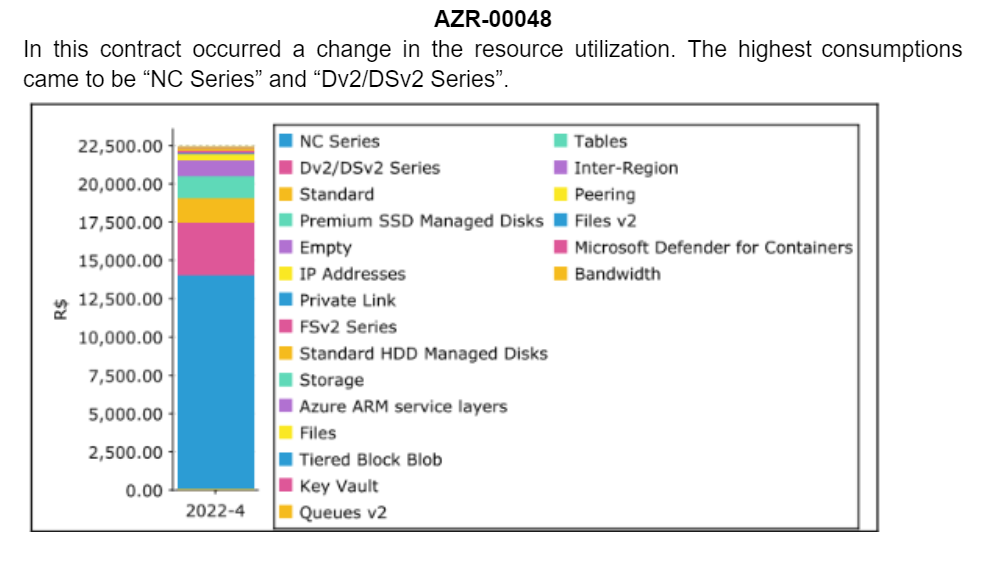
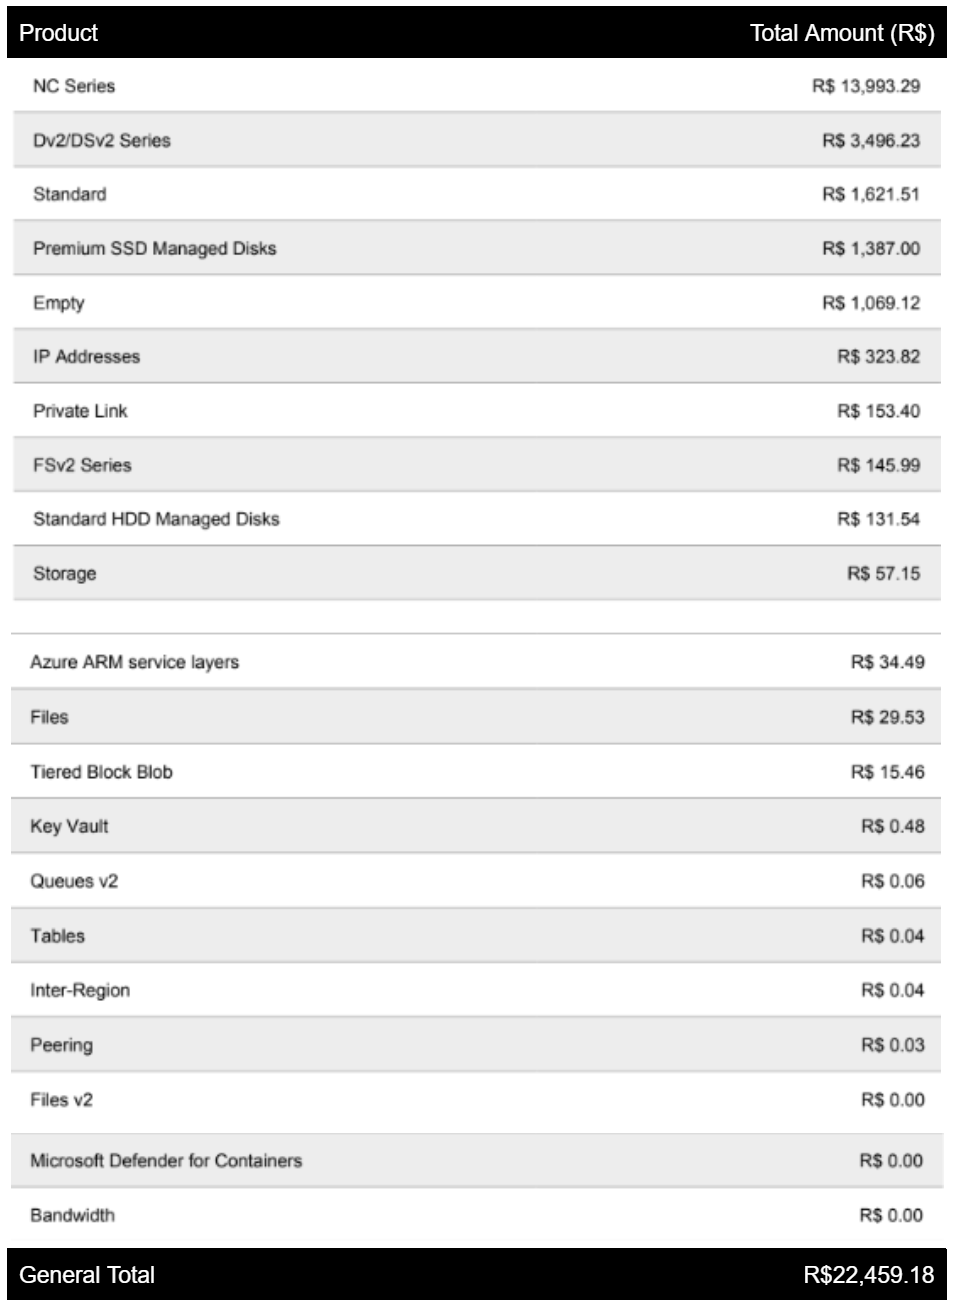
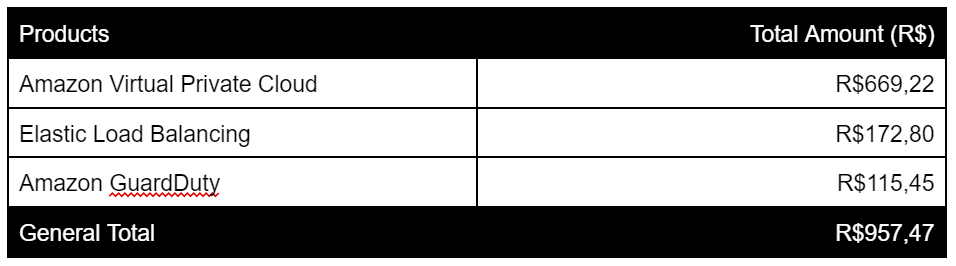
Furthermore, the contract with the highest variation value is highlighted, and presents the information of its resources detailedly. This chart are contains all the contract resources and their expenses, informing the changes in their consumption and its use. The graph also shows which were the resources that spent the most in the month, as exemplified in the following image:
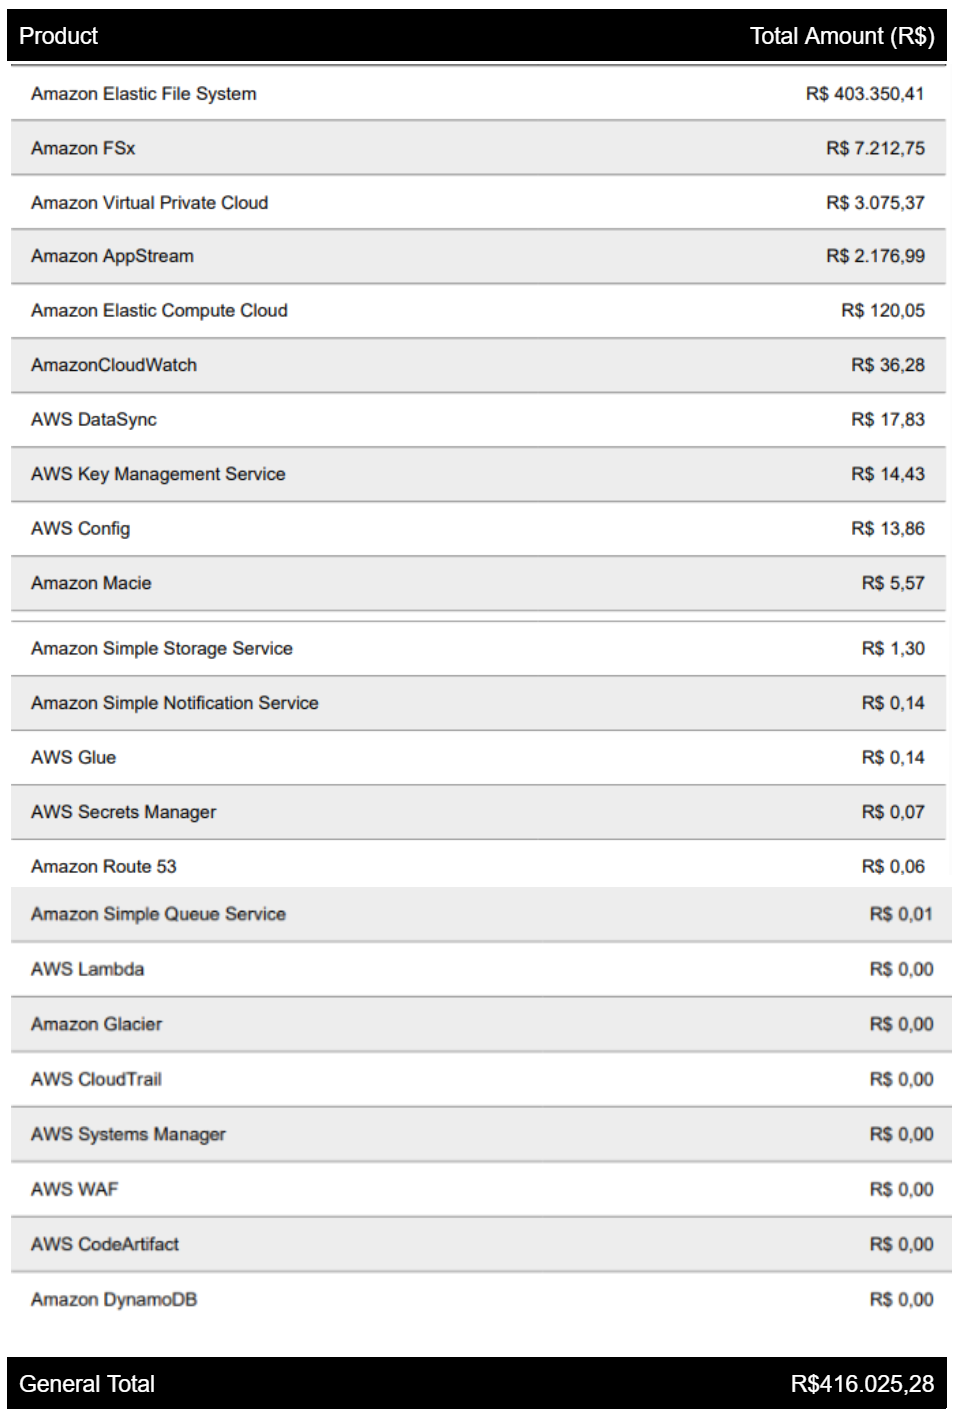
Right after the bar graph, a descriptive table is presented, with columns «Product» and «Total Amount» (BRL) of the quantities of each resource invested separately and specifically, from the highest number to the lowest.
Nota
In case of more than one cloud, the report follows the same pattern of presentation and information.
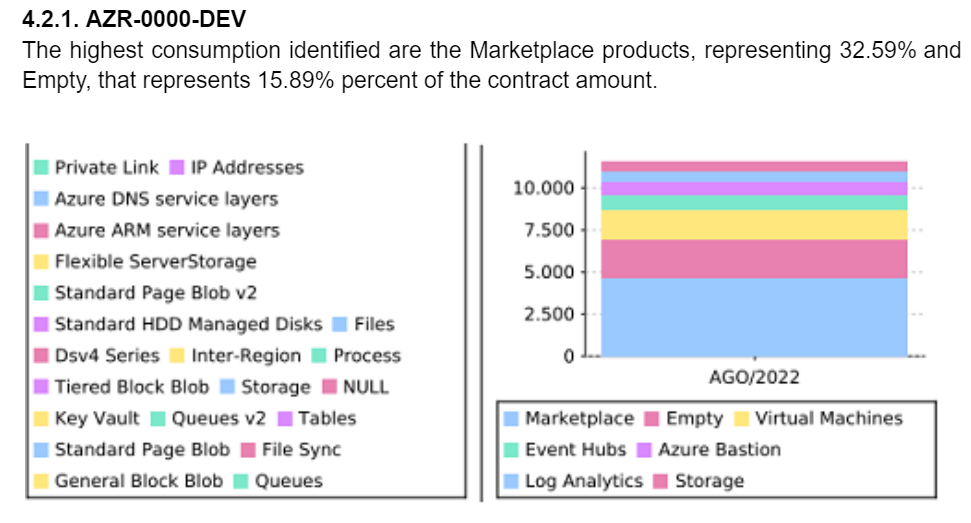
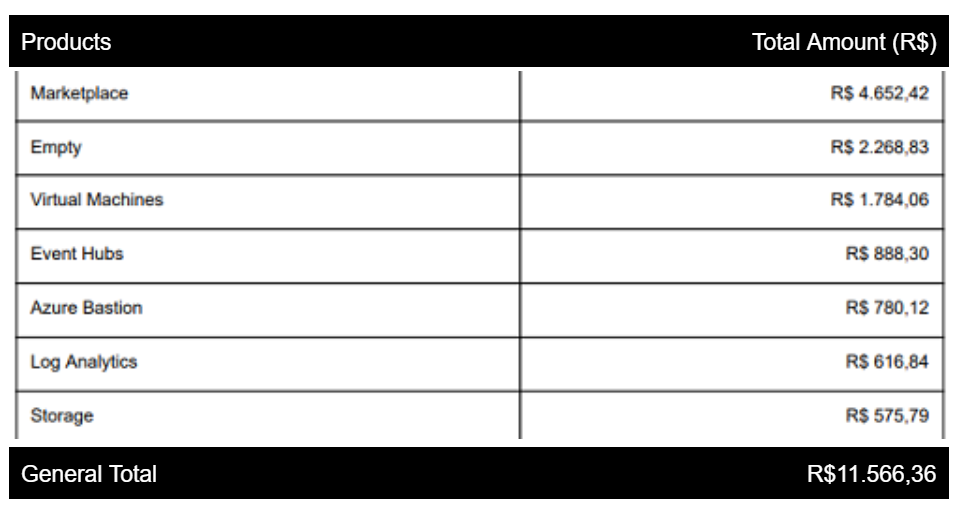
4 - Detailing TOP 3 Contract per Cloud
Finally, an index is exposed, containing the clipping of the three contracts that had the highest consumption in each cloud, and the resources that represent the greatest impact in each one of them. The report presets each of the clouds used by the company, the name of the contracts and their total values in BRL and USN, as presented on the next example:
Next, the summary of how much each product costs the contract is presented in more detail, specifying them and showing the percentage of the total expenses of each contract. Such information is displayed from a illustrative graph, according to the example below:

Atenção
In case of more than one cloud, the report follows the same pattern of presentation and information.
Finally, is noticeable that the implementation Consumption Monitoring Report (v1) CMR.v1, helps to control the monthly expenses, presenting and comparing them with the previous month.
This update has a vast index, containing tables, reports and graphs that range from the most general to the most specific, granting the company and, consequently, the user all the necessary information and tools that allow total control over their investments and projects.
Adaptation to the changes occurred in Clouds
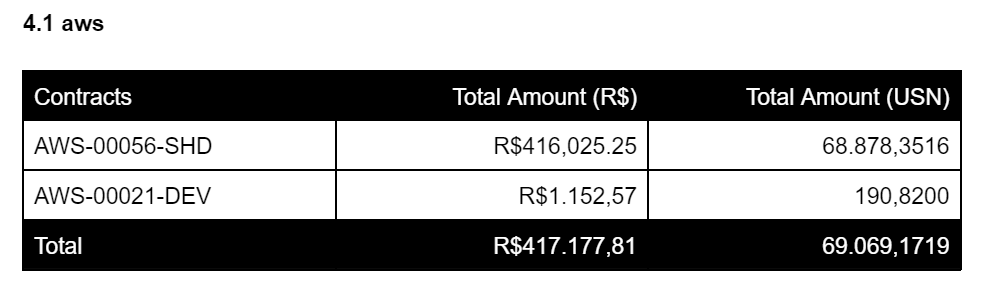
Amazon Web Services (AWS)
Regarding the interaction with the public cloud service provider Amazon Web Services (AWS) the following improvement is listed:
FEATURE |
VERSION |
|---|---|
From this adequacy forward, the Container Import can only be carried out for the invoicing |
tag 5.2-b45 05jul |
Microsoft Azure (Azure)
Regarding the interaction with the public cloud service provider Microsoft AZURE, three improvements can be listed:
FEATURE |
VERSION |
|---|---|
Alteration of the graphical interface of the Scaling Group creation button |
tag 5.3-b12 27jul |
For the best user experience, it is opted to hide the VDCs Security Group blank |
tag 5.2-b72 21jul |
Carry out the Container Import only for billing |
tag 5.2-b57 13jul |
Google Cloud Platform (GCP)
On what concerns the integration with the public cloud service provider Google Cloud Platform (GCP), there were eight improvements listed below:
FEATURE |
VERSION |
|---|---|
The button to associate the disk to the VM receives a new graphical interface |
tag 5.2-b38 22jun |
Improvement in the default user contract when creating a Database Virtual Machine |
tag 5.2-b46 05jul |
Adding the loadbalencers detailing of a Scaling Group |
tag 5.2-b46 05jul |
Google-type Container Import adaptation |
tag 5.2-b48 07jul |
Inclusion of new regions, they are: |
tag 5.2-b64 18jul |
|
|
|
|
Selection refinement to associate subnet with the Container Import |
tag 5.3-b30 03aug |
Zone binding when creating a VM |
tag 5.3-b36 08aug |
New invoicing filters: |
tag 5.2-b57 13jul |
The discounted credit type is used for amounts received after a contractual spending limit has been reached. |
|
In the Cloud Billing reports available in the console, this is listed as “Expense-Based Discounts (Contract)”. |
|
Some services offer “free use of resources up to the specified limits». On these services, credits are applied to implement the free tier usage. |
|
Promotional credit type includes “Google Cloud free trial and marketing campaign credits or other concessions for using it”. When available, promotional credits are considered a form of payment and are automatically applied to reduce the total bill. |
|
Huawei Cloud (Huawei)
Regarding the interaction with the public cloud service provider Huawei there is no occurrence of alteration, new implementation or functionality.
IBM Cloud (IBM)
Regarding the interaction with the public cloud service provider IBM there is no record of correction, alteration, new functionality or implementation.
VMware 6.5 or superior (vCenter/vSphere)
On what concerns the interaction with the VCenter/vSphere hypervisor, the following improvement is related:
FEATURE |
VERSION |
|---|---|
Scheduling policy for Scaling Group allows the policy that defines when to create new machine(s) |
tag 5.3-b36 08aug |
VMWare vCloud (vCloud)
Regarding the interaction with the vCloud hypervisor there is no occurrence of alteration, correction, new implementation or functionality.
uCloud Platform Enhancement
The Ustore renews the uCloud platform in accordance with the continuous evolution of innovations in the cloud computing sector - dynamic environment that allows remote access to softwares, files storage and processing of data through the Internet.
Therefore, the continuous improvement practice adopted on the enhancement of the uCloud platform in Account, OPS and Billing, associated with productivity, results in the following list of the global improvements:
FEATURE |
VERSION |
|---|---|
Creation of user in the Account: Shortcut to create user straight from the Administration menu, Account submenu |
|
Listing in alphabetical order of container and VDC in the creation screen of a security group: when listing the VDCs in the creation of this group, the display is ordered |
tag 5.2-b39 23jun |
Listing in alphabetical order of Container and VDC in the creation screen of a network: The screen of creation of a network presents the list ordered of container and VDC |
tag 5.2-b39 23jun |
Listing in alphabetical order by container and VDC when creating a Public IP: At the time of creating it the sorted list of the container and VDC, is displayed. |
tag 5.2-b39 23jun |
Reinforcement of the security of the uCloud interface Security improvements were made in the Front-End |
tag 5.2-b43 30jun |
The user’s language can be switched at the account-level, besides the level of the existing user So an account can have a language and be seen in the in the language that the user determines |
|
Persistence of changing the user’s language: The platform maintains the language chosen on the first access |
tag 5.2-b61 14jul |
Persistence of the language when sending emails portal: within the portal: The platform maintains the language chosen when sending emails |
tag 5.2-b73 21jul |
Adaptation of the listing of permission and visualization profiles in the graphical interface: The list of profiles appears above the modal, optimizes the visualization |
tag 5.2-b47 06jul |
Virtual Tags creation with the same key and, with with different values: This improvement allows the creation of one or more Tags with the same keys and different values |
tag 5.2-b49 07jul |
uCloud CORE.sql update: Speeds significantly the response from the environment. |
tag 5.2-b52 12jul |
Updating quotas across the entire uCloud platform: Its unification, in all the environments, standardizes the visualization of user quotas in the contract and group functionalities |
tag 5.2-b52 12jul |
In the Configuration functionality menu, the General submenu includes the addition of the button (ON/OFF) in automatic activation and uCloud v.2, this button indicates that the function is enabled or disabled |
tag 5.2-b55 13jul |
Password recovery format update |
tag 5.2-b60 14jul |
Improved branding customization at contract-level |
tag 5.3-b08 26jul |
In the Task menu, in its list of running tasks, the “Actions” column allows the user to cancel or pause a Task regardless of its status, as long as the as long as the percentage is below 99% |
tag 5.2-b69 20jul |
Updated checkbox functionality associating all VMs in contract and group. [improvement] |
tag 5.3-b43 10aug |
In the Administration Menu, when clicking on the Contract submenu and selecting a determined Contract on the list, is allowed to “Add Administrators” either a user or group of users. To facilitate the search, a search bar was added, which delivers the name of a user or a group as a result. |
tag 5.3-b54 17aug |
Quota creation by amount of VM/Instance per contract [new functionality] |
tag 5.3-b36 08aug |
Workflow adaptation to support the chaining of several tasks in a sequence and/or parallel way, with no maximum number f existing workflows in the portal [new functionality] |
tag 5.3-b50 15aug |
Task approval when exceeding quota: When a user exceeds the existing quota in the contract, the administrator automatically realizes that the user more quota. Thus, the administrator can approve or reject this request [new functionality] |
tag 5.3-b53 16aug |
New presentation in the Financial Report in the Billing data interface. |
|
CentOS7 option for ResourseKey creation: Cloud requirement met by adding the CentOS7 as Operating System to tag USN [new functionality] |
tag 5.3-b09 26jul |
Kubernetes to create ResourceKey: Addition of the Kubernetes as an Operating System as Google requirement to tag Kubernetes machines [fix] |
tag 5.2-b45 05jul |
The Virtual Tag Profile menu enhances the usage experience by allowing similar names in the creation of the virtual tag profile and preventing the use of special characters |
tag 5.2-b57 13jul |
Increment of the Tag Virtual profile by including the uCloudIdentifier blank that is used as a reference. It is applied in the container and ticketing operations |
tag 5.2-b65 18jul |
The Services Catalog menu after the refactoring of the transmission point and reception of endpoint information details the result only when the user requests the search |
tag 5.2-b58 13jul |
Associate the same USN Tag price to several contracts Removed tag restriction to a single contract. |
tag 5.2-b65 18jul |
The Tasks menu receives the update of the record of tasks in the activities that occurred in Billing within the Portal |
tag 5.3-b09 26jul |
Adding variables when creating a Virtual Tag |
tag 5.3-b49 15aug |
Consumption Monitoring Report: Addition of the container’s Universally Unique Identifier (UUID), optimizes the closing of the contract invoice that monitors consumption |
tag 5.3-b18 28jul |
The detailed invoice summary screen increases data loading and makes the delivery of the request faster in its interface |
tag 5.3-b22 29jul |
Improved visualization of closing invoices with multicontracts users: A user linked to more than one contract, has the option to see the closing of the invoice with the expenses of each specific contract individually |
tag 5.3-b46 10aug |
Checkbox to select all the VDCs in a contract |
|
Loader for the uCloud late loading [new functionality] |
tag 5.3-b15 28jul |
Search blank for subnets within the virtual machine screen |
tag 5.2-b72 21jul |
The stop functionality in the VM was re-enabled |
tag 5.2-b72 21jul |
Listing of the Billing’s data detailed |
tag 5.3-b09 26jul |
How the consolidated report presents the data |
tag 5.3-b11 27jul |
Creating persistence in resource validation that are not in the contract for virtual machine and Scaling Group creation |
tag 5.2-b47 06jul |
Global Corrective Actions
This topic lists the corrective actions done by our development team, identified as a result of the reports generated in the usage experience and quality assurance.
The corrective actions of fix and bugs can refer to:
Cloud adaptations and
On the uCloud platform in Account, OPS and Billing.
Clouds Adaptations
Amazon Web Services (AWS)
Regarding the interaction with the public cloud service provider Amazon Web Services (AWS), the following corrective action can be listed:
FEATURE |
VERSION |
|---|---|
Balancer creation with the selected Security Group [fix] |
|
Microsoft Azure (Azure)
Regarding the interaction with the public cloud service provider Microsoft AZURE, the following corrections are listed:
FEATURE |
VERSION |
|---|---|
Persistence when adding a loadbalancer to an Azure virtual machine [fix] |
tag 5.2-b51 08jul |
Alteration on the Azure disks calculation [fix] |
tag 5.3-b45 10aug |
The “Edit Subnet” button that used to inactivate the inputs when creating subnets was hidden [fix] |
tag 5.2-b72 21jul |
Google Cloud Platform (GCP)
Regarding the interaction with the public cloud service provider Google Cloud Platform (GCP), the following corrections can be listed:
FEATURE |
VERSION |
|---|---|
Call from storage screen on loop [fix] |
tag 5.2-b38 22jun |
Loadbalancer creation, and rectifying the error message [fix] |
tag 5.2-b46 05jul |
Huawei Cloud (Huawei)
Regarding the interaction with the public cloud service provider Huawei Cloud, there has been no alteration, correction, new implementation or new functionality.
IBM Cloud
Regarding the interaction with the public cloud service provider IBM Cloud, the following correction can be listed:
FEATURE |
VERSION |
|---|---|
Resource listings are made available by filtering regions at network creation time [bug] |
tag 5.2-b64 18jul |
VMware vCloud
Regarding the interaction with the private cloud hypervisor VMware 6.5 (or superior), the following corrections can be listed:
FEATURE |
VERSION |
|---|---|
VMware cloned a VM from Scaling Group [fix] |
tag 5.2-b62 14jul |
Scaling management based on disk writing and reading policies [fix] |
tag 5.3-b14 28jul |
uCloud Plataform
OPS
FEATURE |
VERSION |
|---|---|
VDC filter in the group [fix] |
tag 5.2-b65 18jul |
VDC filter in the company [fix] |
tag 5.2-b65 18jul |
Persistence of the portal logo on the first access [fix] |
tag5.2-b39 23jun |
VDC screen on loop [fix] |
tag 5.2-b44 05jul |
Persistence of the data on the total cost price from the amount displayed on the screen [fix] |
tag 5.2-b54 13jul |
uCloud dashboard screen crashing when logging in [fix] |
tag 5.3-b17 28jul |
Adding a VM to a workflow [fix] |
tag 5.3-b51 16aug |
Subnet operations [fix] |
tag 5.3-b54 17aug |
Persistence of new translations in the dashboard [fix] |
tag 5.2-b44 05jul |
Query for VM [fix] |
tag 5.3-b39 08aug |
Billing
FEATURE |
VERSION |
|---|---|
Virtual Tags Pop-up [fix] |
tag 5.2-b45 05jul |
Duplicated data on the pop-up of the user’s invoice details [fix] |
tag 5.2-b45 05jul |
Detailed CSV report to fill in the USN column [fix] |
tag 5.2-b45 05jul |
Do not list resources marked with USN [fix] |
tag 5.2-b45 05jul |
NullPointer to obtain the currency in the invoice calculation process [fix] |
tag 5.2-b65 18jul |
Added the column to the Billing financial report [fix] |
tag 5.3-b02 22jul |
Nullpoint in the invoicing of the Billing consolidated report [fix] |
tag 5.3-b02 22jul |
Data found in the generation of the detailed report [fix] |
tag 5.3-b06 25jul |
Action taken to deliver contract values [fix] |
tag 5.3-b06 25jul |
Summarizing per Container of the PDF Report [fix] |
tag 5.3-b23 29jul |
PDF report of closed invoices [fix] |
tag 5.3-b31 03aug |
Financial report CSV export [fix] |
tag 5.3-b35 05aug |
USN calculation [fix] |
tag 5.2-b58 13jul |
My invoice screen call by group for data loading [fix] |
tag 5.3-b25 01aug |
Fixed the issue with detailed Report coming empty [fix] |
tag 5.3-b46 10aug |
This release evokes the principle of the ISO 9001 norm, elaborated by the International Organization of Normalization, (in Brazil known as ABNT NBR ISO 9001). Which aims to establish consistent standards that increase the quality of the applied processes and result in the continuous improvement and adjustments in functionalities, in pursuit of a quality management and business excellence.
The above refers to the principle of the ISO 9001 norm.
In summary, the document presents:
Seven (7) new implementations;
Thirteen (13) improvements made in the Cloud category by demand in adapting to changes in these providers;
Forty (40) global enhancements on the uCloud platform;
- Thirty-four (34) corrective actions, including:
Nine (09) related to clouds;
Ten (10) related to uCloudOPS and;
Fifteen (15) belonging to Billing.
Therefore, the quarterly release is concluded, corresponding to the launches that took place in the months of June, July and August of the current year, on the uCloud platform, innovations generated in the Ustore development area.