User manual
Information technology solutions that make it possible to implement a scalable, solid and reliable computing architecture in a distributed cloud.
Presentation
This document aims to explain the use of the Mangue.io platform, an environment management platform for multiple container orchestrators.
This manual introduces the concepts, screens, functionalities and commands for using this product.
Introduction
Mangue.io is an environment management platform for multiple container orchestrators, which allows the orchestration, implantation (location and scheduling) and operationalization (execution) of application containers within one or more computing clusters (public or private) or among them.
The platform operates on a hybrid multicloud model and, this way, allows the organizations total control, support for sustaining backups, replication and environment migration. Centered on an agile, secure and productive approach to continuous application delivery for implantation, tests and updates with zero downtime and deployments rollback.
The Mangue.io platform supports the implantation and operationalization of image-based applications from a registry service. Besides, it also allows the creation of services for the applications (internal or external to the cluster to which the application belongs).
Access to the Platform
The access to the platform is done through a website, the user must use an internet browser, after inserting the URL/link address they view the initial presentation screen.
After starting a session in the chosen internet browser, the address/path to access the application must be filled out as displayed next:
https://<mangueserver_IP_Address>:80
https://mangue_Server_Name.com/
After inserting the address correctly, the user’s login screen is similar to the image below:
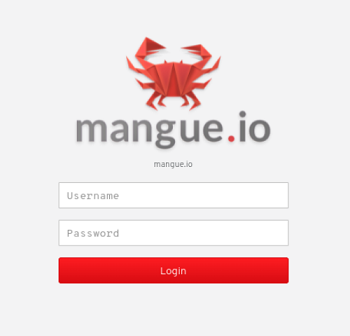
The credentials for the login and password are the same as those of the uCloud platform, which the Mangue.io platform is integrated with. Every user provisioned on the uCloud can automatically use their credentials to gain access to Mangue.io.
After inserting the access credentials (login and password) and performing the login procedure, a similar figure may be presented to the user, in case of existing a cluster associated with the user’s in the Mangue.io contract.
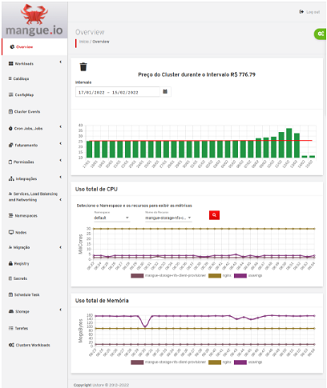
The screen above represents an example of the home screen that the user views after entering valid credentials to access the Mangue.io platform.
Browsing Settings
On the upper right corner of the platform there is a configuration menu that is identified by a gear  , in which the user has the option to select which contract, cluster and/or which namespace (namespaces are workspaces) they want to have access to.
By clicking on any of the blanks, the information on the screen changes automatically.
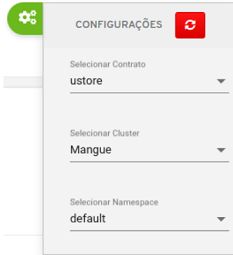
When selecting a contract, the options for selecting clusters are updated, listing only the ones that are associated to the selected contract, as well as the permissions that the logged in user has on these clusters - corresponds to the level of permission they have in the uCloud contract.
The contracts that appear in this part are only those that already have some cluster integrated with the Mangue.io, in the sequence of this document the description of how to integrate and/or create a cluster in the application. On the selection occasion, the cluster that the platform is communicating with is changed and the information on the screen is updated for this new context.
The moment the user selects the cluster and namespace, the values on the Overview screen are changed with the specific data of the user’s selection.
Home screen
The Overview home screen displays some graphs referring to the consumption values of computing resources specific to the user’s selection, the details of the graphs follow below:
Cluster Monthly Price Graph
This bar graph displays the cost evolution referring to the use of the computing infrastructure that supports and executes the applications.
On the vertical axis, you can follow the value and, on the horizontal axis, the value referring to the consumption of infrastructure on a daily basis is presented. It is possible to select the time gap to visualize the infrastructure consumption, being able to view the last 7 days, the last 20 days, the current month, the previous month, as well as customize a desired time interval.
It is possible to observe that the values fluctuate due to the consumption of computing infrastructure resources to support all applications (deployments) that are active in the selected cluster.
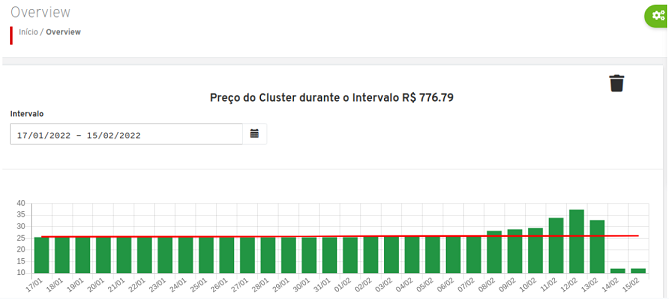
This graph allows you to track the variation of the actual infrastructure cost required to maintain and support the running of a cluster, day by day. In the area: “Graph title” it is possible to know the total accumulated value, until the present day.
These values are stored in an internal database of the Mangue.io platform, so the user can monitor the evolution of the value referring to the computing resources consumption to support an active and functional cluster.
If the user wishes, this database (“Ticket”) can be cleared, removing all the information stored, in order to zero all the accumulated values.
For this purpose, the user must click on the “Trash Bin”  icon. The Mangue.io platform requests a confirmation from the user for the action displaying the screen below:
For the user to confirm the action of deleting all financial data (values) of consumption referring to the selected cluster in the “Browsing Settings” tab, click on the green-colored button Delete.
With this action all cluster consumption values are removed and a new period of information collection is started, losing all the information accumulated (the historic series) of the selected cluster.
Cluster Consumption Value Calculation
The values presented here are calculated based on the value/hour of vCPU and RAM Memory that is stored in the Mangue.io database.
The Mangue.io Platform stores the resources consumption (CPU and Memory) of applications every minute; at the end of an hour (60 minutes), it stores the total value of consumption in these 60 minutes. At the end of each day (24 hours) the Mangue.io Platform stores the value related to the consumption of computing resources, to keep all the applications active in each container.
The CPU and Memory price used is the same price as the contract resources, the value is defined through uCloud, the contract price can be viewed on the Mangue through the Permissions/ Contract screen:
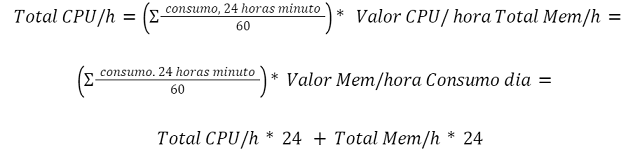
At the end of each 24-hours cycle, the total consumption value of the computing resources is stored in the Mangue.io Platform database and previously presented in the graph in: Cluster Monthly Price.
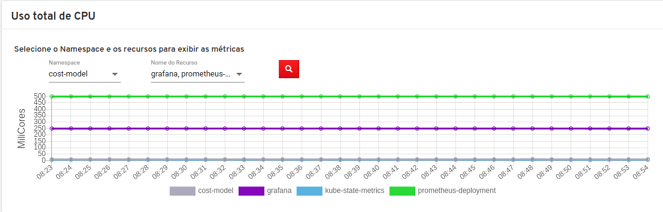
Total CPU Usage Graph
On this screen, it is also possible to visualize the CPU usage, in millicores, of each Kubernetes resource, for this, the user has to specify the namespace and the resources they wish to view the CPU consumption, and click on the «Magnifying Glass» icon  , to do the search, returning the last thirty minutes of CPU and Memory consumption.
Total Memory Usage Graph
When searching for the Total CPU Usage Graph item, the platform retrieves information on the value of memory consumption, in MegaBytes, of the last thirty minutes of memory consumption corresponding to the namespace and selected resource.

User Menu
The user menu bar is located on the left of the screen and, initially, is presented in expanded mode, as displayed on the picture below.

Some menu options have a submenu, which are presented when the user places the mouse over the indication (less than sign “<”). When clicking on this icon  , the interface presents this option’s submenu to the user, detailed in the sequence.
Workloads
On this Workloads user menu option, the dashboard presents information about Deployments, Daemonsets, Horizontal Autoscaler, StatefulSets and Updates.

A Deployment is a Kubernetes object, the orchestrator used by the Mangue.io, which is nothing else than an implantation controller that provides declarative updates for two other Kubernetes objects: Pods and ReplicaSets.
The Pods are the smallest implantable logical (computing) units that can be created and managed from within the Mangue.io. ReplicaSet has the objective to maintain a stable set of Pods replicas in execution at any moment.
The StatefulSet is the workload API object used to manage applications in state. It is responsible for managing the implantation and dimensioning of a set of Pods and provides guarantees about their order and uniqueness.
The Daemonsets manage a group of replicated pods. However, DaemonSets tries to adhere to a model of one pod per node, whether it is cluster-wide or on a subset of nodes. As the nodes are added to a cluster, the DaemonSets automatically add pods to new nodes as needed.
The Horizontal Autoscaler automatically dimensions the number of pods in a replication controller, replica set or stateful set based on observed CPU utilization (or supported by custom metrics, on some other metrics provided by the application). Note that the pod horizontal automated scaling does not apply to objects that can not be scaled, for example, DaemonSets.
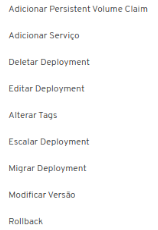
Deployments
The Workload/Deployments menu presents all deployments of a cluster in a certain namespace.
A Deployment is a Kubernetes object, the orchestrator used by the Mangue.io, which is nothing more than an implantation controller that provides declarative updates for two other Kubernetes objects: Pods and ReplicaSets.
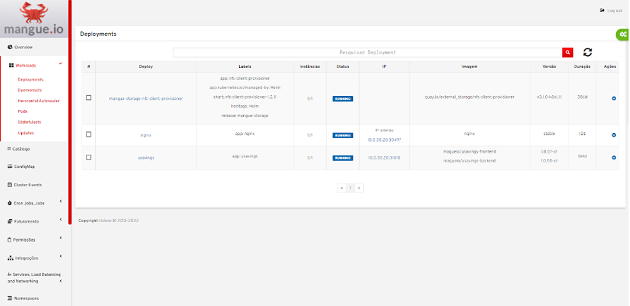
On the table the following columns are presented with their respective information:
# actionable column: This column presents an alternative way to remove (delete) multiple rows with a single command. Each row is represented by a selectable icon
 .
.When the user choses a line or several, the Mangue.io platform presents the icon(s) above this column, they represent user actions to be performed at once in all selected lines.
In this case three icons with very distinct actions are displayed:
Rollback
 : This option allows the user to perform an action of reversing the current version of the selected deployment(s) for its immediate previous version to the existing one on the Mangue.io Platform.
Scale
 : The function of this screen allows the user to inform the number (full) desired to increment the application (deployment) replica number.
Trash bin
 : This option allows the user to remove all the selected items with a single command.
Change version
 : This option allows the user to update multiple deployments at once, to which the user can inform the next version of each of them.
Deploys: It is the representation of the deployment.d name;
Labels: These are the deployments’ identifiers, they are used to link to a service;
Instances: Presents the number of replicas that are operational of a deployment, and the total number of operational replicas desired for this deployment. They are divided by a slash (“/”) where the values found before the slash are the operational replicas, and the values after the slash represent the expected amount of operational replicas;
Status: The status of a deployment identifies its current state. They can be presented as Running, Pending or “!” (exclamation mark):
The Running status identifies that no error is happening with the deployment;
The Pending status identifies some transition state in the deployment. Whether it is by update, container process initialization or any other activity that identifies a transition state;
The “!” status (exclamation mark) identifies an alarm, in other words, that something went wrong with the deployment and its replicas. For example: the image of a container is passed with an inexistent version, thus, its download does not occur;
IP Access: If the deployment has an associated service it is on this blank where the load balancer IP may be a service of type loadbalancer; port for access to the service if it is an external service (type nodePort) or the “intern IP” string in case it is an internal cluster service (type ClusterIP);
Image and Version: In case there is more than one image or version of a container, they are listed one below the other, as in the example of the sixth deployment listed in the image of the deployment table;
Actions: The last column presents a dropdown menu of actions that can be performed on the deployments:
A. Add Persistent Volume Claim
Applications that run in containers store their data in memory, and containers and pods that are run by Kubernetes can eventually die, which impacts the loss of data stored in memory. In case a user has sensitive information to persist, such as database volumes, a PersistentVolumeClaim must be created.
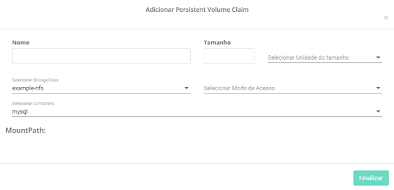
On this screen the user must fill out the blanks with the following information:
Name: Inform the volume name the user wants to create.
Size: The user must fill out a full number that represents a volume size file to be created.
Size Unit: The user must select the size unit that will be used to create the volume. The options are:
Kilo: Kilobytes when the user wants to create a file with the previous value multiplied by 1,000;
Mega: Megabytes when the user wants to create a file with the previous value multiplied by 1,000,000;
Giga: Gigabytes when the user wants to create a file with the previous value multiplied by 1,000,000,000;
Tera: Terabytes when the user wants to create a file with the previous value multiplied by 1,000,000,000,000;
Peta: Petabytes when the user wants to create a file with the previous value multiplied by 1,000,000,000,000,000;
Atenção
The Mangue.io platform does not validate, previously, if there is an available disk space, in the informed size. No warning is presented to the user, if the computing environment does not have the necessary space, no error message is presented when creating this persistent volume with the informed characteristics.
Nota
The user may verify an error indication, on the Status column on the menu Workloads / Deployments screen and consult the specific deployment, to which the PersistentVolume is associated with, as the previous image displayed on the Deployments topic.
StorageClass: The user must select which NFS Storage volume are available in the presented list;
Access Mode: This column presents the access configuration to this volume, there are three access mode, they are:
ReadWriteOnce: The volume is mounted and can only receive read and write instructions from a single node;
ReadOnlyMany: The volume is mounted and has read-only permissions, but from different nodes simultaneously, writing is not allowed;
ReadWriteMany: The volume is mounted and can read and write instructions simultaneously, but from different nodes;
Container: When the user clicks on this location, the name of the application container will be displayed with a symbol similar to this “□”;
Mount Path: Is the path where the volume is mounted in the container. If the application is based on a Linux environment, the volume mount path must use the operating system notation corresponding to the environment; if the application environment is based on an MS-Windows environment, the volume mount notation must be used with the corresponding operating system folders.
To confirm all the values and options informed, the user simply clicks on the Finish button to create the PersistentVolume and wait for the creation feedback in the upper right corner of the Mangue.io platform screen.
B. Add Service
The second option of this submenu allows the user to add a service, when clicked the following modal interface screen is opened:
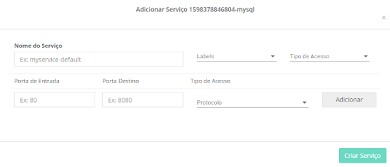
On this modal, the user must fill in the following blanks:
Name of the service: The user must fill out with the service name they want to create;
Deployment Labels: The user must inform the labels that are associated with this service;
Types of access to the service: Internal, External or LoadBalancer:
Internal: Services that can only be accessed from inside the cluster;
External: Corresponds to services that allow access from outside the cluster. A TCP-IP port between 30,000 –– 32,767 is provided;
LoadBalancer: Integrated straight with the Cloud Providers (AWS, AZURE, GOOGLE) creating a LAYER 7 loadbalancer for the respective app;
Source port: Inform the TCP-IP port number of the container allocated to the service;
Destination port for the service: Inform the TCP-IP source port in the container, the service will receive the request on the source port and forward it to the destination port;
Select the protocol: TCP or UDP.
Addbutton: If the service needs to expose more than one port, the user must return to the SourcePort/Destination Port, and add as many source/destination ports as necessary.
To confirm all the options informed above, the user must click with the mouse on the Create Service button and wait for the creation feedback.
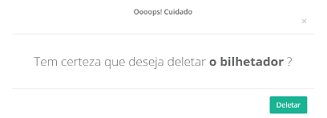
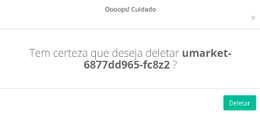
C. Delete Deployment
The third option of this submenu allows the user to remove definitely a Deployment from the cluster and from the namespace that was selected in the Configurations tab; when clicked, the following modal interface screen is opened, requesting confirmation from the user:
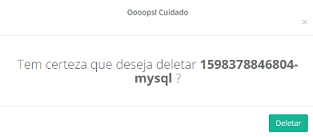
This action is immediate and irreversible, the Mangue.io platform removes the deployment selected by the user from the contract/cluster/namespace.
Just click over the button Delete to confirm the action and the Mangue.io platform deletes the deployment from the selected environment.
Nota
This action does not remove any additional components external to this deployment - e.g.: an associated PersistentVolume, therefore if an external file exists, it continues to exist on the destination volume. This action only removes the deployment from the environment, but does not remove any other additional files from the computing environment.
D. Edit Deployment
Some information is not editable through the Mangue.io forms. Elements, such as:
Container port;
Add some environment variable;
Remove some environment variable.
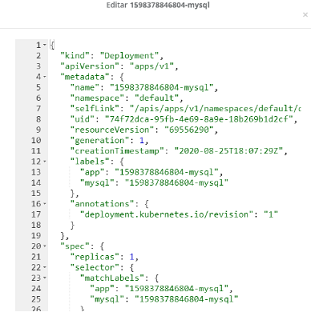
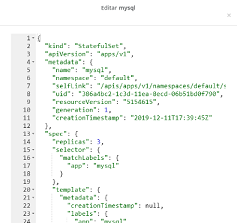
In meeting all edition demands for a Deployment, it is possible to directly edit the Deployment YAML in the Mangue.io platform.
This option displays as example the image: Edit Deployment. Its content represents the JSON file with all the configurations of the deployment in Kubernetes, the user can edit whatever is necessary, confirm by pressing the Edit button and wait for the action feedback by the Mangue.io platform.
This functionality meets the users that have knowledge about the Kubernetes files format.
E. Change Tags
The function of this screen allows the user to change the Tags associated with the selected application. From there, it is possible to create a Tag, by clicking on the  icon, to be associated with the application.

Importante
To create a Tag is necessary to specify its key and value.

F. Scale Deployment
The function of this screen allows the user to inform the number (full) desired to increment the number of replicas of the application (deployment), which starts automatically after the confirmation with the click of the mouse over the Scale button.
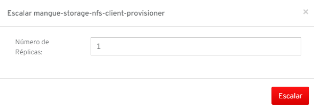
It is important to highlight that there is an increase in the usage consumption of CPU and cluster memory to support the simultaneous execution of the replicas of this application in the cluster infrastructure.
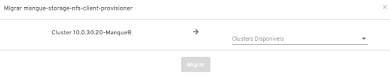
G. Migrate Deployment
In the sixth option of the Deployment actions menu, there is the option to migrate the deployment between different clusters configured in the Mangue.io platform.
The user must select which cluster integrated with Mangue.io they wish to migrate the chosen deployment.
The recipient cluster blank is a dropdown list type, when the user clicks on it, the list of available clusters associated with the chosen contract in the configuration menu is presented.
To do the migration, the user just needs to click on the Migrate button and wait for the action feedback from the Mangue.io platform. As a result of this action, a “Success” alert will be displayed on the upper right menu of the screen.
H. Modify Version
After clicking on “Update Application Version” the platform presents the image “Update Deployment Version”. Through this control, the user can generate a “new version” for any deployment existing on the Mangue.io platform.
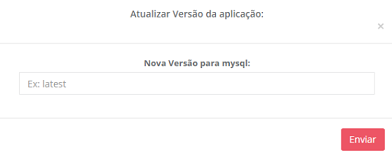
This blank is alphanumeric and the user can enter the desired information to identify the new version of the selected deployment. The new versions are under the sole control of the user, as they refer to the offers created by this user.
After filling with the desired information, the user must click on the Send button to confirm the action to create a version for the deployment.
Atenção
These new versions are not necessarily related to any version of the composing softwares, or any software that was used to compose the offer, different versions can be found outside of the Mangue.io platform.
J. Rollback
This option allows the user to perform the action of reverting the deployment version to its version immediately prior to the existing version on the Mangue.io platform.
This action in particular does not activate any additional confirmation screen, its action is immediate.
Importante
By selecting this option, the Mangue.io platform performs the reversal of the version immediately without requesting any confirmation from the user.
Nota
Caution and attention are recommended, as this action creates some type of low performance to the deployment in which is being performed the action of rollback.
Deployment Information
If the user clicks over a deployment name, the Mangue.io platform presents the deployment details screen, as shown in the picture below.
The user can note that this screen has several sections, each one described below respectively.
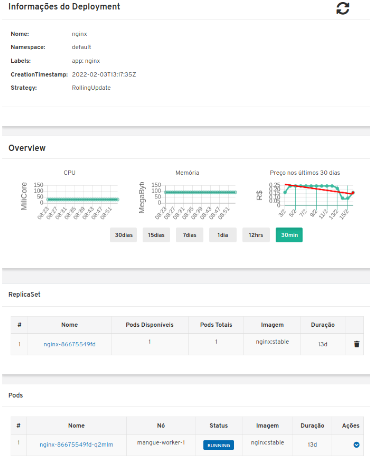
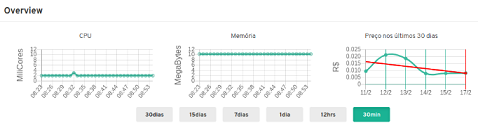
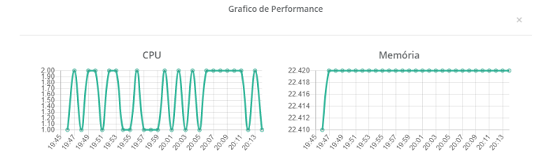
A. Section: Deployment Overview
This section displays three graphs, two of performance and one of value:
CPU;
Memory;
Price in the last 30 days.
They display the performance of the CPU (in millicores), Memory (in megabytes) and Price in the last 30 days, all regarding the deployment selected by the user. The red line on the price graphs indicates the tendency of the graph.
Interaction buttons are also displayed for the user, they can specify the period of CPU and Memory graphs.
B. Section: ReplicaSet
The Replicaset section presents a table that lists all the presented replicasets for a deployment, on this list is shown information such as:
Name;
Number of pods available;
Number of total pods at a given moment;
Image along with its specified version;
Time (in days) since the creation of this replicaset;
A button with the option to delete it, as shown in the figure below.

On this part, the Mangue.io platform presents the following information:
#: Sequential number of the replicaset in this list;
Name: This column presents the replicaset name, the user can verify that the Kubernetes environment generates unique names for each replicaset;
Available pods: This column presents the number of pods for this replicaset;
Total Pods: This column presents the total amounts of pods, configured for this replicaset;
Image: This column presents the image file information used to create this deployment;
Duration: This column presents the total of days this replicaset exists since the moment of its creation until the present day the user views this list.
C. Section: PODs
In the Pods section there is a table with the list of all the pods present for the deployment, each one details their information such as:
Name;
Node in which it is being run;
Current status of the pod;
Image along with its version and duration.
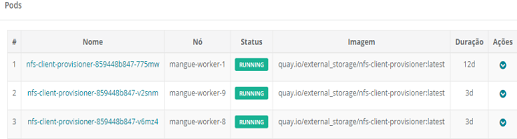
On this section, the Mangue.io platform presents the following information:
Name: Deployment name that is established when it is created;
Node: Presents the name of the Kubernetes node that is executing this deployment;
Status: Presents the deployment status in its respective node. The status of a deployment identifies the current state. They can be represented by:
Running identifies that no errors are happening with the deployment;
Pending identifies some transition states in the deployment. Whether it is by update, container process initialization or any other activity that identifies a transition state;
! (exclamation mark) identifies an alarm, in other words, that something wrong happened with the deployment and its replicas. For example: the image of a container is passed with an inexistent version, thus, its download does not occur;
Image: This column presents the information of the public image that was used for the creation of this deployment. This image can be found in public websites that contain technical information regarding the application itself, an example is the website Docker Hub.
Duration: Presents the time (in days) elapsed since the creation of this deployment;
Actions: This column presents the
Actionsbutton when clicked, it displays the actions that can be performed on each listed pod, as shows the following picture:
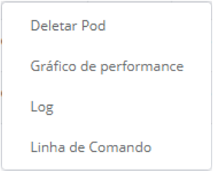
Each of the options of this submenu is detailed and described below:
Delete Pod: When clicking on the delete option, just wait for the action’s feedback. It generates an alert of “Success” or “Error” on the superior right menu. As the first option exists a pod deletion in question, when selecting this option the following modal appears:
Performance Graph: The second option allows the user to observe the CPU and Memory graph performance of each pod, once this option is clicked, the screen below is presented to the user with the consumption graphs of CPU and memory of the selected pod.
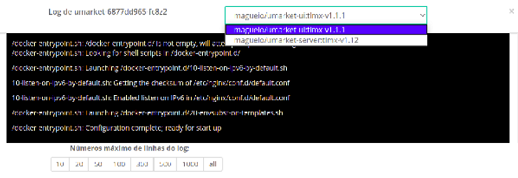
Log: This third option allows the user to view the logs of a particular pod in a similar way to what one obtains with a SSH terminal console emulation session. The user is capable of filtering the number of records (rows) that they wish to see (options are: 10, 20, 50, 100, 300, 500, 1000, all).
In case the pod has more than one container running, there is a dropdown where is possible to select which container the user wants to view the logs, as is shown in the following image:
Command Line: The fourth option offers the user to run command lines at the pod’s operating system prompt, similar to what you get with an SSH terminal console emulation session. This functionality extends to one or more containers that existed within the pod in question.
Importante
To enable this function it is necessary to access the Integrations Menu and follow the steps corresponding to Container Execution.
In case the pod has more than one container running, there is a dropdown that is possible to select which container the user wants to execute the commands, as shown in the following image:

D. Section: Volumes and Secrets
In this section are listed all the Volumes (files that store data) or Secrets (files, or authentication definitions when necessary), associated with the deployment selected.

The Mangue.io platform presents the following information in this section:
#: This column presents the sequential number of the volume or secret, shown in this list;
Name: This column displays the name of the volume or secret (operating system file) presented in this list;
Type: This column presents what is the type of item shown in this list, which can be a volume or secret
E. Section: Events
In this section, all events linked to a deployment are listed. These events can be: due to an alteration in the quantity of Pods/Replicas, a change in the version of the deployment containers or any other change in its state.
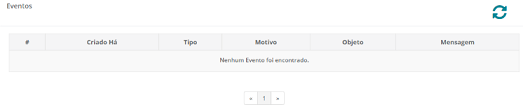
The Mangue.io platform presents the following information in this section:
#: Event sequential number in the presented list;
Created in: Presents the total number of days, until the present date, since the event surge on the Mangue.io platform;
Type: Describes the type of event that occurred, and the following types of events can be listed:
Normal;
Warning.
Object: Describe which object configured in the Mangue.io platform was the source of the listed event. The identification of object type allows the user to identify this origin so they can have access to it and act in the event resolution, through its redefinition, or opt for its removal. Its type can be some of those listed below:
Deployments;
Daemonsets;
Horizontal Autoscaler;
Pods;
Statefulsets;
Updates;
Services;
Ingress;
StorageClass;
PersistentVolumes;
PersistentVolumesClaim.
Message: On this column the Mangue.io platform presents a list of messages that can help to identify the success of the event or the root cause of a potential problem, thus allowing the user to take some action to eliminate the root cause of the problem or being secure of the success of this event.
Pulled;
Created;
Started;
NoPods;
FailedGetScale;
ProvisioningFailed;
FailedBinding.
F. Section: Pods Horizontal Autoscaler
The Mangue.io platform allows the user to define the rules so the deployment performance is always the best possible, and the Mangue.io platform can increase the deployment processing in parallel, run several instances (replicas), to guarantee that users always have the best usage experience possible.
It is worth mentioning that it is necessary to extract an instance of the Kubernetes Metrics Server active and operating in the cluster, for the Horizontal Pod Auto Scaler execution to occur. By default, the Mangue.io installation contemplates the installation of the metrics service.
In case the deployment does not have any Horizontal Autoscaler, the screen is presented as the example below:

For the user to create a Scaler rule, just click on the plus sign icon by the example of the image above, for the interface to be presented where the user configures the rule(s) of how the platform should measure the infrastructure consumption of the deployment to start new replicas within the computing infrastructure so that the performance is met.
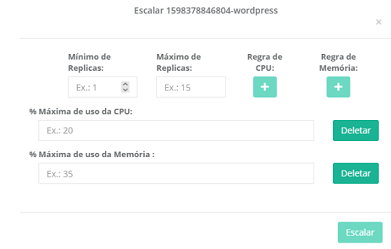
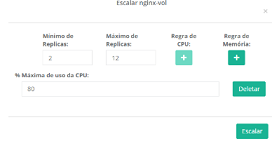
Minimum of Replicas: Inform the minimum value of replicas of the deployment (a full number is mandatory - e.g: 1, 2) that the Mangue.io platform must keep active so the application has a minimum required performance, ensuring the user experience optimization. The minimum value for this blank is “one” (1);
Maximum of Replicas: Inform the maximum value of replicas of the deployment (a full number is mandatory - e.g: 1, 2) that the Mangue.io platform must start for the application to support the growth in demand for users access and guarantee the optimization of the user experience. The maximum value for this blank is “fifteen” (15);
% Maximum of CPU usage: The user must click on the green button with the plus sign
for the platform to present the blank where the user informs the maximum percentage value (a full number is mandatory - e.g: 20, 22, 30) to be used by the Mangue.io as the maximum CPU allocation limit to execute a deployment replicas. This number is the maximum limit that the platform considers to start creating and running a new deployment replica. The maximum value for this blank is “one hundred percent” (100%).% Maximum Usage Memory: The user must click on the green button with the plus sign
for the platform to present the blank where the user informs the maximum percentage value (a full number is mandatory - e.g: 20, 22, 30) to be used by the Mangue.io as a maximum limit for a memory resource allocation to execute the replicas of a deployment. This number is the maximum limit that the platform considers to start creating and executing a new deployment replica. The maximum value for this blank is “one hundred percent” (100%).
It is important to highlight that when confirming the Horizontal Autoscaler event creation, there is a waiting time for it to appear on screen. This time comes from the need for the scaler to collect the metrics to become an active object in Kubernetes.
The definition of “Scalability Rules” controls the increment/decrement in the number of replicas of the application, and, as consequence there is an increase/decrease in the computing resources consumption to run the largest/smallest number of active replicas. Therefore, there is an increase/decrease in the value of the infrastructure cost, during the time in which the several replicas are executed.
After the definition, or in case of an existing rule, the user sees the screen below:

#: Horizontal Autoscaler sequential number in the presented list.
Nome: Identifies the name of the Autoscaler created, and normally, it must be the same name as the deployment;
Min. Replicas: Identifies the parameter placed in the Autoscaler definition and corresponds to the minimum number of replicas that this scaler keeps active to guarantee the deployment performance.
Max. Replicas: Indicates the parameter placed in the scaler, it corresponds to the maximum number of replicas maintained active to guarantee the deployment performance.
Number of Replicas: Identifies the number of active replicas of the deployment at the present moment.
CPU Usage: Presents the defined rule for the autoscaler, for the minimum and maximum limits of CPU usage. This rule must be interpreted as follows:
The first number is the current consumption of the CPU resource.
The second number is the maximum limit of CPU occupation, limit which the Mangue.io platform commissions (activate) a new deployment replica.
Memory Usage: Presents the defined rule to the autoscaler, for the minimum and maximum limits of memory allocation. This rule must be interpreted in the following way:
The first number is the current allocation consumption of the Memory resource.
The second number is the maximum memory allocation limit, which the Mangue.io platform commissions (activate) a new deployment replica.
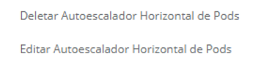
Actions: This column presents the Actions button when clicked displays the actions that can be performed about the Horizontal Autoscaler, there are two options, they are:
Delete pods horizontal autoscaler;
Edit pods horizontal autoscaler.
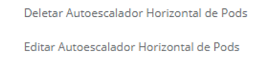
By clicking on the “Delete” option the user confirms the removal of the scalability rules created and they are no longer applied to the deployment.
Atenção
An alert feedback is created on the superior right corner of the screen informing the success or error.
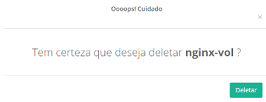
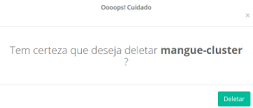
The option to “Delete” from the Horizontal Autoscaler Actions menu presents the screen below:
By clicking over the “Edit” option, the Mangue.io platform presents the screen below, where it is possible for the user to change the existing values of the Horizontal Autoscaler. The following image “Horizontal Auto Scaler - Creation” presents options on how to change the values.
It is important to point out that the rules of the Horizontal Autoscaler described above are only associated with the deployment selected by the user.
Through the Workloads/Autoscaler Horizontal menu the user can view all the rules of the Horizontal Autoscaler, configured on the Mangue.io platform, associated with their respective deployments.
G. Section: Application Price in the Last Month
This section displays the screen “Application price in the last month”, on it are listed the columns of currency, price per memory, price per CPU and total application price, on the sequence of each one of the columns is detailed:

Currency: Presents the name of the current currency referring to the values presented in the columns of this table;
Price per Memory: Presents the total value, of the current month, of the RAM memory resource consumption to keep the deployment running (see the calculation formula);
Price per CPU: Presents the total value, of the current month, of the CPU resource consumption to keep the deployment running (see the calculation formula);
Total APP price: This column presents the sum of the two previous columns (Price per Memory and Price per CPU). With this information, the user can assess the real infrastructure cost necessary to maintain and support the execution of an active and functional 24 x 7 deployment.
Daemonsets
This section presents all the Daemonsets of a cluster in a certain namespace, in the following table we have information such as:
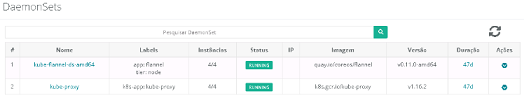
#: Sequential number of the daemonset on the presented list;
Name: It’s the representation of the Daemonsets name;
Labels: Daemonsets identifiers, they are used to link to a service;
Instances: Represents the number of operational replicas of a Daemonsets, and by the total quantity of operational replicas desired for this Daemonsets. They are divided by a slash (“/”) where the values found before the slash are operational replicas, and the values after the slash represent the expected amount of operational replicas;
Status: A Daemonsets status identifies its current state. It can be presented by Running, Pending or “!” (exclamation mark):
The Running status identifies that no errors are happening with the Daemonsets;
The Pending status identifies some transition state in the Daemonsets. Whether it is by update, container process initialization or any activity that identifies a transition state;
The “!” (exclamation mark) status identifies an alarm, in other words, that something wrong happened with the Daemonsets and its replicas. For example: the image of a container is passed with an inexistent version, thus, its download does not occur;
Access IP: In case the Daemonsets has an associated service is in this blank where the load balancer IP can be a service of the loadbalancer type, port for access to the service can be an external service (nodePort type) or a string “intern IP” if it is a intern cluster service (ClusterIP type);
Image and version: In case there is more than one image or version of a container they are listed below the other, as in the example of the sixth Daemonsets, listed in the image of the Daemonsets table;
Duration: Presents the duration time of the Daemonsets.
Actions: This column presents the
Actionsbutton when clicked displays the following options:
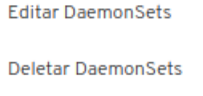
Edit DaemonSets: This option presents the daemonset in JSON format, the user can edit what is necessary and select the edit option and wait for the action feedback from the Mangue.io platform.
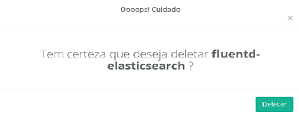
Delete DaemonSets: When selecting this action, the Mangue.io platform requests the confirmation from the user, as shown on the figure below:
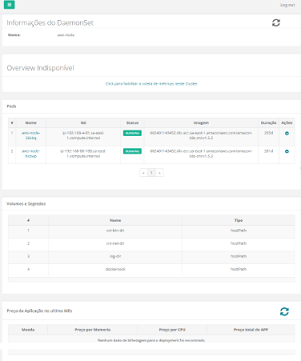
DaemonSet Information
If the user clicks on the name of any Daemonsets present on the list, the Mangue.io platform displays the screen with a Daemonset information, as shown in the example below:
Pods Horizontal Autoscaler
The Mangue.io platform allows the user to define rules so the application performance is always the best possible and that deployment may increase the parallel processing, several instances of deployment (replicas), to guarantee that the users always have the best user experience possible.
The definition of “Scalability Rules” controls the increment in the amount of replicas of a deployment, and consequently, there is an increase of the cost of the infrastructure, during the time in which the various replicas are running. In the table there is information such as:

# actionable column: This column presents an alternative way to remove (erase) various rows in a single command. Each row is represented by a selectable icon
.When the user choses a line or several, the Mangue.io platform presents the icon(s) above this column, they represent the user’s actions to be executed once for all the selected lines.
In this case the «Trash bin» icon
is presented, which allows to remove all the items indicated by the user with a single command;Name: Identifies the name of the Autoscaler created, and normally it must be the same name as the Deployment;
Min. Replicas: Identifies the parameter placed at the time of creation of the scaler, it corresponds to the minimum number of replicas which this scaler guarantees for the Deployment it is associated with;
Max. Replicas: Indicates the parameter placed at the time of creation of the scaler corresponding to the maximum number of replicas maintained active to guarantee that the Deployment is associated;
Current Number of Replicas: Identifies the current state of the number of replicas of the Deployment to which the scaler is associated with;
Actions: This column presents the button of Actions when clicked displays the actions that can be performed on the Horizontal Autoscaler, there are two options:
In the Horizontal Autoscaler “Actions” menu there is the option to delete, when selecting it, the following modal is shown:
By clicking on the Delete button the Horizontal Autoscaler is removed, and the scalability rules created are no longer obeyed by the Deployment previously associated.
Atenção
A feedback alert is created in the upper right corner of the screen informing the “success” or “error”.
PODs
A Kubernetes Pod is a group of containers, implanted together, in the same host.
Pods operate at a higher level than the individual containers, because it is very common to have a group of containers working together to produce an artifact or to process a working set.
For example:
To illustrate what a pod is, by analogy, it is possible to use the sentence “a pod of whales” that means “a group of whales” in this specific case, the term pod is related to the group of whales.
Nota
A pod is a group of one or more containers, with shared storage/network resources and a specification of how to run the containers.
The content of a pod is always put and scheduled together, then executed in a shared context.
Importante
A pod models an application-specific “logical host”. It contains one or more application containers that are relatively tightly coupled.
The Mangue.io platform can help the user create as many pods as needed for its Kubernetes environment, associating the Deployment with a Pod is described in another section of this manual, as well as the description of the process creation of a Pod.

The image above displays the listing of the created pods, followed by a description of the meaning of each one of the seven columns on this screen:
# actionable column: This column presents an alternative way to remove (erase) various rows in a single command. Each row is represented by a selectable icon
.When the user choses a line or several, the Mangue.io platform presents the icon(s) above this column, they represent the user’s actions to be executed once for all the selected lines.
In this case the «Trash bin» icon
is presented, which allows to remove all the items indicated by the user with a single command;Name: Deployment name that is established in its creation;
Node: Presents the name of the Kubernetes node that is running this Deployment;
Status: Shows the status of the Deployment in its respective node. The status of a Deployment identifies the current state. It can be represented by:
Running identifies that no errors are happening with the Deployment;
Pending identifies some transition state in the Deployment. Whether it is by update, container process initialization or any activity that identifies a transition state;
“!” (exclamation mark) identifies an alarm, in other words, that something wrong happened with the Deployment and its replicas. For example: when the image of a container is passed with an inexistent version, thus, the download of this container does not occur;
Image: This column presents the public image information that was used to create this deployment. This image can be found on public websites that contain technical information regarding the application itself, an example is the website Docker Hub.
Duration: Presents the time (in days) elapsed since the creation of this Deployment;
Actions: This column presents the
Actionsbutton when clicked presents the actions that can be performed over each listed Pod, as shown in the following picture:
Each of the options of this submenu is described below:
Delete Pod: When clicking on the “Delete” option, just wait for the action’s feedback. An alert of “Success” or “Error” is generated on the top right menu. As the first option exists a Pod deletion in question, when selecting this option, the following modal is shown:
Performance Graph: In the second option, the user is able to observe the CPU and Memory performance graphs of each Pod, once this option is clicked, the screen below is presented to the user with the consumption graphs of CPU and memory of the selected Pod.
Log: On the third option, the user is capable of visualizing the logs of a particular Pod in a similar way to what one obtains with a SSH terminal console emulation session. The user is also capable of filtering the number of records (rows) that they wish to observe (options are: 10, 20, 50, 100, 300, 500, 1000, all). If Pod has more than one container running, there is a dropdown where is possible to select which container the user wants to view the logs, as it is shown in the following image:
Command Line: On the fourth option, the user is able to run command lines in the prompt Pod operating system, similar to what one obtains with a SSH terminal console emulation session. This functionality extends to one or more containers that existed within the Pod in question.
Importante
For this function to be enabled it is necessary to access the Integrations Menu and follow the steps corresponding to the Container Execution.
If the Pod has more than one container running, there is a dropdown where is possible to select which container the user desires to execute the commands, as shown in the following image:
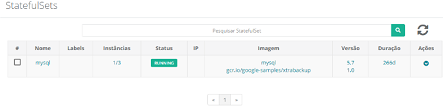
StatefulSets
On this functionality the Mangue platform presents all statefulsets of a cluster in a certain namespace, on the following image is displayed information such as:
# actionable column: This column presents an alternative way to remove (erase) various rows in a single command. Each row is represented by a selectable icon
.When the user choses a line or several, the Mangue.io platform presents the icon(s) above this column, they represent the user’s actions to be executed once for all the selected lines.
In this case the «Trash bin» icon
is presented, which allows to remove all the items indicated by the user with a single command;Name: It is the representation of the Statefulsets name;
Labels: These are Statefulsets identifiers, they are used to link to a service;
Instances: The values presented here indicate that the number of replicas of a Statefulsets. They are divided by a slash (“/”) where the values found on the left side of the slash are the values of active and operational replicas, and the values on the right side of the slash represent the maximum number of replicas that can be activated to maintain the desired Statefulsets performance.
Status: The status of a Statefulsets identifies the current state of each Statefulsets listed. They can be presented by Running, Pending or “!” (exclamation mark):
The status Running identifies that no errors are happening with the Statefulsets;
The status Pending identifies some transition states on the Statefulsets. Whether it is by update, container process initialization or any other activity that identifies a transition state;
The status “!” (exclamation mark) identifies an alarm, in other words, that something wrong happened with the Statefulsets and its replicas. For example: the image of a container is passed with an inexistent version, thus, its download does not occur;
IP: In case the Statefulsets has an associated service, it is in this blank is where the load balancer IP if it is a service of the loadbalancer type, port for access to the service can be an external service (nodePort type) or the string “intern IP” if it is a internal cluster service (ClusterIP type);
Image and Version: In case there is more than one image or version of a container, they are listed one below the other, as in the example of the sixth Statefulsets listed in the picture of the Statefulsets table;
Duration: This column represents the time elapsed since the Statefulsets creation moment;
Actions: This column presents the
Actionbutton when clicked displays two options as shown in the following picture:
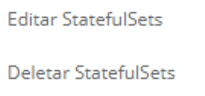
Edit Statefulsets: This option presents a screen with a JSON file with all the Statefulsets configurations in Kubernetes, the user can edit whatever is necessary and select the edit option and wait for the action feedback from the Mangue.io platform. This functionality attends the users that have knowledge about the Kubernetes files format.
Delete Statefulsets: In the Statefulsets actions menu there is the option to delete, the user just needs to click on the button to confirm the action, as shown in the screen below:

Updates
An Update is considered as an update event in a Kubernetes Cluster, its functionality has the purpose of facilitating the control and direct communication between the Kubernetes environment and Mangue.io interface.
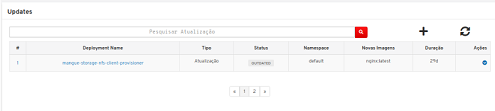
The image above displays the list of created updates, next the definition of each one of the eight columns:
#: Event sequential number in the presented list;
Deployment Name: Indicates the Deployment name;
Type: Determines the type of update to be performed, there are two possible updates, they are:
Update - Occurs when the user determines which is the next version and the Deployment container;
Rollback - It is an operation that reverts the event for the previous version.
Status: There are two possible status for an update, they are:
UPDATED - This state corresponds to a performed update;
OUTDATED - Refers to a previous or old status, that waits for the update event through the Mangue.io platform;
Namespace: Corresponds to the application Namespace to be updated and is being executed;
New Images: Regards new images and versions of containers that are updated;
Duration: Corresponds to the time the update was registered/executed;
Actions: This column presents the
Actionbutton when clicked displays a single option:
Update: When selecting the option to update on the
Actionsbutton of the table, the Mangue.io platform presents a screen of confirmation for the operation:
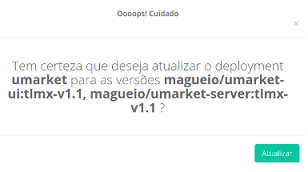
By clicking on the Update button the update event for the corresponding Deployment is released.
The images and versions of containers contained on the “New Images” blank are used. An alert feedback is created on the superior right corner of the screen informing the “Success” or “Error”.
Right above the table, there are three elements with which the user can act:

Search action: In case the list presented on this screen is too long (occupying more than one page), there is a blank where it is possible for the user to make a search with the desired Update name. It is just necessary to inform part of the name and type enter or click on the «Magnifying glass» icon
 . As a result of this search only comes up the Updates that contains the key-word of the search;
Update action: Just click on the icon
 for the Mangue.io to update the interface with the most recent values of the Updates table;
Create Integration with Updates: Just click on the plus sign
for the user to register a new update for a Deployment in a certain Namespace. The Mangue.io platform presents the following screen for the user:
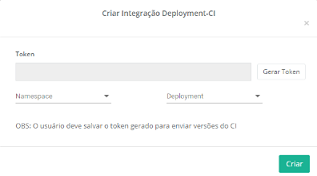
Next, follows the description of the blanks of this screen:
Token: This blank is filled with a string of characters after the user clicks on the
Generate Tokenbutton, the blank is filled with the token string that is informed for the communication with the Mangue.io API. This token must be saved and informed to authenticate the C.I. versions. When generating a token, it must be sent via API for the Mangue.io server, because it is responsible for guaranteeing the integrity of the requisition sent.Namespace: When clicking on this blank, it is presented a dropdown list with all the existing Namespaces in the cluster selected on the “Configuration Selection” tab.
Deployment: When clicking on the blank is presented a dropdown list with all the Deployment associated with the namespace selected on the previous blank.
Createbutton: When the user configures all the blanks on this screen, with the correct criteria to add an update event (update), they must click over theCreatebutton to add the update event on the Mangue.io platform. This new event is added to the list with the pending status. By clicking on theCreatebutton a permission is generated for the user to register the updates on the platform through calls to the Mangue API. An alert feedback is created on the superior right corner of the screen informing of the “Success” or “Error”.
Nota
In case the event does not appear listed, immediately, the user must click on the (update) icon to update the information on the screen.
Below there are two examples of the benefits for the Updates functionality:
Example 1:
A user has a CI/CD pipeline that is executed and generates some stable versions per day. As the user has their cluster Kubernetes managed by the Mangue.io and its applications installed it is possible to register the updates on the platform through the CI/CD pipeline, and wait for the update event to be launched through the Mangue.io interface.
Example 2:
A user has a CI/CD pipeline that is executed and generates some stable versions per day. As the user has their cluster Kubernetes managed by Mangue.io and its applications installed it is possible to update the application directly through the CI/CD pipeline.
Catalog
The Mangue.io platform allows the user to create applications (Deployments) in two different ways: the simplified way that guides the user through the sequence of screens and the elaborated one that allows uploading a text file. Next, the description of the two formats of how to create applications (deployments).
The first is simplified, it occurs when guiding the user using those screens as intermediate, that after all the filling and confirmation by the user, the informed data are converted in a file with “YAML syntax”, and this construction (practically with no errors) is used to generate the application.
The objective of this first approach is to minimize the potential YAML syntax errors to a Kubernetes environment. The creation of code in YAML syntax, in the Kubernetes environment, demands a high degree of specialization and knowledge of the developer. The syntax, correct for the environment must have all the needed dependencies to generate the desired result in the correct form and ready for use in the Kubernetes environment (e.g.: an application/ Deployment).
The other form is to allow the user to upload a text file, whose content is the application codification in YAML syntax, already adapted and prepared for a Kubernetes environment. If the developer (user) has enough practice to create their own scripts in YAML syntax, they may use them and bring this to the Mangue.io platform with the purpose to conduct in which Cluster, Pod, Node, this code/script is executed and managed.
When the user accesses the Catalog menu, the Mangue.io platform presents the screen below, on the sequence the description of each one of the options from this menu flow.
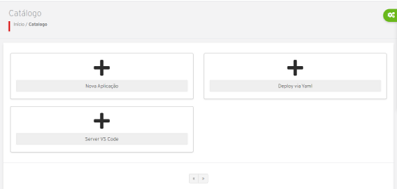
New application
This modality is the form the Mangue.io platform conducts the user through the screens, requesting the information in sequence so that, posteriorly, the Mangue.io platform makes the compilation of information generating the application within the Cluster and Namespace selected in the gear tab “Configuration Selection”.
Below are described the steps to fill the forms from the screens that guide the user.
A. First Step: New application
For the creation of a new application (Deployment) the Mangue.io platform segments the process in two steps, the user must fill the following blanks:
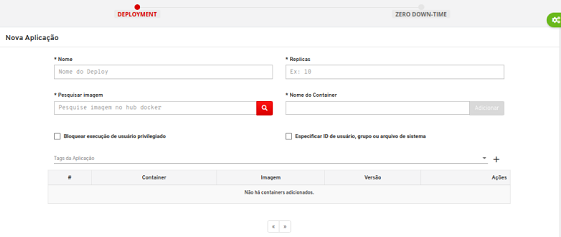
Name: This space is mandatory, the user must inform the application (Deployment) name with which this stays identified on Mangue.io platform;
Replicas: This blank is mandatory, the user must inform the number (full)that they desire to allocate to execute the application (Deployment) as soon as created. This number is allocated in the computing infrastructure so that the user obtains a better performance experience, and the Mangue.io platform takes care of allocating these computing resources;
Search Image: This area is mandatory, an image search of an application is performed in the server of image register http://hub.docker.com. The user can inform a sequence of characters (even if partial) of any image cataloged on Hub Docker, and the Mangue.io platform does a search and presents a list that contains the characters sequence. See the example below, with the sequence search “wordp”, to search the application Wordpress image:
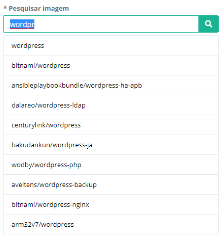
The user just needs to click with the mouse cursor on the line of the desired image to select the best image available.
Container name: This blank is mandatory, in it the name with which the user intends to identify it within the Mangue.io platform must be informed;
Block execution of privileged user: On this space the user can block all the Deployment containers for it to be executed in a privileged way, with access to resources and Kernel capacities of the Host machine;
Specify user, group or system file ID: On this area it is possible to indicate the user, group or system file ID the container is executed;
Application Tags:On this blank the user can inform the application Tags, as well as create a Tag to be associated to the application;
Addbutton: To create a new application (Deployment) the Mangue.io platform segments the process in two steps. After the user confirms the action with theAddbutton the user views the following screen:
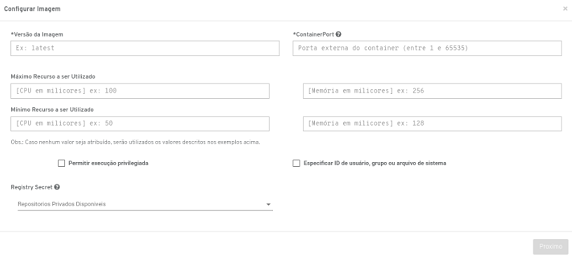
Image version: This blank is mandatory on it the user must inform how the application (Deployment) is identified on the environment. This blank can be filled with numbers or characters, to attend to the user demand (e.g.: latest, last, 1.xx, 1.20);
ContainerPort: This area is mandatory on it the user must inform which TCP-IP container port can be used for the application (Deployment) to be available to others users access;
Maximum Resource to be used [CPU in millicores]: On this space the user can inform the maximum of CPU resources that must be allocated, on the computing infrastructure of the Cluster to offer the maximum performance for this application (Deployment). This quantity must be informed with a full number, to support and execute the application (Deployment);
Minimum Resource to be used [CPU in millicores]: On this blank the user can inform the minimum of CPU resources that must be allocated, on the computing infrastructure of the Cluster to offer the minimum acceptable performance for this application (Deployment). This quantity must be informed with a full number, to support and execute the application (Deployment);
Maximum Resource to be used [Memory in millicores]: On this area the user can inform the maximum of RAM memory resources that must be allocated, on the computing infrastructure of the Cluster to offer the maximum performance to this application (Deployment). This quantity must be informed with a full number to support and execute the Deployment;
Minimum Resource to be used [Memory in millicores]: On this blank the user must inform the minimum of RAM memory resources that can be allocated, on the computing infrastructure of the Cluster to offer the minimum acceptable performance for this application (Deployment). This quantity must be informed with a full number, to support and execute the new application (Deployment);
Allow privileged execution: On this blank the user must inform if the container has access to the resources and Kernel capacities of the Host machine;
Specify user, group or file system ID: On this area it is possible to indicate the user, group or file system ID that the container is executed;
Registry Secret: On this blank the user must inform the Secret name of the images server associated with this image. By clicking with the mouse over this blank, the Mangue.io platform presents a list file of Secrets available on the private image server;
Nextbutton: When the user clicks on theNextbutton the Mangue.io platform presents the screen with the blanks respectives of Secrets and Environment Variables of the container. See the screen below:
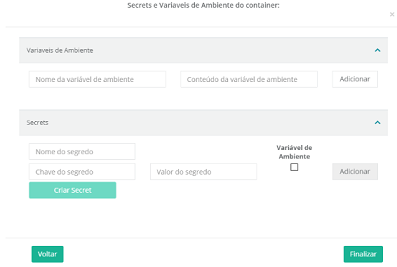
Environment Variables:
Environment variable name;
Environment variable content;
Addbutton
- Secrets
Secret name;
Environment Variable;
Secret Key;
Secret Value;
Addbutton;Create Secretbutton;BackbuttonFinishbutton.
After clicking on the Finish button, the Mangue.io platform closes the sub screens and returns to the first step of the new application process, it presents the its configuration listed, as the example below:

Below the content description of the columns presented on this list:
#: Shows the container sequential number on the present list;
Container: Displays the container name informed on the previous steps, the start of a new application creation process (Deployment);
Image: Presents the image name of the application that was selected from the images register server (e.g.: http://hub.docker.com);
Version: Displays the information of the application version (Deployment) informed on the previous steps;
Actions: This column presents the
Actionbutton when clicked, it presents a submenu with the following options:
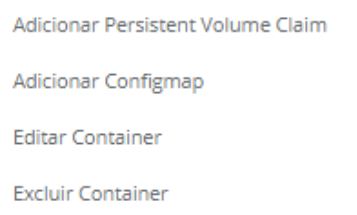
Add PersistentVolumeClaim: Through this screen the user may configure the file characteristics regarding the PersistentVolumeClaim (PVC). The Mangue.io platform simplifies the PVC configuration process, offering to the user options on the graphic interface that conduct the decisions regarding the PVC, as below:
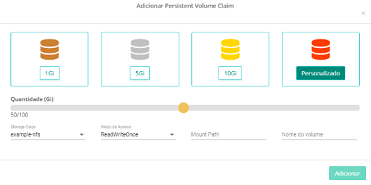
Size / 1Gi, 5Gi, 10Gi: The user can select the volume size simply by clicking with the mouse cursor over the desired number, selecting the best size option for this PVC. The options are expressed in Gigabytes (1, 5, or 10);
Size / Customized: Another way of creating a PVC with a volume with a differing size from the previous options, the Mangue.io platform presents a slide bar that allows the user to select the PVC’s desired size. Using the mouse cursor over the orange indicator, the user can move this indicator (left or right) to define the final desired size. The minimum size is 1 Gigabyte and the maximum of 100 Gigabytes;
Storage Class: This blank is a dropdown list that is composed only of NFS servers configured on the Mangue.io platform. The user must select the more adequate NFS server to receive the PVC file;
Access Mode: This column presents the access configuration to this volume, these access modes can be three, they are: ReadWriteOnce, ReadOnlyMany, ReadWriteMany;
Mount Path: On this space the user must inform the path where the volume is mounted on the container. If the application base is on a Linux environment, the montage volume path must use the notation of the Linux operating system;
Volume name: On this area the user must inform the name of the volume file that is created on the Cluster operating system.
Add ConfigMap: A ConfigMap is an API object used to store non-confidential data in key-value pairs. On this sub screen the user can include and configure the desired ConfigMap(s) file(s) for their environment.
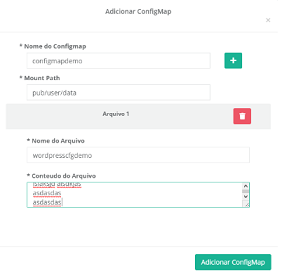
ConfigMap Name: This blank is mandatory, the user must inform the desired name to register in the Mangue.io platform and identify this ConfigMap;
Addbutton;Mount Path: This space is mandatory the user must inform the path where the volume is mounted on the container. If the application base is in a Linux environment, the mount path of the volume must use the environment notation of the Linux operating system;
File Name: This area is mandatory the user must inform the file name that is created on the virtual machine operational system that uses the ConfigMap;
File content: This blank is mandatory and the user must fill in with the specific content of the ConfigMap;
Add ConfigMapbutton: After filling in all the previous blanks the user must press this button with the mouse cursor so the Mangue.io platform can promote the creation, configuration and recording of the ConfigMap for this new application (Deployment).
Edit Container: When selected this option the Mangue.io platform presents the screen regarding the Fist Step: New Application, so the user can edit the configurations on this container.
Exclude Container: This action is defined and when actioned the Mangue.io platform removes allo the container initial configuration, no confirmation of this action is required.
B. Validate New Application
If the user clicks with the mouse over the container name the Mangue.io platform presents a screen with all the information about Container resources.
The Mangue.io platform identifies all the resources of PersistentVolumeClaim, ConfigMap, of the container the user configured for this application and list these resources according to the example of the screen below:
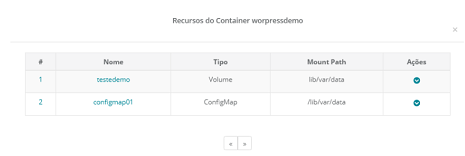
#: This column presents the container sequential number in the presented list;
Name: This column shows the name of the resource informed on previous steps;
Type: This column displays the type of resource created on previous steps;.
Mount Path: This column presents the information of the operational system directory according how it was configured on previous steps;
Actions: This column presents the
Actionbutton when clicked, it presents a submenu with the following options:
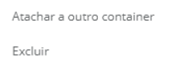
Attach to another container: A Mangue.io platform facility allows the user to attach this application to a different container than the one created since the beginning of this process. When loading this option the Mangue.io platform presents the following screen:
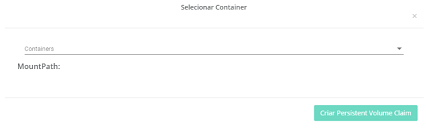
When clicking over the containers blank a drop-down list is presented with the containers available and configured on the Mangue.io platform. The user just needs to select the desired container and confirm the action.
Delete: This action is definitive and by actioning it the Mangue.io platform removes all the container initial configuration;
Atenção
There is no request confirmation on the «Delete» action.
C. Second Step: Deploy on the Clusters
This section enables the understanding of how to operate one of the greatest facilities of this platform. It allows the creation, launch and execution of this new application (Deployment) in more than one Cluster, simultaneously.
The platform makes it possible to operationalize the selection of one (or more) Cluster (s) currently configured on the Mangue.io environment. The image and the description of this section is below:

Clusters Available: This blank when selected presents the drop-down list with all the configured Clusters on the platform. The user just needs to select which ones they want to launch and execute the application Deployment that is being created.
NextButton: The user must click on this button to start the third and last step to create a new application (Deployment).
D. Third Step: Enable Zero Down-time
As mentioned at the start of this topic, the objective of this first approach - Creation of New Application via screens/forms on Mangue.io - is to minimize the potential YAML syntax errors for a Kubernetes environment.
The creation of a code in YAML syntax in the Kubernetes environment demands a high degree of specialization and knowledge from the developer. Thus the syntax correct for the environment, may have all the dependencies needed to generate the desired result and be integrated in the Kubernetes environment use (e.g.: an application/ Deployment).
The development of an application (Deployment) script with the YAML syntax in a Kubernetes environment can be very long, and the dependencies between script sections and with external elements (PVCs; ConfigMaps, environment variables, among others) can induce the script creation with errors or parameters absence failures, decorring of the little experience or attempt of using a script developed by another person.
For example:
A generic script found on the virtual environment may not make clear all the dependencies of environment variables and external files.
The scripts adaptation process (very little documented in the year of 2018) could be a great frustration and prevent the popularization of the Kubernetes environment, therefore the Mangue.io platform simplifies this process by guiding the user through screens and forms.
After the complete fill in (of this second part) of all the blanks of screens and forms regarding the application (Deployment) creation the Mangue.io platform generates the complete YAML script and, by consequence, its compilation with no errors.
This document’s reader can see below the description of the next screens that are part of the last step before the finalization and creation of the application (Deployment) that is executed and managed by the Mangue.io platform.
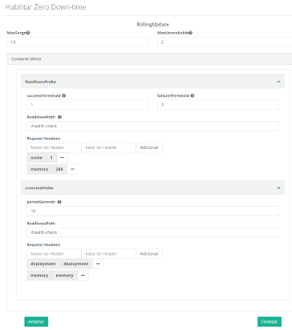
MaxSurge: On this space the user must inform the maximum quantity of replicas they wish to keep active on the Mangue.io platform. During the update process of the application (Deployment) version, this number is responsible for keeping a minimum of replicas to guarantee the user experience during an update process;
MaxUnavailable: On this blank the user must inform the maximum quantity of replicas they wish to keep unavailable on the Mangue.io platform. During an update process of the application (Deployment) version, this number indicates to the Mangue.io the quantity of replicas that can be updated in a parallel mode;
Container: This is a header of a section that indicates the container name that is being created for this new application (Deployment).
Section ReadinessProbe: The Kubernetes environment uses ReadinessProbe to know when a container is ready to start to accept traffic. A Pod is considered ready when all its containers are concluded. On the blanks below the user must insert the values referring to the environment of ReadinessProbe.
SuccessThreshold: On this blank the user must inform a full number that defines the minimal quantity of containers that the Mangue.io platform must keep available during the process of update in a way to guarantee the user experience that is using the application (Deployment);
FailureThreshold: In this area the user must register a full number that defines the maximum quantity of containers that are unavailable during an update process of the application (Deployment) version. This number indicates to the Mangue.io platform the quantity of replicas that may be updates in a parallel manner;
ReadinessPath: On this space the user must indicate the path of the directory where is created a file register (log) that stores all the events during the process of container update;
Request Headers: On this subsection the user may configure the update events register file content layout that must be created, adding columns (headers) and the column content;
Header name: On this blank the user must inform the column name that is created within the update events register file (log).
Header Value: This space the user must indicate the initial value of the column that is created within the update events register file (log).
Addbutton: This button informs the Mangue.io platform the set header/value must be configured in the update events register file (log). The user may add the quantity of columns that is made necessary, they just need to fill in the values on the previous blanks and press theAddbutton.
LivenessProbe: The Kubernetes environment uses LivenessProbe to know when to restart a container. These probes are performed in intervals of time (seconds) defined by the user and after this period it is added a line on the log file. On the spaces below the user enters with the values referring to the LivenessProbe environment:
PeriodSeconds: On this blank the user must inform the full number that represents the period of seconds referring to the probe activity break (livenessprobe);
ReadinessPath: In this area the user must indicate the path to the directory where a register file (log) is created that stores all the events during the container update process.;
Request Headers: On this subsection the user may configure the update events register file content layout to be created, adding the columns (headers) and the column content;
Header name: On this blank the user must inform the column name that is created within the update events register file (log).
Header Value: This space the user must indicate the initial value of the column that is created within the update events register file (log).
Addbutton: This button informs the Mangue.io platform the set header/value must be configured in the update events register file (log). The user may add the quantity of columns that is made necessary, they just need to fill in the values on the previous blanks and press theAddbutton.Backbutton: If the user needs to go back to a previous step, they must press this button. It is important to highlight that in this operation all the information filled on this screen by the user is lost, and the Mangue.io platform returns to the previous screen.Finishbutton: The user must press this button when the filling of all the blanks from the previous screens are concluded, when it’s ready to start the application (Deployment). The Mangue.io platform compiles all the information on the blanks and generates a YAML script. By compiling this script and generating the application (and all its dependencies: PVCs, ConfigMaps, log files, among others) it is executed and managed within the Mangue.io platform environment.
At this point the Mangue.io platform ends the application (Deployment) screens creation and the user can find their new application installed on the Workloads/Deployments menu screen.
The user may have a larger quantity of information about its new application on the «Deployment Information» menu.
Deploy via YAML
This is the second approach the Mangue.io platform allows the user to upload a text file, whose content is the application codification in YAML syntax, already adapted and prepared for a Kubernetes environment.
YAML stands for “Ain’t a markup language”, according to https://yaml.org/, is an amicable data serialization default to any programming language. YAML was created in the belief that all data can be represented adequately as a combination of lists, hashes (maps) and scalar data (simple values).
The syntax is relatively simple and was projected considering that it is very readable, but that also was easily mapped for the common types of data in most high-level languages. Beyond that, YAML uses a notation based on indentation and a set of distinct characters of the ones used by XML, making that both languages are easily composed in one another.
Any user with a YAML syntax knowledge can use the Mangue.io interface to create a: Deployment, Service, Statefulsets, Volume or Ingress.
The Mangue.io platform allows the user expert in YAML enters with their code in a free manner directly through the interface (data-entry), or upload a file in text format not formatted (ASCII) of a directory/folder of their computer to the Mangue.io platform.
When clicking over the Deploy via YAML Code option the Mangue.io platform presents the following screen:
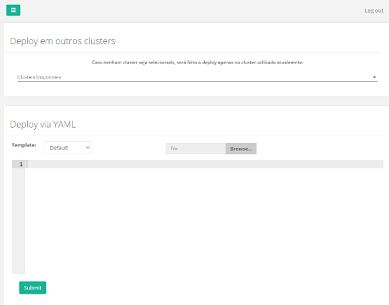
A. Available Clusters
The user must click over the “Available Clusters” blank to open a dropdown list of all the configured clusters on the Mangue.io platform, then select the recipient Cluster in which the Deployment is created and executed.
There is a mensage present on the screen that is important to highlight for the Deployment via YAML creation process.
Nota
In case no Cluster is selected, the deploy is made only on the Cluster being used currently.
B. Template
On the sequence the user must select one of the YAML code model options (template) that is previously configured on the Mangue.io platform, this functionality adds productivity to the user, and each model type is an option on the drop-down list:
Default: Allows the user to configure the YAML code in a free way. In this option the user must have a good YAML syntax knowledge to enter with the desired code. The user must start clicking with the mouse on the gray area beside the number “1”, before starting to type their YAML code.
Atenção
For each new line the user must use the Enter key to start a new line.
The user must use their own development experience to structure the syntax of their code line by line. Through this option the user may enter with a YAML code to create, provision a new Pod on the Mangue.io platform.
Deployment: In this option the Mangue.io platform presents a new YAML code template with the initial syntax to create a Deployment. The user may use the mouse to click on the desired line and on the location, then start the typing of the specific parameter for the Deployment. Therefore, editing the YAML code template the platform presents.
Service: On this option the Mangue.io platform presents a YAML code template with the initial syntax to create a Service. The user may use the mouse to click on the desired line and on the location, then start the typing of the specific parameters for the service. Therefore, editing the YAML code template the platform presents.
Statefulsets: On this option the Mangue.io platform presents a YAML code template with the initial syntax to create a Statefulsets. The user may use the mouse to click on the desired line and on the location, then it is possible to start the typing of the specific parameters for the Statefulsets. Therefore, editing the YAML code template the platform presents;
Volume: On this option the Mangue.io platform presents a YAML code template with the initial syntax to create a Volume. The user may use the mouse to click on the desired line and on the location, then start the typing of the specific parameters for the Volume. Therefore, editing the YAML code template the platform presents.
Ingress: On this option the Mangue.io platform presents a YAML code template with the initial syntax to create a definition of Ingress. The user may use the mouse to click on the desired line and on the location, then start the typing of the specific parameters. Therefore, editing the YAML code template the platform presents.
The expert user in YAML may see that the use of templates increases productivity and keeps the code better documented and structured according to the best practices.
C. Browse
This button allows the user to upload a text non formatted (ASCII) file type, with a YAML code previously created by the user. The user must click on the Browse button, in this action the Mangue.io platform to presents the «File Explorer» screen of your computer, then, it is necessary to select the folder/directory where the code file is located.
The Mangue.io platform is configured to identify and present all the files with extensions “.yaml and .yml” present on the folder/directory selected. In case the user has saved on their source code in a file with different extension, they must type the full name of the file on the blank “Name” or select the option “All files (.)” to locate and select the desired file.

When the user selects the desired file, just click on the Open button, so the Mangue.io platform uploads the content from the selected file to the interface, at this moment the user visualizes that the Mangue.io platform numbers, sequentially, all the lines of the uploaded code.
At this point the user can edit the code directly through the Mangue.io platform interface, to personalize or correct any YAML code line present on the screen.
D. Submit
When the user is concludes the insertion of all the YAML code content and is secure that this code is correct, the green button Submit must be clicked for the Mangue.io platform to perform the code load and its consequent compilation by make this code available as Deployment, Service, Statefulsets, Volume or Ingress.
At this point the Mangue.io platform closes the application (Deployment) creation screens, then the user can find their new application listed on the «Workloads/Deployments» screen.
The user can view a larger quantity of information about its new application on the «Deployment Information» menu.
E. Server VS Code

To create a Visual Studio Code is necessary to click on the button and fill in the blanks below:
Server VS Code name: Server VS Code name to be created;
Server VS Code size: Disk size to be made available for the Visual Studio Code. The size measure is defined on the “Type of Size” blank;
Type of Service: The user may select the type of service to be attributed to the Visual Studio Code deployment. The available options are: Cluster IP, NodePort, Load Balancer and Ingress;
Port: The user can select the port to be used in the service;
Type of Size: Specifies the size unit. The available options are: Gi e Mi;
Ingress Class: In case the type of service selected is Ingress it is necessary to select the Ingress CLass to be used for the service;
Server VS Code URL: In case the type of service selected is Ingress it is necessary to specify its route path. Example: /vscode;
Activate authentication: The user can attribute a password that is necessary to access the server VS Code;
Servier VS Code password: Password to be used to access the server VS Code.
ConfigMap
In a simple way, it is possible to affirm the ConfigMap is a set of key-value pairs destined to the configuration storage, that is kept within files that can be consumed through pods. It is very similar to Secrets, but provides a work mode with strings that do not possess confidential data, like: passwords, keys, tokens and other sensitive data.
The configMap files, can be both complex files that have few rules, as well as files on JSON format complexes and full of rules.
It is important to highlight that a configMap file can contain the complex content of a JSON, the user just needs to fill the content of this file obeying the correct syntax of a JSON.
When selecting this option on the bar slide, the Mangue.io platform presents the following screen which contains a listing of all the configMaps registered on the platform.

Below the description of each column of this table:
# actionable column: This column presents an alternative way to remove (erase) various rows in a single command. Each row is represented by a selectable icon
.When the user choses a line or several, the Mangue.io platform presents the icon(s) above this column, they represent the user’s actions to be executed once for all the selected lines.
In this case the «Trash bin» icon
is presented, which allows to remove all the items indicated by the user with a single command;Name: On this column is presented the configMap name added by the user. When clicking with the mouse over the name, the Mangue.io platform presents a screen with the content(s) of the configMap file(s).
By default is presented only the visualization of a line from the file content, in case the content is bigger than the blank, the user can position the mouse on the inferior right corner, until the mouse cursor changes for a double diagonal arrow  . Therefore, allowing the user to redimension the listed content space, and accommodate the size that is adequate for the user, for its better viewing.
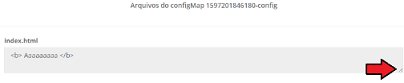
It is important to highlight that this window does not allow the edition of the listed content.
Duration: On this column is presented the time (in days) since the configMap creation moment.
Actions: This column presents the
Actionbutton when clicked, it presents two options, as the following figure:
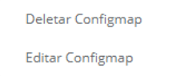
Delete configMap: When the user selects this option the Mangue.io platform presents the screen below requesting the confirmation of the configMap removal option.
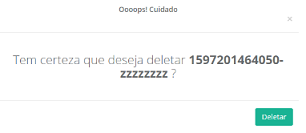
Nota
It is important to highlight that this action is definitive and removes the file from the operating system, not being able to restore it, thus all the references of this configMap on the Mangue.io platform are erased. Therefore, it is necessary to recreate the file from the beginning.
Edit Configmap: When selecting this option the Mangue.io platform presents the following screen, place where the user can perform the necessary alterations on the configMap file(s) content(s).
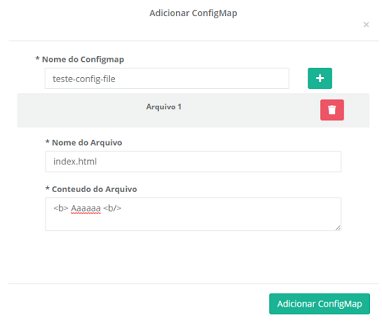
The following image is a cutout of the elements positioned above the table, there are three different and available actions to the user:
Search action: In case the present list on this screen is too long (occupying more than one page), there is a blank where it is possible for the user to perform a search by the ConfigMaps desired name. The user just needs to inform part of the name and click
Enteror click over the «Magnifying glass» icon. As result of this search only the ConfigMaps that contain the key-word will come up on the search.Update action: Just click on the
icon for the Mangue.io to update the interface with the most recent values from this ConfigMaps table.Action of adding a ConfigMap: Just click on the plus sign
so the user can register a new ConfigMaps. The Mangue.io platform presents the following screen to the user:

Below the description of the blanks on the screen above:
configMap name: On this blank the user must type the desired configMap name, then click over the plus sign icon
, which results in the Mangue.io platform adding the blanks below:“n” File: For each time the user clicks on the plus sign
the Mangue.io platform adds a gray line with the configMap file sequential number. In case the user needs to remove (erase) the file configured on the «Trash bin» icon just opt for removing the “n” file from the configMap.File name: On this space the user must inform the file name that is created on the recipient operational system that supports the deployment execution. It is important to remember that this name, and its respective extension, must follow the rules of file naming of the recipient operational system, therefore must contain only ASCII default characters.
Atenção
There must not be used the letters with accents (á, é, í, ã, õ, ç, among others), there may be an error on the file creation on the operational system.
File content: On this blank the user must type the named file content, on the previous blank. This content that must be informed according to the technical necessity and the objective of this configMap.
By default is presented only the visualization of some lines on the file content, in case the content is bigger than the blank, the user can position the mouse on the inferior right corner, until the mouse cursor changes to a double diagonal arrow . Therefore, allowing the user to redimension the space of the listed content and, accommodate the size that is adequate to the user, for better viewing this blank.
Add configMapbutton: After the user informs the necessary configMap file(s), the user must click with the mouse over the buttonAdd configMap, for the Mangue.io platform to perform the creation of the referred file(s) on the recipient operating system environment. After this action over this button the platform closes this window and returns to the screen where the configMap list is presentes.
Cluster Events
Through this menu option, the Mangue.io platform presents all the events that occurred on the cluster and namespace selected on the gear tab «Configuration Selection». For each selection of contract/cluster/namespace the events list is automatically updated.
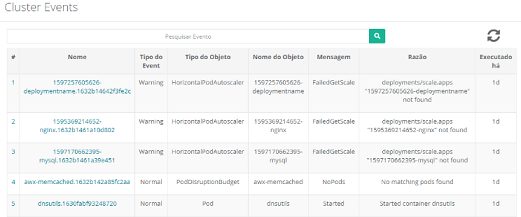
Below the content description of each column presented on the list:
#: Event’s sequential number on the presented list;
Name: Event name the Mangue.io platforms generated for the deployment;
Type of event:
Describes the type of event occurred, and can be listed the following types of events:
Normal;
Warning.
Type of object: Describes which configured object on the Mangue.io platform originated the listed event. The identification of the type of object, allows the user to identify this origin so it can have access to the object and act on the event resolution. It can be through the object redefinition, or opt for its removal. The types of object can be some of the listed below:
Deployments;
Daemonsets;
Horizontal Autoscaler;
Pods;
Statefulsets;
Updates;
Services;
Ingress;
StorageClass;
PersistentVolumes;
PersistentVolumesClaim.
Object name: Name of the event resource.
Mensage:
Pulled;
Created;
Started;
NoPods;
FailedGetScale;
ProvisioningFailed;
FailedBinding.
Executed in: Informs how long ago the event happened.
The following image is a cutout of the elements positioned above the table, there are three actions different and available to the user:

Search action: In case the list presented on this screen is too long (occupying more than one page), there is a blank where it is possible for the user to make a search with the desired event name. They just need to inform part of the name and click
Enteror click on the icon with the «Magnifying glass». As a result of this search only comes up the events that contains the searched key-word;Update action: Just click on the icon
so the Mangue.io update the interface with the most recent values of the events table;
Cron Jobs, Jobs
On this menu option, the user can observe two distinct functions of the Mangue.io platform, they are jobs and cron jobs. The user views the list of all jobs and cron jobs, the list presents what is programmed for the contract, cluster and namespace selected on the gears tab «Configuration Selection». For each contract/cluster/namespace selection the list is automatically updated.
A. Cron Jobs
The Cron Jobs are useful to create periodic and recurring tasks (jobs), such as execute backups or send emails. The Cron Jobs can schedule individual tasks for a specific time, as well as programming a job for when its cluster is probably idle.
The Mangue.io platform lists all the cron jobs configured in its environment:
Below the content description for every column presented on the list:
#: Cron job’s sequential number on the presented list;
Name: Cron job name the Mangue.io platform generates for the deployment;
Schedule: Shows the schedule configuration (date and time) programmed for executing this cron job;
Duration: Presents the cron job duration time;
Actions: This column presents the
Actionbutton when clicked, displays the option to delete CronJob as shown in the following picture:
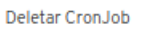
B. Jobs
A job creates one or more pods and guarantees that one of their specific numbers is closed with triumph. As the pods are successfully concluded, the job tracks the well successful conclusions. When a specified number of well successful conclusions is reached, the task (that is, Job) is concluded. Excluding a job cleans all the created pods.
The user can also configure a job for it to be executed, in parallel, in various pods.
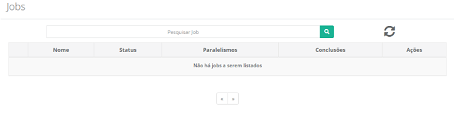
Below the content description of each column presented on the list:
Name: Job name the Mangue.io platform generates for the deployment;
Status: This column presents three possible values:
COMPLETED: Job executed with success;
IN PROGRESS: Job being executed;
FAILED: Job failed on the execution.
Parallelism: Number of pods for parallel execution;
Conclusions: Well successful conclusions;.
Actions: This column presents the
Actionbutton when clicked, it displays the option to delete the job, as shown in the figure:

Invoicing
This Mangue.io platform option is a great ally to the companies” Financial Governance. Few tools available on the market currently present the computing infrastructure consumption in real values, to support a serverless environment based in containers (Kubernetes).
The term serverless may take a false notion that this environment does not generate computing infrastructure costs, but any software application always needs a computing resource (CPU, memory, disk, operating system - OS).
For this software to be executed each item loads its cost of use, storage licensing (OS and softwares) and must be calculated day to day, for it to meet the criteria and policies of the Cost Governance and Financial Governance.
The Mangue.io platform has a database that accumulated month-to-month infrastructure consumption values, since the moment of its installation. This database is calculated day-to-day and accumulated the consumption values, according to the formula calculation presented on the topic «Cluster Consumption Value Calculation». By selecting this menu option the Mangue.io platform presents the following screen:
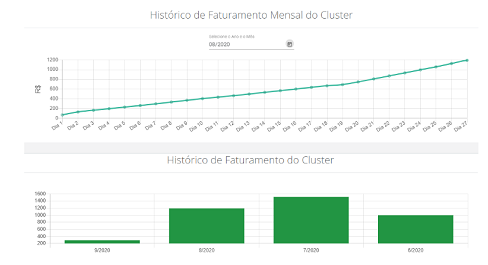
The Mangue.io platform presents the cluster and namespace values selected on the gears tab «Configuration Selection». For each selection of a new contract/cluster/namespace the values and graphs are automatically updated.
This screen is divided in two different sections, next is the detailing of each section.
Consolidated Report
This screen presents information about the monthly consumption of clusters, the user can view the price of each cluster on the pie graph present on the image below. As well as it is possible to view the consumption per user, this only occurs when the deployment is created through the Mangue.io, once it is stored on the deployment the responsible user information for its creation.
By selecting a cluster the information on the screen is reloaded according to the selected cluster, this includes both the graphs that inform the price per cluster and user, as well as the table with details about the application costs.
By default the consult is done considering all the cluster namespaces, but the user can filter by a specific namespace clicking on Select a namespace the information on the screen are reloaded as it is on the previous item, distinguishing for returning only the selected namespace values.
Still on this screen is possible to visualize a details list about the application costs, as can be seen on the image below:
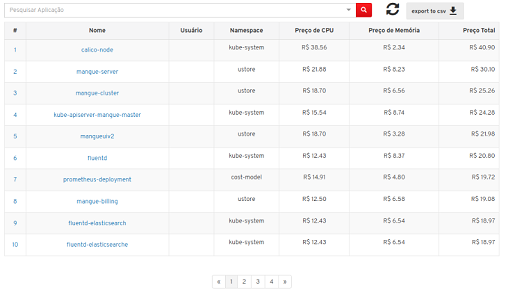
Name: This column presents the deployment name, reminding that for the deployment to appear here it needs to be in a cluster with the “ticket” enabled;
User: This column presents the user responsible for the application creation;.
Namespace: This column presents the namespace which the application belongs;
CPU price: This column presents the cost per application CPU corresponding to the selected month;
Memory price: This column presents the cost per application Memory corresponding to the selected month;
Total price: This column presents the sum of CPU and Memory price.
There is still the possibility to export the information corresponding to the table above, in csv format, through the functionality “export to csv” represented by the following button  , that when clicking the user can download the file right after.
History
The CPU resources and cluster memory consumption is presented in a graph format named as “Cluster Invoicing History”, as the following image:
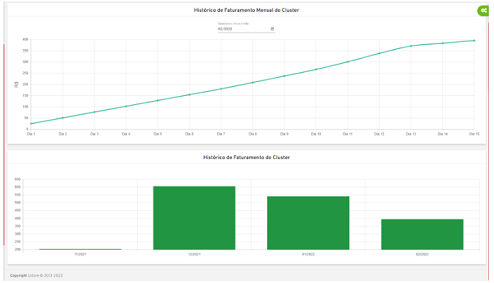
A. Monthly Cluster Invoicing History
This section presents a graph with the evolution of CPU and cluster Memory resource consumption value, to support and execute all the Workloads contents (Deployments, Statefulsets, Horizontal Autoscaler, Pods, Statefulsets).
The user may select the period which they desire to visualize the values, just needing to select the month and year presented right above the graph:

By clicking on the calendar icon, the Mangue.io platform presents an annual selection screen, where the user may choose which year they wish to view:
As soon as the calendar is clicked, it is possible to select the desired year on the Mangue.io platform, according to the image of the screen above. Next, the user may select the month they wish to visualize and its accumulated values:
As soon as the user selects the month, the Mangue.io platform indicates the process of search and value calculation of month and year selected. This process may take a few seconds and the user may follow this process evolution, monitoring a “black line” that appears from the left to the right on the top of the internet browser area.
The minute the line fills in at the top of the browser area, the Mangue.io platform updates the graph of the screen with daily values of the month and year selected.
It is important to mention the daily values presented reflect until the current day, in other words, if the user desires to consult the month values, and current month is found (for example) on the first fortnight, the graph represents only from the first until the 15th day of the current month.
This graph represents an evolution line of the computing infrastructure consumption value and can be comprehended as a mathematical progression. In other words, is the consumption value of the previous day added to the current day consumption and, then, successively.
For each beginning of the month, the value is “zeroed” starting a new calculation cycle of the computing infrastructure for the month period, until the current day. This way, the value of the first day of the month can not be presented immediately, because the Mangue.io platform needs to compute the value of the day after 24 hours of the first day - the value of the current day is presented after 24 hours.
The graph line may present “peaks” and “valleys” due to several factors, therefore must be taken into consideration the environment in its totality. Consumption increase can be recurring with the launch of Horizontal Autoscalers, Migrations, Updates, Cron Jobs creation of new applications, deployment among others.
All the situations listed above are potential causes of computing infrastructure consumption increase and the evolution due to total values of this graph.
B. Cluster Invoicing History
This graph presents the month-to-month accumulated consumption of the last four (04) months of the period the user is found.
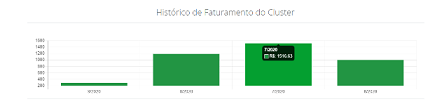
On the figure above, can be seen the example of how the Mangue.io platform presents the cluster infrastructure consumption values. This graph exhibits the last four months of consumption.
The current month’s accumulated value represents the consumption of the first day of the month until the consult day; this way, in case the current day is the first week of the month, the accumulated value represents the week’s consumption.
It is important to mention, the Mangue.io platform zeroes all the values of the month on the first day of each month. And starts the sum (mathematical progression) until the last day of the month (day 30 or 31 - except the month of February).
On the vertical axis, are presented the maximum rounded value for the next value above the maximum, in a period. For the user to identify the correct value, just position the mouse pointer over the bar of the desired month, for the Mangue.io platform may present the detailed value of the month in which the mouse cursor is positioned.
C. By Tags
The Mangue.io platform allows the Kubernetes application to have Tags, composed by a set of key and value, with the objective to group similar applications and the objective of viewing their invoicing.
The Tags can be created or associated with an application during the creation process of an application, according to the demonstration on the «New Application» section on Catalog, or in an already existing application, demonstrated on the «Change Tags» section in Deployments.
The Invoicing by Tags screen is separated in two sections:
Monthly invoicing by tags history;
Tags details.
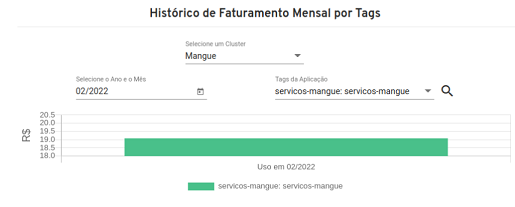
On the Monthly Invoicing by Tags History section, the user must first select a Cluster, so the platform can load the Cluster Tags. After that, the user may select the desired invoicing period and the Tags to be exhibited in graph and on the Tags Details section.

On the Tags Details section, is exhibited a list with all of them or only the selected Tags on the Monthly Invoicing by Tags History section. On the Tag detailing, is presented a list of applications with Tag and a graph with the Tag invoicing in the last 30 days.
The user can exclude a Tag clicking on the button, on the Tag detailing.
D. Alerts
Through alerts, it is possible for the user to be notified when reaching the established budget for a deployment or set of deployments, when grouped in tags. Besides being able to configure the actions that must be executed when the budget for these resources is achieved. This makes it possible for the user to have more control over the cost of each service.
As viewed on the following images, a card displays «Alerts» and the other «Webhooks», the details of each one of them are described on the sequence:
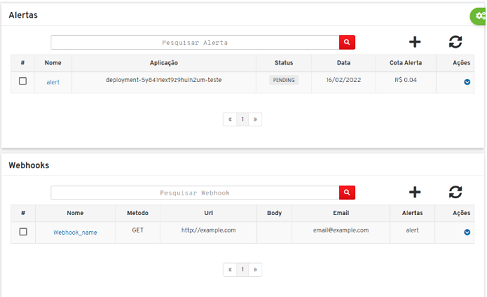
Alerts: Shows an alert list, with the following columns:
# actionable column: This column presents an alternative way to remove (erase) various rows in a single command. Each row is represented by a selectable icon
.When the user choses a line or several, the Mangue.io platform presents the icon(s) above this column, they represent the user’s actions to be executed once for all the selected lines.
In this case the «Trash bin» icon
is presented, which allows to remove all the items indicated by the user with a single command;Name: This column presents the alert name defined on its creation moment. When selecting this blank is presented the information screen about the alert, on it the user can visualize a progress bar, actions and webhooks selected in the creation moment. As can be seen on the image below:
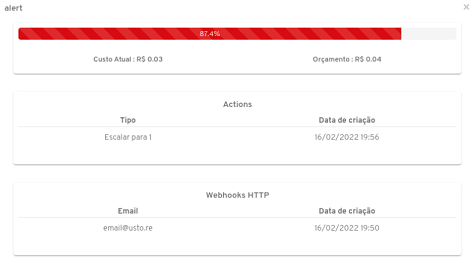
Progress bar: Corresponds to the current value of the deployments associated with the alert, having as 100% the alert budget value;
Actions: Action executed in the moment in which the deployments associated to an alert reach the budget price;
Webhooks: Webhook executed in the moment in which the deployments associated to an alert reach the budget price;
Application: This column presents the deployment or set of deployments selected for the corresponding alert in the moment of the alert creation;
Status: This column presents two possible values, “DONE” and “PENDING”:
DONE: Indicates the alert has already reached the budget price and that was executed, shooting the webhooks and configured actions;
PENDING:Indicates the alert was not executed;
Date: This column presents the creation date of the alert;
Alert quota: This column presents the budget price defined for the alert;
Actions: This column presents the action button

Delete Alert: When the user selects this action the Mangue.io platform requires a confirmation from the user to remove (erase) the desired alert from the platform database:
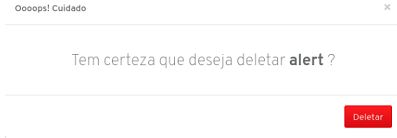
On this alert sections it is possible to visualize the add alert icon, as the following example
Details: On this step is required information about the alert specifically:
Name: Blank corresponding to the alert name;
Description: Blank corresponding to the alert description;
Type: There are two possible values for the type, by Tag to select a set of deployments, and by Deployment to select only one deployment.
By selecting a tag or deployment occurs a search of the total cost value corresponding to the deployment or selected tag, this value is presented on the Current Cost blank presented on the screen;
Deadline: This blank may be defined a deadline for the alert execution, the alerts with the pending status are not executed after the deadline established for the alert;
Budget: On this blank may be informed the alert budget price, when the total cost of the selected deployments sum reaches the value informed the alert is executed.
Atenção
The Budget Value needs to be bigger than the Current Cost value.
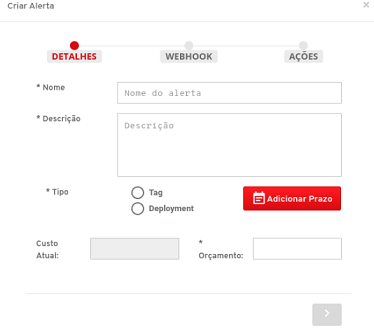
Webhook: On this step there is a list of webhooks, the user can select none or several. When selecting a webhook it is listed below for the user to inform the type of return executed, being able to choose between HTTP or e-mail.

Actions: On this step it is possible to select an action to be executed in the moment of alert execution, there are three values the user can select for action, as the example on the image below:
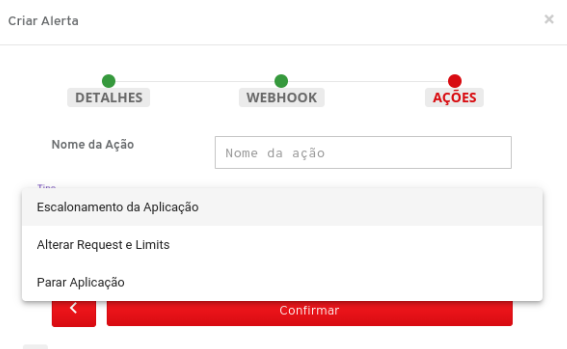
Application Escalation: This action allows the user to configure the switch of quantity of replicas in execution of the selected application. The moment in which the alert is executed, makes it possible to decrease/increase the quantity of instances of an application, in an aligned way to the current cost of the same application.
Change Request and Limits: This action allows the user to change the request and limit of the selected applications, by the moment in which the alert is executed.
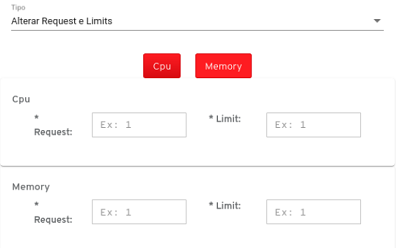
Stop Application: It is also possible to stop the selected application, by the moment in which the alert is executed. For that, it is necessary to click on
Confirm application stop.

Nota
At least one webhook or one action must be informed to enable the alert creation.
Webhooks: The webhook is a form of sending information to some recipient when an event happens, in this case when the deployments related to the alert reach the budget price defined on the alert creation, the Webhook shoots the information. The Mangue.io provides two forms of sending information: through the HTTP protocol, and/or through the email.
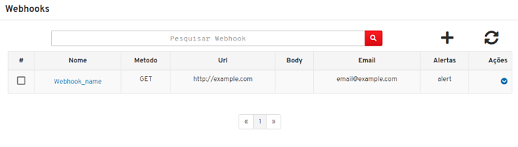
# actionable column: This column presents an alternative way to remove (erase) various rows in a single command. Each row is represented by a selectable icon
When the user choses a line or several, the Mangue.io platform presents an icon(s) above this column, they represent the user’s actions to be executed once for all the selected lines.
In this case the «Trash bin» icon
Name: This column presents the webhook name defined in the creation moment;
Method: This column presents the HTTP method selected in the webhook creation moment, there may be the following values: “GET”, “POST”, “PUT”, “DELETE”, “PATCH”;
Url: This column presents the recipient url to send the message;
Body:This column presents the HTTP requisition body;
Email: This column presents the recipient email to send the message to the corresponding webhook;
Alerts: This column presents an alerts list that are related to the corresponding webhook;
Actions: This column presents the
Actionbutton
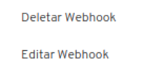
Delete Webhook: When the user selects this action the Mangue.io platform requires confirmation from the user to remove (erase) the desired alert from the database:
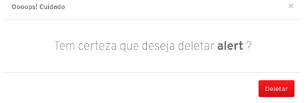
Edit Webhook: When the user selects this action the Mangue.io platform presents the form present on the image below with the webhook information, for the user to edit.
Name: The webhook name must be informed;
Method: Indicates the HTTP requisition method;
URL: Informs the HTTP requisition url;
Body: Communicates the HTTP requisition body;
Email: Indicates the email to send messages;.
Menssage: Expresses the message that is sent to the email informed on the previous blank.
On this webhook section it is possible to visualize the add icon, as the following example .
Atenção
The webhook addition form is the same one presentes for edition.
Recommendations
The Mangue.io platform may make recommendations to optimize the CPU and Memory usage of the Cluster applications, with the objective to avoid waste. On Kubernetes makes the resource allocation to an application using the following concepts:
Request: Minimal quantity of allocated resources to the application.
Example: an application with memory request of 256 MB always has allocated that memory quantity, even if the application always use only 20MB;
Limit: In case the application needs to use more resources than specified on Request, the Kubernetes tries to allocate more resources in case the machine does not have it available. It is possible to limit the resource quantity the Kubernetes tries to allocate the application using Limit.
Example: an application request of 256 MB always has 256 MB allocated, if it needs more memory it can be allocated until 512MB and in case it is not enough the application runs out of memory, causing slowness or instability on the application.
The platform makes the optimization by analyzing the history metrics of CPU and memory usage, therefore verifying if an application is with more resources allocated than necessary or with insufficient resources to keep the stability.
The recommendations page is exhibited in a list with the applications on namespace and current Cluster, and it is possible to search recommendations through the application name.
Below is described the information presented on the scheduled tasks table.
#: Sequential number recommendation registered on Mangue.io platform;.
App: Application name with the recommendation;
CPU Current /Ideal Request: Indicates the current value and recommended CPU Request. In case there is no recommendation on this column “- / -” is exhibited;
CPU Limit Atual/Ideal: Indicates the current value and recommended CPU Limit. In case there is no recommendation on this column “- / -” is presented;
Memory Request Current /Ideal:Indicates the current value and recommended Memory Request. In case there is no recommendation on this column “- / -” is shown;
Memory Limit Current /Ideal: Indicates the current value and recommended Memory Limit. In case there is no recommendation on this column “- / -” is presented;
Actions: This column has the following elements:
Applybutton, when clicked applies the recommended values on the application;Actionbutton when clicked, it presents the following option:

Discard the current recommendation: When selecting the option to discard, the recommendation selected is removed, and a previous recommendation is shown, in case there is one.
More Suggestionsbutton: when clicked redirects to a page where is presented a list with all the recommendations generated previously.
Permissions
All the points described on this segment are stored on the database that supports the Mangue.io platform installation. This database, and its content, must be managed and changed at the servers Linux operating system prompt (virtual machines) that support the Mangue.io platform infrastructure.
During the process of default implementation on the Mangue.io platform, it is installed a database manager (MariaDB / MySQL) and the content of this database and its registers referring to Clusters, Permissions, Billing, Contracts, ClusterRole, ClusterRoleBinding, Service and ServiceAccount, are populated during the post-installation software process.
It is not object of this document do described the inclusion process of new registers on the Mangue.io platform database, get in touch with the Ustore support area so you can have access to the document “Mangue.io Installation Manual (see item: Default Content from the Database)”.
On the next screens are described how the platform interface presents the database content through the Mangue.io HTML interface.
Contract
Below is the screen that presents information about the contract selected on the configuration menu, it is possible to visualize the information about the contract and information about the users of the contract.
A. Contract information
It is possible to visualize the contract administers, price per CPU and price per memory defined for the contract.
B. Users information
On this section are listed the information about the contract users, and the level of permission of each user. The permissions per user reflect the level of permission attributed to a user on the uCloud, following the example of the table below:
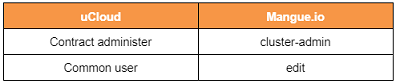
In case some permission change had happened in some of the users whether it is a user removed from the contract, user added to the contract, or even the same level of permission altered, there is a routine to synchronize the users permissions with the uCloud, reflecting such changes on the Mangue.io.
Nonetheless, in case there is interest of executing the permissions synchronization in that exact moment, there is a icon on the right side  , when clicked it is executed the same function to synchronize permissions that would have been by the routine.
Through this users list it is possible to extract the following information:
Login: This blank presents the user login that was provisioned on the Mangue.io platform database;
Role: This column presents the authorization profile (role) of the provisioned user;
Service Account: This column presents the service account associated to the user;
Cluster Role: This column presents the cluster role associated to the user;
Actions: This column presents the
Actionbutton when clicked, it displays the following option:

Delete Permissions: By selecting this action the corresponding user to the selected line permissions is removed. The platform requests a confirmation to delete the user permission on the Mangue.io, as the image below:
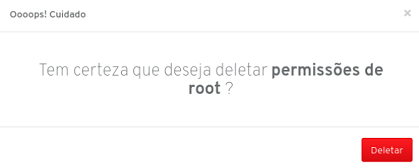
Roles
Access control based on functions/profile (Role Based Access Control - RBAC) is a method of regular access to computer resources or networks based on the functions of individual users in its organization.
A RBAC role (permission/profile) or ClusterRole contains rules that represent a set of permissions.
Nota
A role always defines permissions in a specific namespace; when creating a rule it must specify the namespace to which it belongs.
A. Section: Roles
In this section the user may see a list of all the existing roles in the cluster that was selected on the gears tab «Configuration Selection».
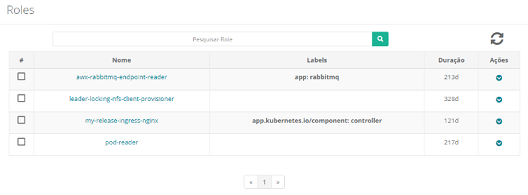
# actionable column: This column presents an alternative way to remove (erase) various rows in a single command. Each row is represented by a selectable icon
.When the user choses a line or several, the Mangue.io platform presents the icon(s) above this column, they represent the user’s actions to be executed once for all the selected lines.
In this case the «Trash bin» icon
is presented, which allows to remove all the items indicated by the user with a single command;Name: On this column it presents the role name added by the user;
Labels: Labels are used to specify the objects attributes identification that are significant and relevant and present on the role yaml syntax;
Duration: This column presents the elapsed time in days since the moment of the initial application of this role;
Actions:This column presents the
Actionbutton when clicked, it displays two options:
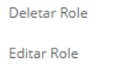
Delete Role: When the user selects this action they remove the role from the cluster that was selected on the gears tab
Atenção
It is worth remembering that this action is irreversible and definite. The Mangue.io platform requires the user confirmation to remove (erase) the desired group from the database:
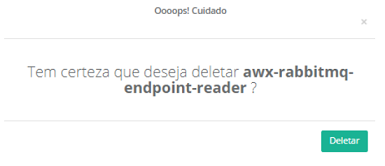
In case the user had executed this action by mistake, it is necessary to register the group on the Mangue.io platform database through any SSH tool; The action of including configuration on the database is made through the command line on the virtual machine Linux operating system that supports the execution of the Mangue.io platform.
Edit Role: It is recommended that only users experts in YAML syntax make the alterations in a role, because the codification (or alteration) of the syntax in a wrong form may result in the access lost to all the existing clusters” environment.
This option opens a screen of role edition using the YAML syntax code, as on the example of the screen below.
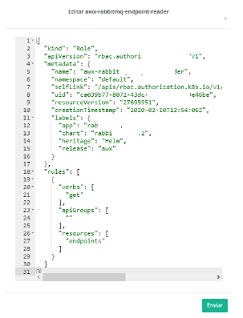
The user must start clicking with the mouse on the gray area next to the number of the line they wish to edit, before starting to type their YAML code. For each new line the user must use the Enter key to start a new line, using their own development experience to structure their syntax code line by line.
Through this option the user can enter (or edit) with a YAML code to create, edit the role on the Mangue.io platform.
After editing a role the user must click on the green button Send for all the code to be sent and applied to the cluster that was selected on the gears tab «Configuration Selection».
B. Section: Role Bindings
A linking of function/profile (rolebinding) concedes the permissions defined in a role to a user or set of users. It contains a list of subjects (users, groups or service accounts) and a reference to the role that is being conceded. A RoleBinding concedes permissions within a specific namespace, while a ClusterRoleBinding concedes this access to the whole cluster.
A RoleBinding may make reference to any role in the same namespace. As an alternative, a RoleBinding may make reference to a ClusterRole and link a ClusterRole to the RoleBinding namespace. If you wish to link a ClusterRole to all the namespaces in its cluster, use a ClusterRoleBinding.
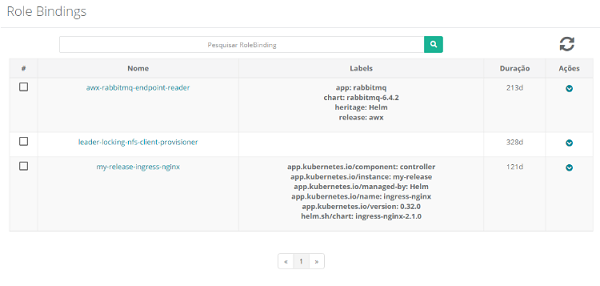
# actionable column: This column presents an alternative way to remove (erase) various rows in a single command. Each row is represented by a selectable icon
.When the user choses a line or several, the Mangue.io platform presents the icon(s) above this column, they represent the user’s actions to be executed once for all the selected lines.
In this case the “Trash bin” icon
is presented, which allows to remove all the items indicated by the user with a single command;Name: On this column is presented the rolebinding name added by the user. When clicking with the mouse over the name, the Mangue.io platform presents a screen with the content(s) of the configMap file(s).
By default it presents only the visualization of a line from the file content, in case the content is bigger than the blank, the user can position the mouse on the inferior right corner, until the mouse cursor changes for a double diagonal arrow
, that allows the user to redimension the listed content blank size, for a better view of this blank.Labels: Labels are used to specify the objects attributes identification that are significant and relevant and present on the role yaml syntax;
Duration: This column presents the time elapsed in days since the moment of its initial application of this rolebinding;
Actions: This column presents the
Actionbutton when clicked, it presents two options:
Delete RoleBinding: When the user selects this action they remove the rolebinding from the cluster that was selected on the gears tab
The Mangue.io platform requests the user confirmation to remove (erase) the desired rolebinding from the database:
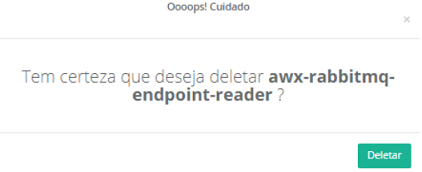
In case the user had executed this action by mistake, it is necessary to register the rolebinding on the Mangue.io platform database through any SSH tool; The action of including configuration on the database is made through the command line on the virtual machine Linux operating system that supports the execution of the Mangue.io platform.
Edit Rolebinding: It is recommended that only users experts in YAML syntax make the alterations in a rolebinding, because the codification (or alteration) of the syntax in a wrong form may result in the access lost to all the existing clusters” environment.
This option opens a rolebinding edition screen using the YAML syntax code, as the example of the screen below:
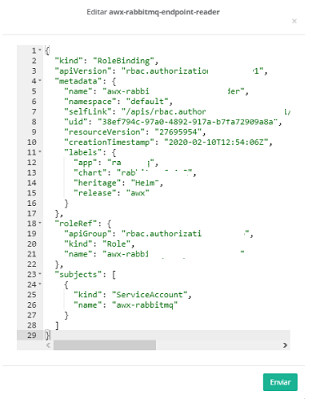
The user must start clicking with the mouse on the gray area next to the number of the line they wish to edit, before starting to type their YAML code. For each new line the user must use the Enter key to start a new line, using their own development experience to structure their syntax code line by line.
Through this option the user can enter (or edit) with a YAML code to create, edit the rolebinding on the Mangue.io platform.
After editing the rolebinding the user must click on the green button Send for all the code to be sent and applied to the cluster that was selected on the gears tab «Configuration Selection».
Service accounts
When a user accesses the cluster, they are authenticated by APIServer as a specific user account (currently, generally is admin, unless the cluster administrator has personalized their cluster). The process in containers within the PODs can also get in touch with APIServer. When they do, they are authenticated as a specific service account (for example, default).
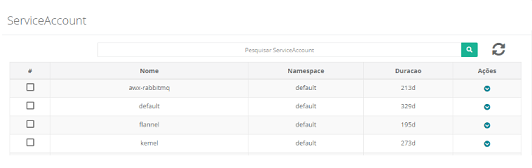
# actionable column: This column presents an alternative way to remove (erase) various rows in a single command. Each row is represented by a selectable icon
.When the user choses a line or several, the Mangue.io platform presents the icon(s) above this column, they represent the user’s actions to be executed once for all the selected lines.
In this case the «Trash bin» icon
is presented, which allows to remove all the items indicated by the user with a single command;Name: On this column, it is presented the serviceaccount name added by the user;
Namespace: Informs the namespace in which the serviceaccount was created;
Duration: On this column presents the time elapsed in days since the moment of the initial application of this serviceaccount;
Action: This columns presents the
Actionbutton when clicked, it presents a single option:
Delete ServiceAccount: When the user selects this action they remove the serviceaccount of the cluster that was selected on the gears tab
The Mangue.io platform requests confirmation from the user to remove (erase) the serviceaccount desired from the database:
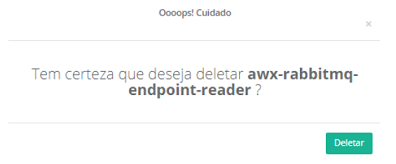
In case the user had executed this action by mistake, it is necessary to register the serviceaccount on the Mangue.io platform database through any SSH tool; The action of including configuration on the database is made through the command line on the virtual machine Linux operating system that supports the execution of the Mangue.io platform.
Cluster Role
A RBAC role or ClusterRole has rules that represent a set of permissions.
ClusterRole, on the other hand, is a resource with no name space. The resources have different names (Role and ClusterRole) because a Kubernetes object always needs to have a namespace or not; it cannot be both.
ClusterRoles has several uses, it can be used to:
Define permissions in resources with namespace and be conceded within the individual namespaces;
Define permissions in resources with namespaces and be conceded in all the namespaces;
Define permissions in resources with the cluster scope.
If you want to define a function in a namespace, use a role; if you want to define a role in the whole cluster, use a ClusterRole.
The user notes that this screen has multiple sections, each section is described below respectively.
A. Section: Cluster Roles
On this screen the Mangue.io platform presents a list of all the Cluster Roles configured and the time since its creation.
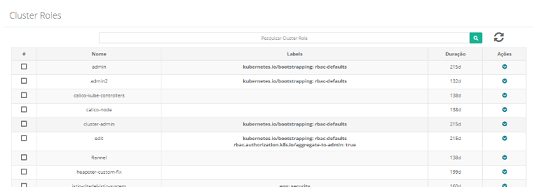
# actionable column: This column presents an alternative way to remove (erase) various rows in a single command. Each row is represented by a selectable icon
.When the user choses a line or several, the Mangue.io platform presents the icon(s) above this column, they represent the user’s actions to be executed once for all the selected lines.
In this case the «Trash bin» icon
is presented, which allows to remove all the items indicated by the user with a single command;Name: On this column, it is presented the Cluster Roles name added by the user;
Labels: Labels are used to specify the objects attributes identification that are significant and relevant and present on the role yaml syntax;
Duration: On this column presents the time elapsed in days since the moment of the initial application of this Cluster Roles;
Action: This columns presents the
Actionbutton when clicked, it presents a single option:

Edit Cluster Role: It is recommended that only users experts in YAML syntax make the alterations in a Cluster Role, because the codification (or alteration) of the syntax in a wrong form may result in the access lost to all the existing clusters” environment.
This option opens a Cluster Role edition screen using the YAML syntax code, as the example on the screen below.
The code of a Cluster Role can be long, and its screen very long, the example of some lines of this code on the screen that follows.
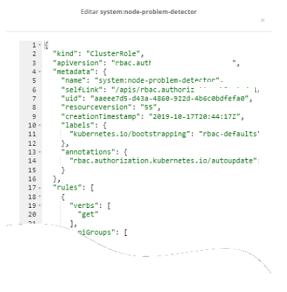
When clicking with the mouse on the gray area next to the number of the line that the user wishes to edit, next the typing of their YAML code may start.
At each new line the user must click Enter to open another line.
It is indicated to the user to use their very own development experience to structure the syntax of their code line by line.
Summarizing, the Cluster Role provides the option to create or edit a YAML code on the Mangue.io platform.
After editing the Cluster Role the user must lick on the green-colored button Send for the entire code is sent and applied to the cluster selected on the gears tab  «Configuration Selection».
B. Section: Cluster Role Binding
On this screen the Mangue.io platform presents a list of all the Cluster Role Binding configured and the time since its creation.
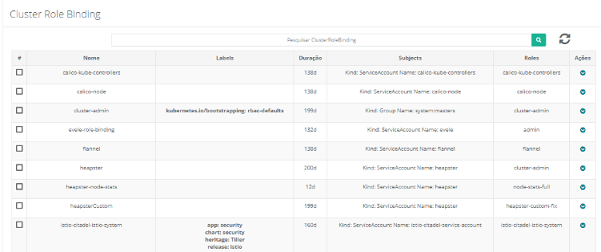
# actionable column: This column presents an alternative way to remove (erase) various rows in a single command. Each row is represented by a selectable icon
.When the user choses a line or several, the Mangue.io platform presents the icon(s) above this column, they represent the user’s actions to be executed once for all the selected lines.
In this case the «Trash bin» icon
is presented, which allows to remove all the items indicated by the user with a single command;Name: On this column, it is presented the Cluster Role Binding name added by the user;
Labels: Labels are used to specify the objects attributes identification that are significant, relevant and present on the role yaml syntax;
Duration: On this column presents the time elapsed in days since the moment of the initial application of this Cluster Role Binding;
Action: This columns presents the
Actionbutton when clicked, it presents a single option:

Edit Cluster Role Binding: It is recommended that only users experts in YAML syntax make the alterations in a Cluster Role Binding, because the codification (or alteration) of the syntax in a wrong form may result in the access lost to all the existing clusters” environment.
This option opens a screen of Cluster Role Binding edition using the YAML syntax code, as the example on the screen below:
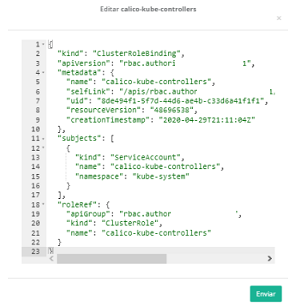
When clicking with the mouse on the gray area next to the number of the line that the user wishes to edit, before starting the typing of their YAML code. At each new line the user must click Enter to open another line.
It is indicated to the user to use their very own development experience to structure the syntax of their code line by line.
Summarizing, the Cluster Role Binding provides the option to create or edit a YAML code on the Mangue.io platform.
After editing the Cluster Role Binding the user must click on the green-colored button Send for the entire code is sent and applied to the cluster that was selected on the gears tab «Configuration Selection».
C. Section: Pod Security Policy
Pod Security Policy is a Kubernetes resource that allows the user to limitate the applications created for a specific ServiceAccount, or all. That being possible, for example, prohibits that a ServiceAccount creates an application that uses the user root.
The Pod Security Policy screen is separated into two sections:
Pod Security Policy.
Cluster Role and Role Binding of Pod Security Policy.
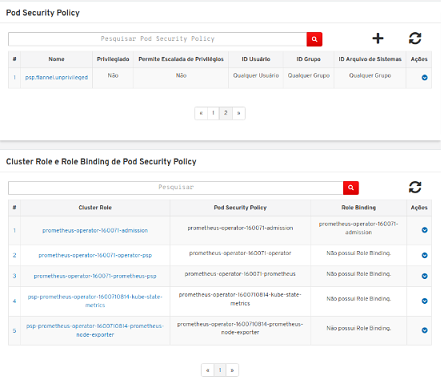
On the Pod Security Policy section is shown a list with the Cluster’s Pod Security Policy and is shown a bar search to search using the name.
Below we describe the information present on the Pod Security Policy table.
#: Pod Security Policy sequential number registered on the Mangue.io platform.
Name: Pod Security Policy name specified by the user during the creation.
Privileged: Allows that all created applications use resources and Kernel capacities of the Host machine.
Allows Privileges Escalation: Allows that the application created alters its user ID, making it possible that container’s sons processes get more privileges than the father privilege.
User ID: User ID range that the created applications may use on the execution.
Group ID: Group ID range that the created applications use on the execution.
Systems File ID: System File ID range that the create applications use on the execution.
Actions: This column presents the
Actionbutton when clicked, presents two options:
Create Cluster Role: When selecting the option to create a cluster role it is presented on the screen below, through which the user may create a Cluster Role for the Pod Security Policy.
Delete Pod Security Policy: When selecting the option to exclude is deleted the Pod Security Policy from the Cluster.
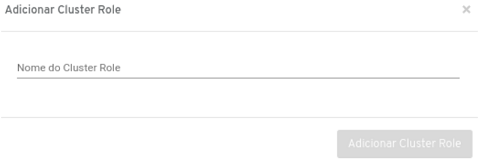
To create a Pod Security Policy it is necessary to click on the button, when clicking it is exhibited the screen below:
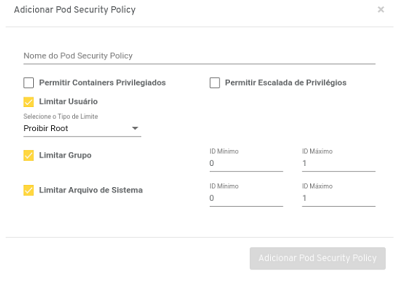
The blanks needed for the Pod Security Policy creation are the following:
Pod Security Policy Name: Pod Security Policy name to be created.
Allow Privileged Containers: Allows the creation of resources that use privileged containers, these containers may have access to the resources and Kernel capacities from the Host machine.
Allow Privilege Escalation: Allows that the created application alters its User ID, making it possible for the containers” sons processes to get more privileges than the father process.
Limit User: In case it is selected a dropdown list is displayed, with the options to:
Prohibit Root: this option allows the creation of an application that uses any user ID, with the exception of the root user ID.
Limit per User ID: this option allows the creation of an application that uses only a specified User ID range.
Limit Group: Allows only applications that use the range of specified Group ID.
Limit System File: Allows only applications that use the range of specified System File ID.
After filling out all the mandatory blanks, the Add Pod Security Policy button is available and when the user clicks on it the platform creates the Pod Security Policy and shows a status message.
On the Cluster Role and Role Binding section of Pod Security Policy is shown a list with all the Cluster Role and Role Bindings of the Pod Security Policy and is shown a search bar to search using the name of resources.
Below the description of information present on the Pod Security Policy table.
#: Cluster Role sequential number registered on the Mangue.io platform.
Cluster Role: Cluster Role name specified by the user during the creation.
Pod Security Policy: Pod Security Policy name associated with the Cluster Role.
Allows the Privilege Escalation: Allows that the application created alters its User ID, making it possible the container’s sons process get more privileges than the father process.
Role Binding: Role Binding name associated with the Cluster Role.
Actions: This column presents the
Actionbutton when clicked, presents the following options:
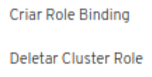
Create Role Binding: When selecting the option to create cluster role is presented the screen below, through which the user may create a Role Binding associating the Cluster Role with the ServiceAccounts.
Delete Role Binding: In case there is a Role Binding associated with the Cluster Role it is exhibited the option to delete the Role Binding, when selecting the option the Role Binding is deleted.
Delete Cluster Role: When selecting the option to exclude is deleted the selected Cluster Role.
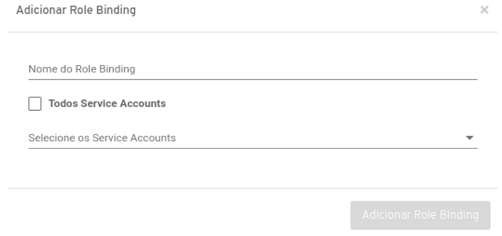
Integrations
Through this Integrations menu, the user may connect the Mangue.io platform with entities, services and external providers. These integrations allow the user to expand the Mangue.io platform coverage connecting and integrating the current infrastructure, to which supports and executes the Mangue.io installation with the containers managers in public providers.
This menu comes with the purpose of treating other questions beyond the simple Kubernetes management, like for example:
Integration via containers command line executed in the cluster;
Clusters Kubernetes creation in the public clouds AWS and Google;
Import already existing clusters Kubernetes;
Import credentials for the cluster’s creation procedures in public clouds are more easily performed.
Creation of clusters on premise.
Clusters
The Integrations/Clusters menu allows the user to integrate the Mangue.io platform to an existing cluster, that may be active in another computing infrastructure, to the Mangue.io platform. Beyond that, this screen presents a list with the information of clusters integrated to the Mangue.io.
The Integrations/Cluster menu allows to make all the management and integration of Clusters Kubernetes managed by the platform through a user. In this menu, it is possible to provision clusters Kubernetes on the Amazon and Google (EKS e GKE) infrastructures, reminding that to provision these clusters is necessary to add a credential on the Integration/Credentials menu.
It is also possible to add a cluster Kubernetes that had not been provisioned on the platform, whether it is on its On Premise environment or in the cloud. It is important to highlight that the clusters that have the Kubernetes APIS modified, may not correspond positively to the Kubernetes APIS calls made by Mangue.io.
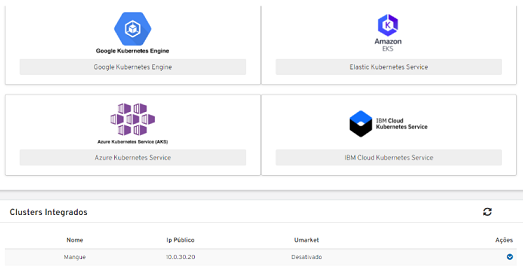
On the list it may find information of each cluster configured and integrated to the Mangue.io platform:
Name: On this column it is presented the name that was used to identify the Cluster during the process of configuration by the user.
Public IP: This column presents the information of the cluster’s Public TCP-IP Address. This is the address by which the cluster may be used to access the applications (deployments) that are being executed on this cluster.
Actions: This column presents the
Actionbutton when clicked, presents the actions two options:
Edit Cluster: On this option the user may edit the characteristics of an existing cluster and when selected the platform presents the screen below:
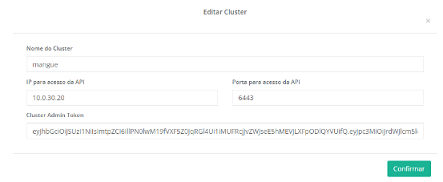
Cluster name: On this blank the user may alter the reference name with which cluster is configured.
IP for API access: On this blank the user may alter the Public TCP-IP Address so the cluster is possible to be accessed.
API access port: On this blank the user may alter the TCP-IP PORT so it is possible to access the cluster.
Cluster Admin Token: On this blank the user may alter the character chain (string) that was generated by the public provider with the objective to confirm and authenticate the configuration identity (token) with the cluster. In case it is necessary to alter this chain of characters, it is important to consult the process of identification generation (token) of each provider, or each container management environment, specifically.
Confirmbutton: The user must press this button after confirming all the altered blanks.
Delete Cluster: When the user selects this action they remove the cluster. The Mangue.io platform requires the user confirmation to remove (erase) from the Mangue.io platform:

In case the user has executed this action by mistake, it is necessary to include the cluster again on the Mangue.io platform. See the sequence of inclusion of a new cluster that is described in this document below.
The Mangue.io platform allows the user to integrate with the infrastructure of an existing cluster as well as implementing or creating a new cluster.
In the sequence the process of integration is described, it allows the user to add an existing cluster or a new one to the Mangue.io platform.
Integrate Cluster
To start the process of Integrating a Cluster the user must click with the mouse over the button on the left side so the screen presents the specific blanks.
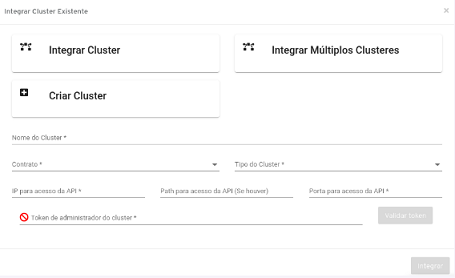
Cluster Name: On this blank the user must inform the reference name with which cluster is identified on the Mangue.io platform.
Contract:This blank is a dropdown list with the user’s contracts, when selecting, the Cluster is associated with the selected contract.
Type of Cluster: This blank is a dropdown list with the four available options on the Mangue.io platform. Currently available are public environments: Google Kubernetes Engine (GKE), Amazon Elastic Kubernetes System (EKS), Azure Kubernetes Service (AKS) and IBM Cloud (IKS). When selected, each one of the recipient options the Mangue.io platform behaves in the correct way to communicate and manage the cluster in the correct way.
IP for API access: On this blank the user must inform the Public TCP-IP Address so the cluster is possible to be accessed.
Path for API access: On this blank the user must inform the path used to access the Kubernetes’ API, in case there is.
Port for API access: On this blank the user must inform the TCP-IP PORT number so the cluster is accessed.
Cluster Admin Token: On this blank the user may alter the character chain (string) that was generated by the public provider with the objective to confirm and authenticate the configuration identity (token) with the cluster. In case it is necessary to alter this chain of characters, it is important to consult the process of identification generation (token) of each provider, or each container management environment, specifically.
Integrate button: When finalizing the filling of the blanks above, the user must click with the mouse on the green button
Integrateso the Mangue.io platform includes this cluster on the list presented on this screen.Action of updating: In case the Mangue.io interface does not present the list, the cluster newly configured, the user must click on the
icon so the application exhibits the updated list of this clusters” table.
Integrate Multiple Clusters
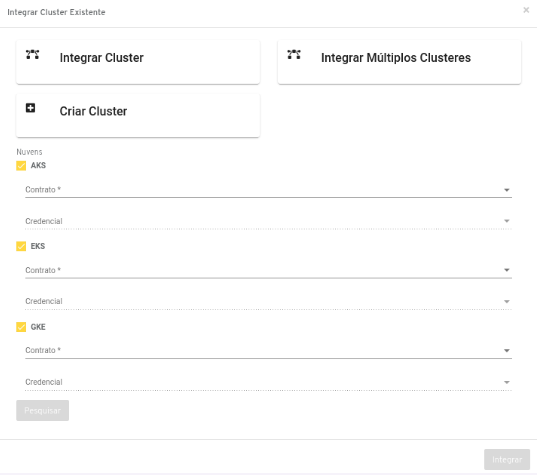
To start the process of Integrating Multiple Clusters the user must click with the mouse on the button on the right side so the screen presents the specific blanks.
On this screen the user may integrate several existing Clusters on the public cloud providers. They must select which they wish to search, next the following blanks are displayed:
Contract: This blank is a dropdown list with the user’s contracts, when selecting, the partform loads the credentials of the selected contract.
Credential: The user must select one of the access credentials registered on the Mangue.io platform to confirm their identity alongside the environment contracted with the public cloud.
After filling in all the blanks, the user must click on the Search button and the platform shows a dropdown list of the Clusters already existing on the selected platforms. The user must select the Clusters that are to be integrated to the platform, after selecting the Integrate button is available to be clicked.
Create Cluster on Premise
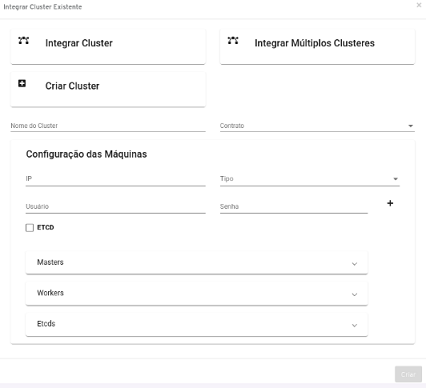
Through the Create Cluster button it is possible to create a cluster on premise, which the user can inform the IP, user, password and type (master, worker) of each one of the machines that together form the Kubernetes Cluster. For that it is necessary to fill out information such as:
Cluster name: On this blank the user must inform the reference name which the cluster is identified in the Mangue.io platform.
Contract: This blank is a dropdown list with the user’s contracts, the cluster is associated with the selected contract.
Machine IP: Determines the machine type, it can be worker or master:
Worker: These are machines responsible for receiving the tasks attributed from the node master, executing them and reporting the status to the node master, thus, they are the machines that execute the docker containers that have the applications.
Master: The node master is considered the Kubernetes cluster brain, because it is responsible for managing and controlling the nodes workers, making decisions about where and how to execute the applications.
User: The user is necessary to connect the informed machine on the IP blank.
Password: Necessary to log in with the user and IP informed on the previous blanks.
ETCD: It’s a checkbox space which if enabled, then that machine also works as ETCD. In case none of the machines informed have the ETCD enabled, then by default te node master machine also works as ETCD
It is necessary at least two machines for the cluster creation to occur with success. The machines need access to the internet. As well as it is recommended the minimum of 2 CPU, 4GB of memory and 80GB of storage per node.
When clicking on Create, a screen with the on premise cluster creation process console is shown, as the image below:
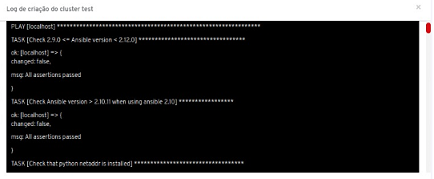
Simplified Process of Cluster Integration via Form
The Mangue.io platform allows to simplify the integration process with an existing cluster in the public cloud providers (Amazon, Google, Azure and IBM) through the form that directs the user to the filling of credentials and configurations in a very clear and simple way.
On the following screen the user can see that below each public service provider logo there is a button that presents the respective form of each provider:
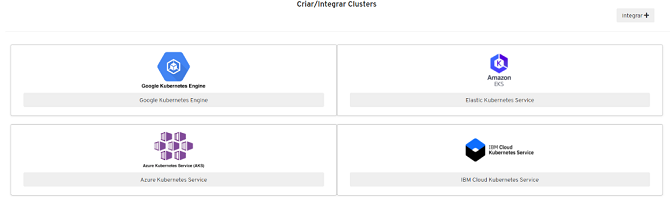
On the screens below is described the specific forms characteristics of each provider.
A. Google Kubernetes Engine – GKE
To perform an integration (via form) with a container manager existing on the Google provider, the user must click with the mouse cursor on the gray area below the Google Kubernetes Engine logo and the Mangue.io platform presents the screen below with the GKE form:
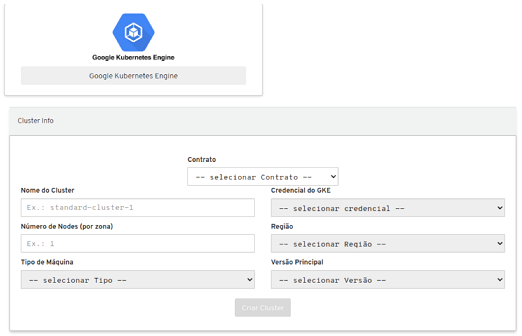
Contract: The user selects the contract for the platform to load this contract’s credentials.
Cluster Name: On this blank the user must fill in this blank with the cluster’s identification name for the Mangue.io platform.
GKE Credentials: The user must select one of the access credentials registered on the Mangue.io platform to confirm their identity alongside the environment contracted by the Google Cloud Platform. It is important to highlight that the specific documentation of each provider must be consulted about how to generate/create these credentials with permission to the provider’s containers management.
Number of Nodes (per zone): On this blank the user must inform the full number that defines the quantity of nodes desired for this cluster.
Region: On this blank the user must select from a dropdown list the regions available on the specific provider. In this case are listed only the global regions specified on the Google Cloud Platform.
Machine Type: On this blank the user must select from a dropdown list the type machine configuration (CPU, Memory, Disk or Template) available on the provider. In this case are listed only the Google Cloud Platform specified templates.
Main Version: On this blank the user selects the Kubernetes version available on the public cloud provider.
Create Clusterbutton: The user just needs to click on theCreate Clusterbutton, when all the configurations regarding all the nodes are finished. For the Mangue.io platform to add a new cluster to the internal infrastructure it must start this new cluster to the computing environment that is executed as one more containers (clusters) manager environment.Action of updating: The cluster creation depends on the public cloud provider, the status of the cluster creation can be followed in Tasks.
B. Elastic Kubernetes Service – Amazon EKS
To perform an integration (via form) with a container manager existing on the Amazon AWS provider, the user must click with the cursor on the gray area below the Elastic Kubernetes Service - Amazon EKS logo and the Mangue.io platform presents the screen below with the EKS form:
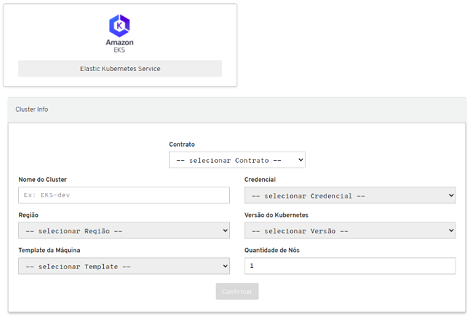
Contract: The user selects the contract for the platform to load their credentials.
Cluster Name: On this blank the user must fill in with the cluster identification name for the Mangue.io platform.
Credential: The user must select one of the access credentials registered on the Mangue.io platform to confirm their identity alongside the environment contracted with the Amazon Web Services - AWS. It is important to highlight that the specific documentation of each provider must be consulted about how to generate/create these credentials with permission to the provider’s containers management environment.
Region: On this blank the user must select from a dropdown list the regions available in the specific provider. In this case are listed only the global regions specified on the Amazon Web Services - AWS.
Kubernetes Version: On this blank the user selects the Kubernetes version available on the public cloud provider.
Machine Template: On this blank the user must select from a dropdown list the type of machine configuration (CPU, Memory, Disk or Template) available on the provider. In this case are listed only the specific templates from the AWS.
Quantity of Nodes: On this blank the user must inform the full number, necessary to the quantity of nodes for the cluster infrastructure.
Confirmbutton: The user just needs to click on theConfirmbutton, when all the configurations regarding to all the nodes are finalized, for the Mangue.io platform adds a new cluster to the Mangue.io platform internal infrastructure, start this new cluster to the computing environment that is executed as once more containers (clusters) manager environment.Action of updating: The cluster creation depends on the public cloud provider, the status of the cluster creation can be followed in Tasks.
C. Azure Kubernetes Services - AKS
To perform an integration (via form) with a container manager existing in the Azure provider, the user must click with the cursor on the gray area below the Azure Kubernetes Service - Azure AKS logo and the Mangue.io platform presents the screen below with the AKS form:
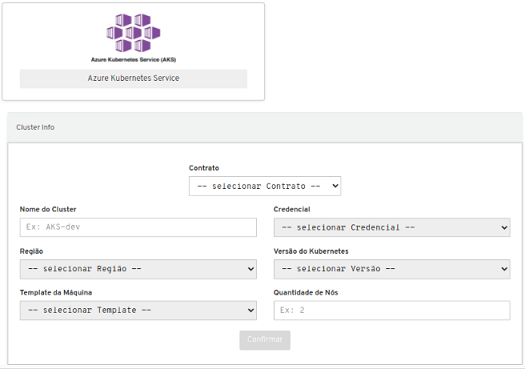
Contract: The user selects the contract for the platform to load their credentials.
Cluster Name: On this blank the user must fill in with the cluster identification name for the Mangue.io platform.
Credential: The user must select one of the access credentials registered on the Mangue.io platform to confirm their identity alongside the environment contracted with Azure. It is important to highlight that the specific documentation of each provider must be consulted about how to generate/create these credentials with permission to the provider’s containers management environment.
Region: On this blank the user must select from a dropdown list the regions available in the specific provider. In this case are listed only the global regions specified on Azure.
Kubernetes Version: On this blank the user selects the Kubernetes version available on the public cloud provider.
Machine Template: On this blank the user must select from a dropdown list the type of machine configuration (CPU, Memory, Disk or Template) available on the provider. In this case are listed only the specific templates from Azure.
Quantity of Nodes: On this blank the user must inform the full number, necessary to the quantity of nodes for the cluster infrastructure.
Confirmbutton: The user just needs to click on theConfirmbutton, when all the configurations regarding to all the nodes are finalized, for the Mangue.io platform adds a new cluster to the Mangue.io platform internal infrastructure, start this new cluster to the computing environment that is executed as once more containers (clusters) manager environment.Action of updating: The cluster creation depends on the public cloud provider, the status of the cluster creation can be followed in Tasks.
D. IBM Cloud
To perform an integration (via form) with a container manager existing in the IBM provider, the user must click with the cursor on the gray area below the IBM Cloud Kubernetes Service - IBM IKS logo and the Mangue.io platform presents the screen below with the IKS form:
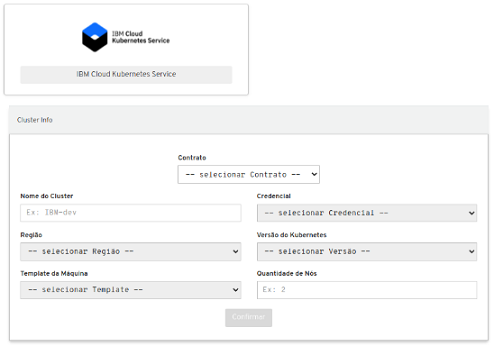
Contract: The user selects the contract for the platform to load their credentials.
Cluster Name: On this blank the user must fill in with the cluster identification name for the Mangue.io platform.
Credential: The user must select one of the access credentials registered on the Mangue.io platform to confirm their identity alongside the environment contracted with the IBM Cloud. It is important to highlight that the specific documentation of each provider must be consulted about how to generate/create these credentials with permission to the provider’s containers management environment.
Region: On this blank the user must select from a dropdown list the regions available in the specific provider. In this case are listed only the global regions specified on the IBM Cloud.
Kubernetes Version: On this blank the user selects the Kubernetes version available on the public cloud provider.
Machine Template: On this blank the user must select from a dropdown list the type of machine configuration (CPU, Memory, Disk or Template) available on the provider. In this case are listed only the specific templates from the IBM Cloud.
Quantity of Nodes: On this blank the user must inform the full number, necessary to the quantity of nodes for the cluster infrastructure.
Confirmbutton: The user just needs to click on theConfirmbutton, when all the configurations regarding to all the nodes are finalized, for the Mangue.io platform adds a new cluster to the Mangue.io platform internal infrastructure, start this new cluster to the computing environment that is executed as once more containers (clusters) manager environment.Action of updating: The cluster creation depends on the public cloud provider, the status of the cluster creation can be followed in Tasks.
Container Execution
The Integrations/Container Execution menu allows to configure a communication interface with the containers that are being executed in a POD. For it to be possible, it is necessary to provide an access credential to the Kubernetes cluster.
This credential is called KubeConfig - or Kubernetes cluster configuration file. In this configuration file there is information like: SSL Certificates for API cluster access, API cluster address and some other information described in KubeConfig.
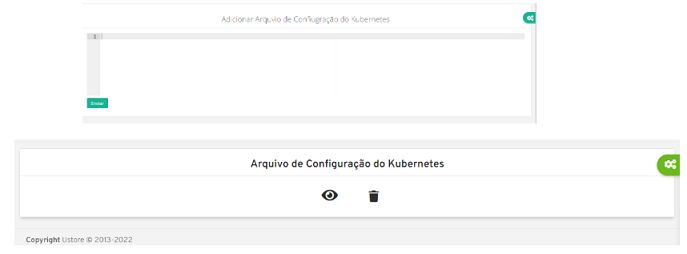
Atenção
It is important to highlight that the TCP-IP informed of the cluster API must be an address that is reachable by the subnet computing infrastructure where the Mangue.io platform was implanted.
In case the KubeConfig is already registered the user may exhibit it clicking on the  icon. It is also possible to exclude the KubeConfig clicking on the icon.
Performance
The Mangue.io platform may use the Metric Server’s API to make the collection of Kubernetes” metrics, but not only the performance metrics regarding its workloads, pods and containers, but also the events and new events generated by its cluster.
This screen is divided in two sections, which is described below:
A. Section: Add the Monitoring
In this section, in the superior part of the screen, is presented a form with the needed blanks for the user to fill out:
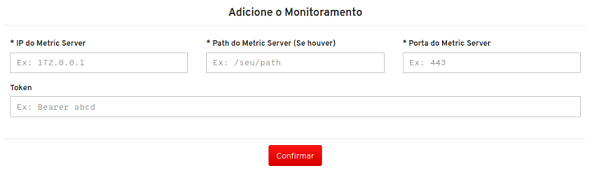
Monitoring IP: This blank is mandatory, and it must be filled in with the cluster TCP-IP address number in which the Metric Server is installed.
Metric Server Path: This blank is mandatory, and it must be filled in with the path used by the Metric Server in the cluster.
Monitoring Port: This blank is mandatory, and it must be filled in with the cluster TCP-IP port which the Metric Server is installed on.
Token: In this blank the user must use a Bearer Token (mentioned on the topic below) of a Service Account with the permission to make consults on the Metric Server’s API.
Confirm: The user must press this button after checking all the previous blanks and therefore, confirm the configurations regarding the monitoring server.
B. Section: Available Monitoring
This section of the screen presents a list of all the servers that are configured on the Mangue.io platform environment.
Below follows the description of information present on this list.
#: Monitoring server sequential number registered on the Mangue.io platform.
Monitoring IP: On this column is presented the TCP-IP address number of the monitoring server.
Monitoring Port: On this column is presented the TCP-IP port number of the monitoring server.
Bearer Token: On this column a part of the Bearer Token is presented used to make the cluster’s consultation.
Ticketing: Shows if the ticketing is available.
Actions: This column presents the
Actionsbutton when clicked, presents three options:
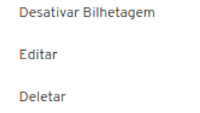
Activate/Deactivate Ticketing: When selecting this option is activated or deactivated the ticketing monitoring.
Edit: When selecting the editing option it is presented the screen below, through which the user may alter the content of the blank previously described in the previous section Add the Monitoring.
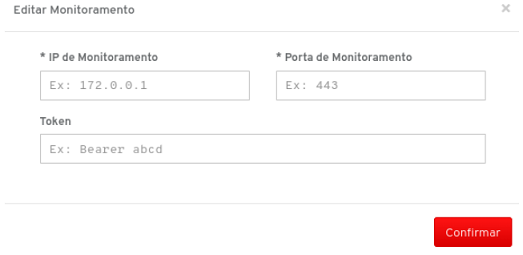
Delete Monitoring: When selecting the delete option it is required an action confirmation from the user, and then an alert feedback is created on the superior right corner of the screen informing the success or error.
Aviso
It is important to highlight that this action is definitive and remorse (erases) this configuration of the Mangue.io platform, because they are erased all the references to this monitoring server on the Mangue.io platform.
Helm
Helm is a tool that allows the installation of Kubernetes applications, working as a package manager for the Kubernetes, the Helm applications are defined on the Helm application repository. To use the Helm functionality, you must have previously registered the Cluster’s KubeConfig on the Mangue.io platform.
On the Helm home screen page it is shown a table with the Helms installed on the application. Making it possible for the user to make a Helm search by the name. On the home screen, the user can also visualize the Helms that were deleted, that way allowing it to be reinstalled again.
Below is described the information present on the Helms table.
#: Helm sequential number registered on the Mangue.io platform.
Name: Helm name specified by the user during the creation.
Creation Date: Date in which was created the Helm application in the Cluster.
Actions: This column presents the
Actionbutton when clicked, presents two options:
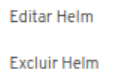
Edit Helm: When selecting the edit option is presented the screen below, through which the user may alter the name and arguments of the Helm application.
Delete Helm: When selecting the option to exclude is uninstalled the Helm selected from the Cluster.
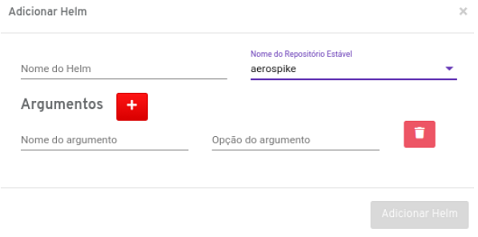
To create a Helm is necessary to click on the button is essential to specify its name and select on the Helms list the application name on the repository. Also, it is possible to specify the arguments for the application, some Helm applications need arguments to make the configuration.
After filling out all the necessary blanks, the Add Helm button is available to be clicked. When clicking on the Mangue.io platform it installs the Helms, after installed it is shown a success message.
Server VS Code
The Visual Studio Code is an Integrated Development Environment (IDE) for the applications development. This IDE may be installed in a Cluster, through a Deployment, that way allowing that the IDE to be executed within a user’s browser. To use the Server VS Code functionality the Cluster’s KubeConfig must be previously registered on the Mangue.io platform.
On the Server VS Code screen it is shown an updates list, with the Visual Studio Code in the cluster currently. It is also possible that the user makes the search of the Visual Studio Code installed, by the name.
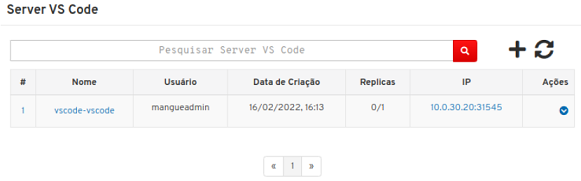
Below is described the information present on the VS Codes table.
#: VS Code sequential number registered on the Mangue.io platform.
Name: VS Code name specified by the user during the creation.
User: User name that created the Visual Studio Code.
Creation Date: Date in which was created the Visual Studio Code in the Cluster.
Replicas: Quantity of deployments replicas available and desired.
IP: Visual Studio Code IP to be accessed on the web browser.
Actions: This column presents the
Actionbutton when clicked, presents the option to delete the VS Code, as shown in the following image:
Delete VS Code: When selecting the exclude option it removes the VS Code selected from the Cluster.
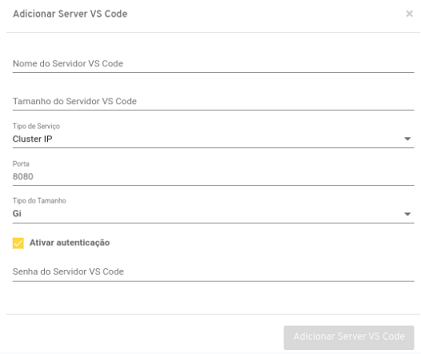
To create a Visual Studio Code it is necessary to click on the button and fill in the blanks below:
Server VS Code name: Name of the Server Visual Studio Code to be created.
Server VS Code size: Size in disk to be available for the Visual Studio Code. The measure size is defined on the blank of Size Type.
Type of Service: The user may select the type of service to be attributed to the Visual Studio Code deployment. The options available are: Cluster IP, NodePort, Load Balancer and Ingress.
Port: The user may select the port that is used in the service.
Size Type: Specifies the size unit. The available options are: Gi and Mi.
Ingress Class: In case the type of service selected is Ingress it is necessary to select the Ingress Class to be used by the service.
Server VS Code URL: In case the type of service selected is Ingress it is necessary to specify the path of Ingress. Example: /vscode
Activate authentication: The user may attribute a password that is necessary to access a Server VS Code.
Server VS Code password: Password to be used to access the Server VS Code.
Services, Load Balancing and Networking
Pods born and die, and when they die, they really die, they do not resuscitate. The controllers ReplicaSets, in particular, create and erase Pods dynamically (for example: when scaling or reducing).
Although each Pod has its own TCP-IP address,even those cannot be considered stable along the time (e.g.: Dynamic Host Configuration Protocol - DHCP). This can create a problem, if any set of Pods (called back-end) provides functionality to other pods (named front-end) within a Mangue.io cluster.
How does these front-ends find out and control the back-ends that are in this set? It is at this moment that the Services are introduced.
A Service in the Mangue.io is an instance of the Kubernetes Service object that, in turn, is an abstraction that defines a logical set of Pods and a policy by which it is possible to access them. The set of Pods segmented by a service is, generally, determined by a set of Labels.
The Services, Load Balancing and Networking menu is divided into two submenus which correspond by: Services, Ingress. Each submenu has its specific purpose described next.
Services
It is an abstract way of exposing an application in execution in a set of pods as a networking service. Such as Kubernetes, the user does not need to modify its application to use an unknown Service Discovery mechanism.
The Kubernetes provides the pods its very own TCP-IP address and a single DNS name for a set of pods and may balance the load among them. On this submenu are listed the existing services in the namespace which the user is browsing.
The Networking/Services menu, presents all the services of a cluster in a certain namespace, on the table we have information listed as on the screen below:
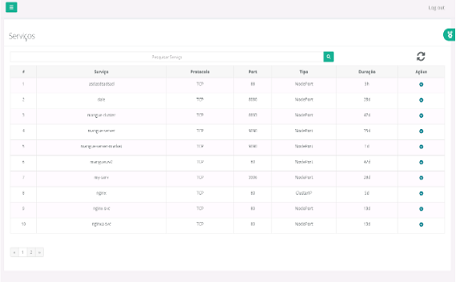
Service: Represents the name of the service created, is the main identifier of a service at the time to execute a search on the search bar.
Protocol: Responsible for identifying the type of protocol of this service, it may be for example: TCP, UDP.
Type: Represents a type of service created on the Kubernetes, there are three types of services, they are:
NodePort: These are external accessible services through a door range from 30000 to 32767.
ClusterIP: These are services that can only be accessed on the cluster’s internal network.
LoadBalancer: It is a type of existing service with the aim to provision a LoadBalancer on the 7th layer, so the communication is made with the service on the 4th layer created on the Kubernetes cluster.
Port: These are the doors that the service is apt to receive requisitions.
Duration: Responsible for identifying for how much time the structure of the service was created.
Actions: This column presents the
Actionbutton when clicked, presents three options:
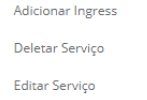
Below follows the description of each option in this submenu:
Add Ingres: Ingress is a service that may be configured to provide the URLs Services external accessible. An Ingress Controller is responsible for complementing the Ingress, generally with a load balancer, although it is also possible to configure its edge router or additional front-ends to help to deal with the traffic.
This screen performs the creation of an Ingress in two steps, initially the creation of a load balancer, and in sequence the Ingress creation on the Mangue.io platform.
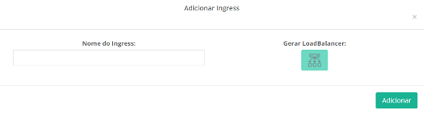
Ingress Name: On this blank the user must inform a name that makes this service to be configured on the Mangue.io Platform.
Generate LoadBalancer: After informing the ingress name the user must click on the green button with the load balancer icon
to start the creation process of the load balancer on the Mangue.io platform. The user must expect an alert feedback that is presented on the superior right corner of the screen informing the success or error of this action.
Addbutton : After the creation, with success, of the load balancer, the user must click on theAddto perform the service creation of ingress on the Mangue.io platform
Delete Service: On the second option of the service action menu there is the delete option, when selected it opens a confirmation modal, it asks to confirm the action, clicking on the
Deletebutton. In sequence it is presented with an alert feedback on the superior right corner of the screen informing the success or error.
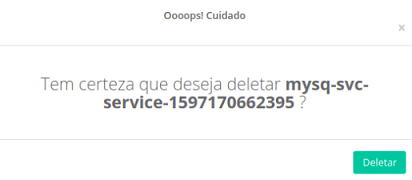
Importante
It is important to highlight that this action is definite and removes (erases) this configuration from the Mangue.io platform, because all references of this monitoring server are erased on the Mangue.io platform.
Edit Service: This option of the actions menu shows the option
Edit Service. When selected the Mangue.io platform presents the content of the file in JSON format with all the configurations of the Kubernetes service. The user may edit what is necessary in this service and select theSendbutton. Await the action feedback that opens the following modal.
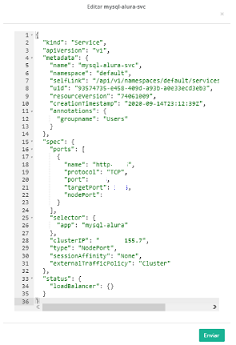
It is recommended that only the experienced users in YAML syntax or Kubernetes perform the code alterations of a service, because the codification (or alteration) of the syntax in the wrong way may cause loss of access to all the existing clusters’ environment.
The user may use the mouse to click on the desired line and on the local to start the typing of its specific services parameters, this way editing the code YAML model that the platform presents.
Ingress
The Ingress exposes the HTTP and HTTPS routes from outside the cluster to services within the cluster. The traffic route is controlled by defined rules in the Ingress resource. An Ingress may be configured to provide the URLs Services externally accessible, Load Balancing, configuration to SSL / TLS.
An Ingress Controller is responsible for complementing the Ingress, generally with a load balancer, although it could also configure its edge router or additional front-ends to help lead with the traffic. On this submenu, are listed the existing Ingress on the namespace that was selected on the gears tab «Configuration Selection» on the Mangue.io platform.
Right above the table, there are three elements which the user may act:
Search action: In case the list presented on this screen is very long (occupying more than one page), there is a blank that makes it possible for the user to perform a search by the name of the Ingress desired. Just inform a part of the name and type enter or click over the «Magnifying glass» icon
. As result of this search only the Ingresses that have the key-word from the search are recovered.Update action: Just click on the
icon for the Mangue.io updates the interface with the most recent values of this Ingress table.
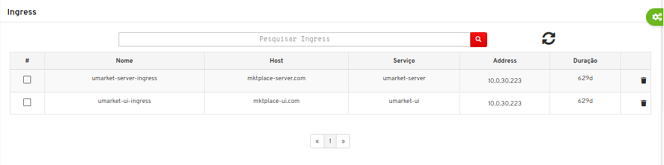
Below is described the information of the list presented on this screen:
#: Monitoring Service sequential number registered on the Mangue.io platform.
Name: This column presents the Ingress name that was informed during the Ingress registration process on the Mangue.io platform.
Host: This column presents the information of the server name that is registered on the DNS, or the number of the TCP-IP address of this server.
Service: This column presents the information of which service this Ingress is associated with.
Address: This column presents the Ingress number of the TCP-IP address that was configured on the Mangue.io platform.
Duration: This column presents the time in days passed since the creation date of the Ingress until the present date that the user is consulting this list.
Actions: This column presents a button of action to delete the ingress through the trash icon
. When clicking on the icon is solicited from the user the confirmation to be possible to delete the Ingress, according to the picture below:

In case the user had included a new Ingress, recently, but the user does not find the name on the list, what the user can do is click on the icon for the Mangue.io to update the interface with the most recent list of this table.
Namespaces
Kubernetes offers support to various virtual clusters supported by the same physical cluster. Those virtual clusters are called “namespaces”. Namespaces are identified by a “name”. These may contain several “resources”, and each resource has their unique names. The user may create the same resource multiple times (repeating the same name) but these resources must be configured in a distinct namespace.
Namespaces also support the definition of quotas, like for example a namespace focused on a Production environment and a namespace focused on a Homologation environment.
Clearly, the computing environment designed for the Production namespace must have greater capacity of cluster computing resources than the namespace configured for a Homologation environment - after all this environment has an eventual usage load. The quotas limit the quantity of computing resources that a certain Namespace may consume.
The Namespace menu presents a list of all the namespaces of a certain cluster, on the table there is information such as: namespace name, status and duration of the namespace. The namespaces consist of different work areas that are part of a cluster.
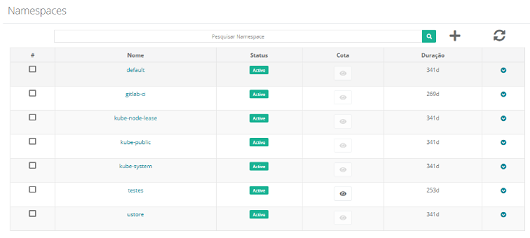
For the user to be able to create a namespace, they must click on the plus sign icon , for it to be presented on the following screen where the user may configure a new namespace:
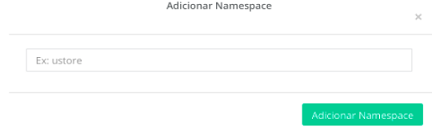
The screen above has only a blank where the user must fill in the name they wish to create for the new namespace and click with the mouse cursor on the Add Namespaces button, to include it on the Mangue.io platform. It presents a feedback of this action on the superior right blank of the screen of the browser.
This new namespace is created within the cluster that was selected in the gears tab «Configuration Selection» of the Mangue.io.
After the inclusion of a new namespace, in case this names is not present on the list, the user may click on the icon for the Mangue.io is able to update the interface with the most recent list of this table.
On the last column of the table there is the option to delete the namespace, when this column is selected it opens a confirmation modal. And if confirmed, there is a feedback of creation for the user.
Below is described the blanks of the table presented on this screen:
# actionable column: This column presents an alternative way to remove (erase) various rows in a single command. Each row is represented by a selectable icon
.When the user choses a line or several, the Mangue.io platform presents the icon(s) above this column, they represent the user’s actions to be executed once for all the selected lines.
In this case the «Trash bin» icon
is presented, which allows to remove all the items indicated by the user with a single command;Name: This column presents the namespace name that was informed during the registration process of the namespace on the Mangue.io platform.
Status: A namespace status identifies the current state of the namespace. They can be presented by Running, Pending or “!” (exclamation point):
The status Running identifies that no error is happening with the namespaces;
The status Pending identifies some transition states on the namespace. Whether it is by update, container process initialization or any other activity that identifies a transition state;
The status “!” (exclamation point) identifies an alarm, in other words, that something wrong happened with the namespaces;
Quota: This column presents an “eye” icon
that is active only on the namespaces lines that have any quota defined for it. The user must position the mouse cursor over the icon and the Mangue.io platform presents a pop-up window with the name and the quota characteristics defined for this namespace.
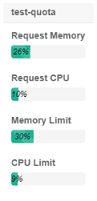
Duration: This column presents time in days passed since the creation date of the namespaces until the present date that the user is consulting this list.
Actions: This column presents the
Actionsbutton when clicked, presents three options:
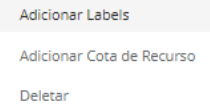
Add Labels: A label allows the user to map their own organizationals structures in system objects in a loosely coupled way, without imposing that the softwares store these mappings. Labels are created with two attributions “key” and “value” and are attached to objects, like pods. The labels must be used to specify the objects attributes identification that are significant and relevant for the users. The labels may be used to organize and select subset of objects (detailed information on Kubernetes documentation website).
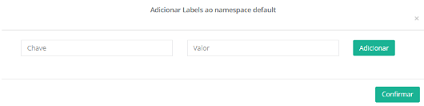
This screen has two blanks and two buttons:
Key: On this blank the user must fill in with the name which the key is identified.
Value: On this blank the user must fill in with the full number that is the key value.
Addbutton: The user must click with the mouse cursor over this button to add the key and its value on the Mangue.io platform. When clicking over this button the Manue,io Platform cleans both blanks and creates a list right below. In case the user has added a key/value in the wrong way, they just need to click on theRemovebutton, that the respective pair of information is removed, and the user may register a new pair (key/value) with the correct content.
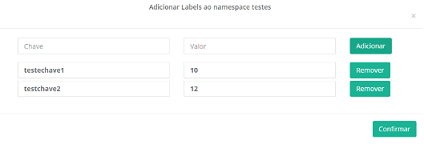
Confirmbutton : The user must click on theConfirmbutton when they have completed informing the key(s)/value(s) necessary(ies) to the namespaces. When clicking on the button, the Mangue.io platform configures this information and closes this screen, presenting the action feedback on the superior right corner of the screen on the internet browser.
Add the Resource Quota: This screen allows the user to establish the ideal quantity of computing resources that the namespace consumes to keep its ideal performance, as well as establishing its maximum consumption limit of computing resources.
The definition of a quote may impact other services (workload) registered on the Mangue.io platform. When the user defines a CPU and Memory limit for a namespace in case of a deployment has various pods, replicas or Horizontal Autoscaler, these never overtake the computing resource limit established in the quota.
For example: if a deployment needs to start a new replica defined on the Horizontal Autoscaler, and the CPU and Memory limit has already been reached, the Mangue.io platform does not start a new replica, even if the defined values on the Horizontal Autoscaler are reached, but the quota limit cannot allows to have computing resources available for this new replica.
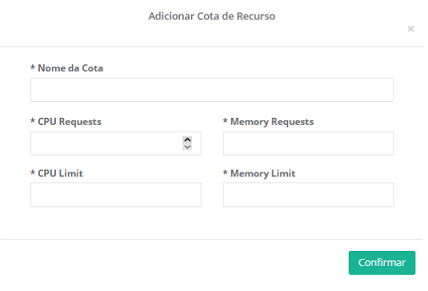
Quota name: Inform the name which the quota is identified for the namespaces on the Mangue.io platform.
CPU Request: On this blank the user must fill in with a full number that is the initial value of CPU quantity the namespace must require to keep the ideal performance.
Memory Request: On this blank the user must fill in with a full number that is the initial value of Memory quantity the namespace must require to keep the ideal performance.
CPU Limit: On this blank the user must fill in with a full number that is the value of the CPU quantity maximum limit the namespace must restrict for it to not exhaust the cluster’s computing resources.
Memory Limit: On this blank the user must fill in with a full number that is the value of the Memory quantity maximum limit the namespace must restrict for it to not exhaust the cluster’s computing resources.
Confirmbutton : When the user fills in all the blanks of this form they must click on the buttonConfirmfor the Mangue.io platform to configure and include the resources quota to the selected namespaces.
Delete: The third option this submenu allows the user to erase (delete) a namespace definitely of the cluster that was selected on the “Configurations” tab; and when clicked opens the following interface screen requiring the confirmation on part of the user.
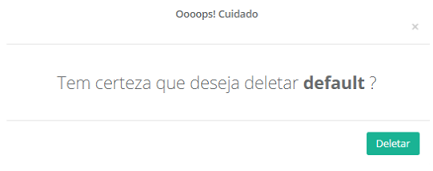
Aviso
This is an extremely destructive action, because when deleting a namespace it also deletes all the resources and services present on it.
Nodes
The Nodes menu presents all the nodes (Virtual Machines) in a certain cluster. In Overview Nodes it is possible to visualize graphically the resource consumption (CPU and memory) of all the Nodes of a Cluster in a determined period.
The CPU consumption is measured in MilliCores and the memory in MegaBytes, both in function of the time.
It is allowed for the user to select the desired period clicking over the buttons placed above the graphs. The available options for the user are in between the last 30, 15, 7 and 1 day(s) and, in the last 12 hours. For the period of 30, 15 and 7 days, the measurements in function of the time are daily and for the period of 1 day and 12 hours, are hourly.
Highlighted in the color blue of the column graph, are presented the quantity of resources used on that selected period, whether it is by day or by hour, as chosen by the user, while the color green measures the total quantity of resources, that is, that keep idle in that period.
The total quantity of Nodes resources of a Cluster, as for CPU as well as for memory, is represented by the adding of these two measures.
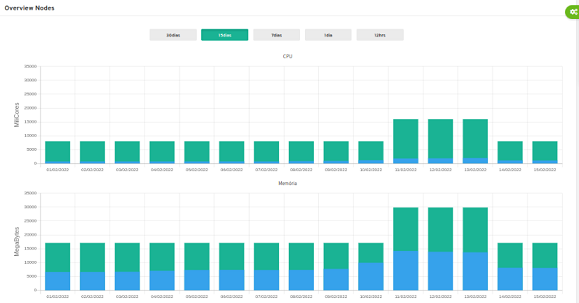
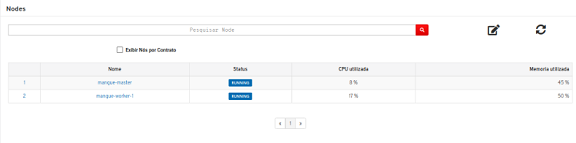
Right above the table, there is an element which the user can act:
Display Nodes per Contract: Selecting this option, appears a blank, where the user may inform the name of the contract which desires to make the search.
Below the description of the columns on this table:
Name: Node name.
Status: Corresponds to the current state of the node.
Running: Indicates that the node is “healthy”.
Failure: Indicates that some error occurred with the node, or in the present moment is found unavailable.
CPU Used: Represents the current consumption of the CPU resource of the virtual machine (node). This value is expressed with a full number fraction (decimals) of the CPU quantity existing in the infrastructure that composes the virtual machine. The computing infrastructure existing of the virtual machines supports and executes microservices (e.g.: deployment), which consumes only a small part of the total CPU resource. Therefore, the application presents the decimal quantity of the CPU total consumed by the virtual machine.
Memory Used: The total consumption of the RAM memory resource of the virtual machine. This value is expressed in Gigabytes, the total Megabytes quantity of existing RAM memory in the infrastructure that composes the virtual machine (node). The existing computing resources of the virtual machine (node) to support and execute micro services (e.g.: deployment), that way a microservice consumes only a small part of the total RAM Memory Megabytes resources of a node.
For the user to know the details of all the pods of a specific node, they just need to click with the mouse cursor over the node name for the Mangue.io platform to present a section with a list of all the pods that are in execution in the selected node.
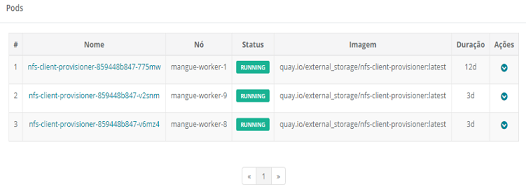
In the “Pods” section presents a table that lists all the pods in execution in this node. There is information detailed such as name, node in which it is being run, current status of the pod, image, alongside its version and lifetime (see complete description of the blanks of this table in the item: Section: PODs).
In case it is necessary for the user to consult the logs, or have access to the prompt operating system of a specific pod, in the Actions column the user must click with the mouse cursor over the icon for the Mangue.io platform presents a submenu with the log access option and the command line of the selected pod.
Right above the table, there are three elements with which the user can act:

Search action: In case the list presented on this screen is very long (occupying more than one page), there is a blank where it is possible for the user to perform a search by the name of the desired Node. The user just needs to inform part of the node name and type enter or click over the «Magnifying glass» icon
. As a result of this search only nodes that have the key-word of the search appear.Update action: Just click on the icon
so Mangue.io may update the interface with the list of node names configured on the Mangue.io platform.Add Labels: In case the user needs to add one (or more) label to the node the user must click with the mouse cursors on the labels icon
 for the Mangue.io platform presents the following screen:
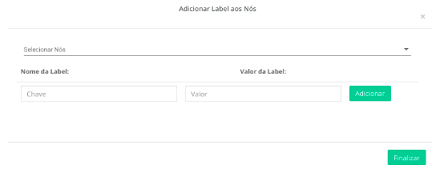
Select Nodes: When selecting the blank is presented a dropdown list with all the configured nodes on the Mangue.io platform. The user just clicks with the mouse cursor over the desired node name to select.
Label name: On this blank the user must fill in with the name which the label (key) is identified.
Label value: On this blank the user must fill in with a full number that is the key value.
Addbutton : The user must click with the mouse cursor over this button to add a label and its value on the Mangue.io platform. When clicking over this button the Mangue.io platform cleans both the blanks and creates a list right below. In case the user has added a label/value in the wrong way, just click on theRemovebutton, that the respective pair of information is removed, and the user may register in a new pair (key/value) with the correct content.
Nota
Add labels when nodes may be important for the users that wish to make configurations of the Node Affinity to their Deployments.
Finishbutton: This button allows the user to add the label(s) selected on the Mangue.io platform. In sequence the feedback of this action is added.
Cluster Migration
Mangue.io is an environment management platform for multiple container orchestrators, which allows the orchestration, deployment (location and scheduling) and operationalization (execution) of application containers within a computing cluster (public or private) or between computing clusters (public and/or private).
The platform operates on a hybrid multicloud model and, in this way, allows organizations total control, support for backup, replication and environments migration.
The Cluster Migrations is responsible for making the migration of multiple resources between clusters - from public/private to public e/or private.
Through the Mangue.io Platform the user may migrate the complete content of a cluster - with all its several types of workloads - to another cluster.
The practicality to migrate all types of workloads between clusters makes it easy to create an environment management for multiple container orchestrators prepared for the Disaster Recovery scenarios.
The Mangue.io platform is agnostic to service providers (publics, privates) and through the Migrations menu functionality the user may keep, manage and operate several copies of its clusters in multiple container orchestrators, in a simultaneous and centralized way.
Workloads Migration Process:
The user may notice that this screen is segmented in two sections: Migration among Clusters and Workloads, and the migration process is simple and the user is guided intuitively to complete the filling of the Mangue.io platform screen process.
Below is presented the process for the correct filling of the migration screen:
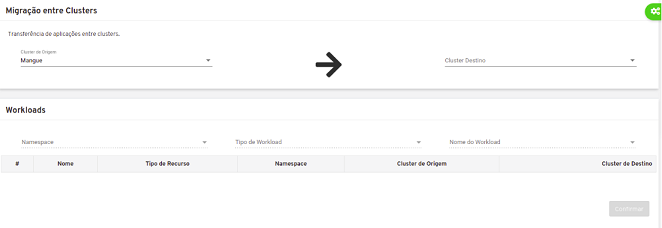
Select the Origin Cluster (Migration Section)
This blank is a dropdown list and lists only the clusters configured on the Integrate Cluster item.
Select Recipient Cluster (Migration Section)
This blank is a dropdown list and lists only the clusters configured on the Integrate Cluster item.
Select Namespace (Workloads Section)
This blank is a dropdown list and lists only the namespaces configured on the Namespaces item.
In case the line below the blank is dotted, it means there is no namespace configured and available for migration on the origin cluster informed on step 11. See the example on the screen below:
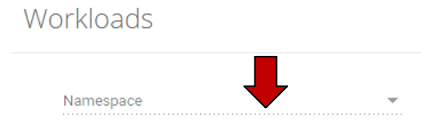
When there are namespaces configured the Mangue.io platform presents a continuous line below this blank, see the example below:
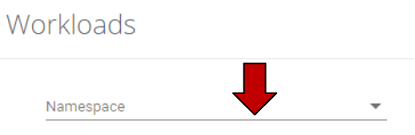
Select the Type of Workload (Workloads Section)
This blank is a dropdown list and it presents the list of all the types of workloads configured on the Workloads item.
When clicking on this blank, the Mangue.io platform presents a relation of workloads that are passable from being migrated from a cluster to another (ConfigMaps, Deployments, DaemonSets, StatefulSets, Ingresses, Services).
On Kubernetes, there is not one object, component or any type of construction called “workload”. Nonetheless, the term is frequently used as a general category for tasks and services that the user desires to execute in their cluster.
Select the Workload Name (Workloads Section)
This blank is a dropdown list and lists only the workloads names that are a part of the same type of workload selected on the previous blank.
When the user fills in all the previous blanks (namespaces, Type of workload) the Mangue.io platform presents a list of names available and the user may select one of the names because each line is represented by a selectable icon
. As soon as the user selects one of the names, it is added to the migration list, as shown on the example below:

The Mangue.io platform allows to add several types of workloads for the migration of various workloads may be performed in a single step, as shown on the example of the screen below:

Confirm: After selecting, the resources are shown on the table containing information such as: Resource Name, Type of Resource, Namespace, Origin and Recipient Clusters. The Mangue.io platform starts the workloads movementation among the selected clusters, and soon after, there is a feedback of this action and it is presented on the superior right corner of the browser screen.
After confirming this procedure the Mangue.io platform performs the migration of all the selected workloads among the indicated clusters, a feedback message is presented on the superior right corner of the browser screen.
Namespace Migration
This menu is responsible for making the migration of several resources among namespaces from the same Cluster.
This screen is segmented in two sections: like the screen of Cluster Migration: Migration between Namespaces and Workloads, and the migration process is simple and the user is guided intuitively to complete the filling of the Mangue.io platform screen process.
Below is presented the process for the correct filing of the migration screen:
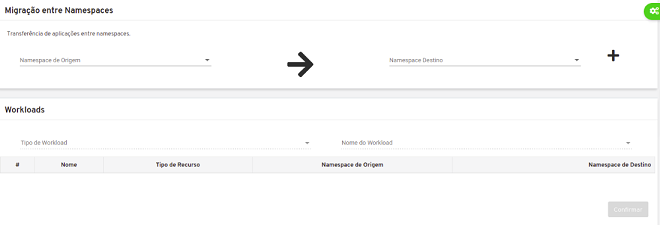
Select the Origin Namespace (Migration Section)
This blank is a dropdown list and lists the Cluster’s namespaces.
Select the Recipient Namespace (Migration Section)
This blank is a dropdown list and lists the Cluster’s namespaces.
Select Type of Workload (Workloads Section)
This blank is a dropdown list and lists all the types of resources available for migration.
Select the Workload Name (Workloads Section)
This blank is a dropdown list and lists only the names of resources that are a part of the same type of workload selected on the previous blank.
When the user fills in all the previous blanks (namespaces, Type of workload) the Mangue.io platform presents a list of names available and the user may select one of the names because each line is represented by a selectable icon
. As soon as the user selects one of the names, it is added to the migration list, as shown on the example below:

The Mangue.io platform allows to add several types of workloads for the migration of various workloads may be performed in a single step, as shown on the example of the screen below:

Confirm: After selecting, the resources are shown on the table containing information such as: Resource Name, Type of Resource, Namespace, Origin and Recipient Clusters. The Mangue.io platform starts the workloads movementation among the selected clusters, and soon after, there is a feedback of this action and it is presented on the superior right corner of the browser screen.
After confirming this procedure the Mangue.io platform performs the migration of all the selected workloads among the indicated namespaces, a feedback message is presented on the superior right corner of the browser screen.
Registry
The Registry menu presents all the Docker Registries integrated to the platform. The Docker Registry provides a service for image hosting of the analog Docker to the one which is available on Hub, but with the possibility of use and hosting in an internal network. The Registries may and must be used as an alternative for storage of the providers docker images and applications of an organization.
On the Registry menu is possible to connect to a private registry, that is, a registry provider of the private image of the organization. Or a registry service of a public image, like for example the Docker Hub.
There is in this section a table containing the information of Registries added to the Kubernetes, reminding that the registries are secrets (see the item Secrets) created by namespace.
Right above the table, there are two elements which the user can act:

Search action: In case the present list on this screen is too long (occupying more than one page), there is a blank where it is possible for the user to make a search with the desired Registry name. They just need to inform part of the name and click enter or click on the icon with the «Magnifying glass»
. As a result of this search only comes up the Registries that contains the search key-word;Add a Registry: Just click on the plus sign icon
for the user to register a new Registry on the platform. On the sequence is shown the screen below:
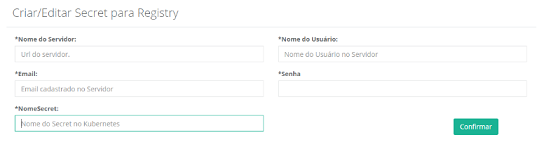
Server Name: This blank is mandatory and the user must inform the Registry server name they wish to configure on the Mangue.io platform.
Username: This blank is mandatory and the user must inform the user login provisioned in the operating system of the existing registry server;
Email: This blank is mandatory and the user must inform the user email that is used to make the authentication on the registry server;
Password: This blank is mandatory and the user must inform the user login password, provisioned in the operating system of the server, that is used to make the authentication of this user on the registry server;
Secret Name: Secret name to be created for the Registry data;
Confirmbutton: After the user alters all the previous blanks, they must click with the mouse cursor over this button to confirm the alterations informed for the Mangue.io platform.
Below is described the columns presented on the registries list:
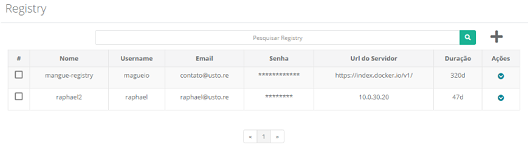
# actionable column: This column presents an alternative way to remove (erase) various rows in a single command. Each row is represented by a selectable icon
.When the user choses a line or several, the Mangue.io platform presents the icon(s) above this column, they represent the user’s actions to be executed once for all the selected lines.
In this case the «Trash bin» icon
is presented, which allows to remove all the items indicated by the user with a single command;Name: This column presents the Registry server name of the image created;
Username: This column presents the username that is used to make the authentication on the image registry server;
Email: This column presents the user email that is used to make the authentication on the image registry server;
Password: This column presents the user password that is used to make the authentication on the image registry server;
Server URL: This column presents the URL the user uses to authenticate and download the images of the image registry server;
Duration: This column indicated how much time that access credential to the image registry server is created on the platform;
Actions: This column presents the
Actionbutton when clicked, presents two options:
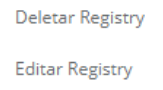
Delete Registry: Action responsible for deleting the access credential to the image registry server. When selecting this button the Mangue.io platform requests the credential removal operation. Reminding that this action when confirmed is irreversible. In case some Cluster application uses this credential to download the docker container, after the deletion this action of downloading the container fails, since the credential has already been erased.
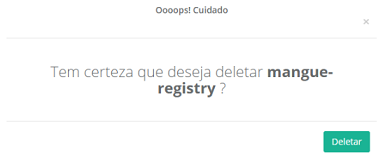
Edit Registry: Action responsible for providing a mechanism to update the information of an access credential to an image registry server. When selecting the action to
Edit Registryappears a screen with the information added previously for the credential in question, it is possible to alter the blanks desired and when clicking on theConfirmbutton the credential is updated. A feedback alert for the update action is generated on the superior right corner of the browser.
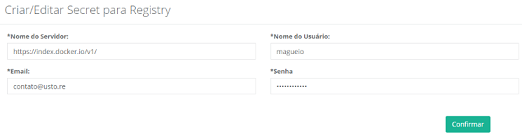
Server Name: On this blank the user may alter the server name of the existing Registry;
Username: On this blank the user may alter the username that is used to make the authentication on the image registry server;
Email: On this blank the user may alter the user email that is used to make the authentication on the image registry server;
Password: On this blank the user may alter the user password that is used to make the authentication on the image registry server;
Confirmbutton: After the user alters all the previous blanks, they must click with the mouse cursor over this button to confirm the alterations informed for the Mangue.io platform.
Secrets
Secrets allow to store and manage information considered confidential or sensitive, such as: passwords, tokens, OAuth and SSH keys. Using this information through a Secret is the safest and most flexible form than “exposing” the information, in a definition of Pod cycle of life or in a container image. The values of a secret are saved in a BASE64.
Nota
Base64 is a method for data codification for Internet transfer (codification MME for content transfer). It is used frequently to transmit binary data through transmission media that only deals with text.
It does not mean that there is a certain “layer” of cryptography in the information, additionally, this is the most recommendable approach for the storage of sensitive information.
When selecting this menu is presented a list of all the secrets present in the cluster that was selected on the gears tab «Configuration Selection» of the Mangue.io platform.
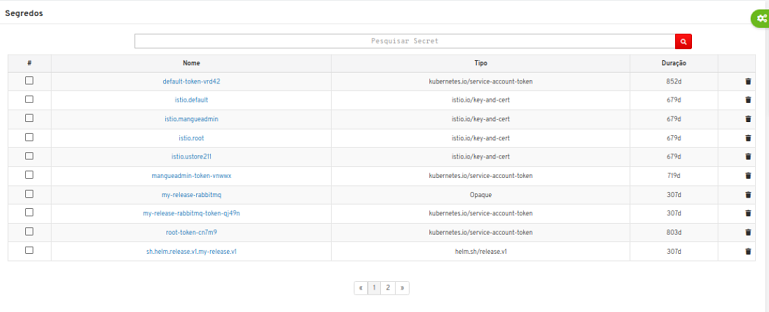
The Secret menu contains a table with the following information:
# actionable column: This column presents an alternative way to remove (erase) various rows in a single command. Each row is represented by a selectable icon
.When the user choses a line or several, the Mangue.io platform presents the icon(s) above this column, they represent the user’s actions to be executed once for all the selected lines.
In this case the «Trash bin» icon
is presented, which allows to remove all the items indicated by the user with a single command;Name: This column presents the Secret name that was used in the moment of its configuration;
Type: Type of Secret;
Duration: This column presents the time (in days) elapsed since the creation of this secret.
Actions: This column presents an action button, that is a trash bin
that when clicked, removes the secret from the same line. When selecting the action Delete Secretthe Mangue.io platform requests the action confirmation from the user.
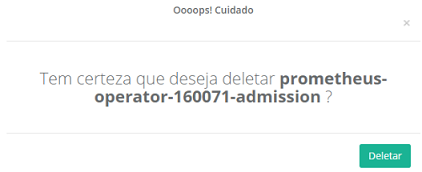
Importante
This action when confirmed is irreversible. Any cluster workload that is associated, or used, this secret can present a fatal error (crash) in its execution.
If the user needs to know the content stored in a Secret, they must click on the Secret name for the Mangue.io platform to present the specific information presented for the Secret in a section below the list. This new section of the screen presents a list of all the components of a secret.
For each component of the secret the Mangue.io platform presents an icon of content visualization of the Secret component. This icon is represented as an “eye” , when the user click over the icon the Mangue.io platform presents a component content with the example below:
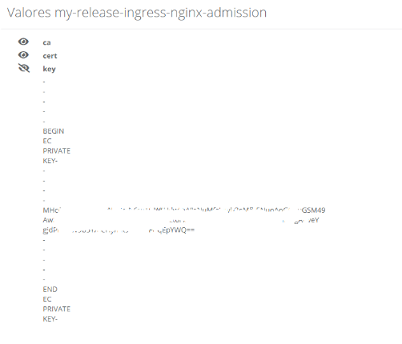
When the user clicks on the visualization icon, once again, the Mangue.io platform closes the presentation of the Secret content of the screen.
Schedule Task
The Mangue.io platform may schedule tasks to be made on a later date, tasks such as:
Update Deployment.
Escalate Deployment.
Update ConfigMap.
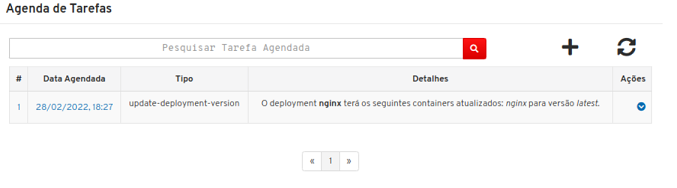
On the Schedule Task page is shown a list with scheduled tasks on the platform, it is also possible to search the scheduled tasks through the resource name.
Below is described the information present on the table of scheduled tasks.
#: VS Code sequential number registered on the Mangue.io platform.
Scheduled Date: Date which the task was scheduled.
Type: Type of task to be done.
Details: Details about the task to be done.
Actions: This column presents the
Actionbutton when clicked, presents the following options:
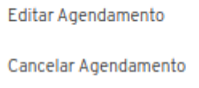
Edit Schedule: When selecting the option to edit is presented the screen with the schedule information, making it possible to edit them.
Cancel Schedule: When selecting the option to delete schedule, the date desired is excluded from the platform.

To create a scheduled task is necessary to click on the button and is necessary to fill in the blanks below:
Update Date: Date and time to execute the task.
Type of Task: Type of task to be executed, the options are:
Update Deployment.
Escalate Deployment.
Update ConfigMap.
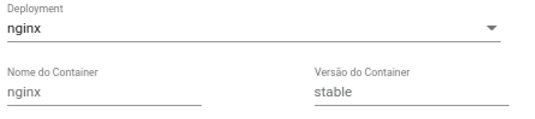
In case is selected the option to “Update Deployment” is necessary to fill in new blanks, as shown in the picture above:
Deployment: The user must select the deployment to be updated.
Container Name: The container name to be updated.
Container Version: Version for which the container will be updated.
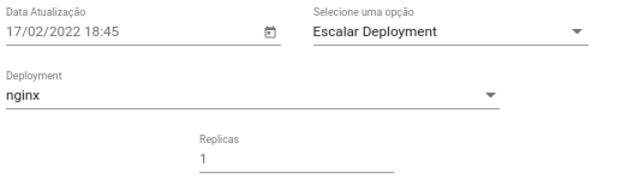
In case is selected the option of “Escalate Deployment”, it is essential to fill in the blanks, as exhibit on the previous image:
Deployment: The user must select the deployment to be updated.
Replicas: Quantity of replicas to which the Deployment will be escalated.
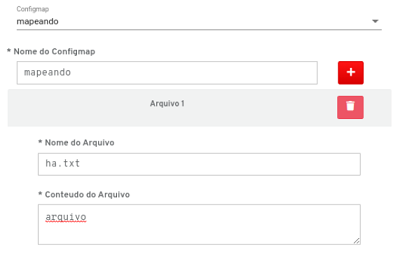
If selected the option to “Update ConfigMap” is necessary to fill in the new blanks, as the figure above shows:
ConfigMap: The user must select the ConfigMap to be updated.
ConfigMap name: The user must fill in with the ConfigMap name.
It is possible to add or remove the files clicking on the icons  and respectively.
The blanks of a ConfigMap files are:
File Name: The user must inform the file name to be created on the operating system of the virtual machine that uses the ConfigMap.
File content: The user must fill in with the specific content of the file to be created.
Storage
Dealing with container applications has some challenges, and one of these challenges is how to interact with disk files. The disk files of a container are ephemeral, this represents some problems for non-trivial applications wrapped in containers.
First, when a container fails, the Mangue.io tries to restart it, but with that the disk files are lost, then, the container always starts with a clean state. In second place, when executing containers together in a Pod, generally it is necessary to share files among these containers. The abstraction of Kubernetes Volume used on Mangue.io solves those two issues (for the Docker environment is different).
Atenção
Docker is also a concept of volumes, although is a bit more flexible and less managed. On the Docker, the volume is simply a directory in the disk or in another container.
On the other hand, the Kubernetes volume (used by Mangue.io) has an explicit lifespan - the same as the Pod that contains it. Consequently, a volume bypasses all the containers that are executed in the Pod and its data are preserved on the restarts of this same container. Naturally, when a Pod stops existing, the volume stops existing as well.
Maybe more important than that, as the Kubernetes supports a lot of types of volumes, and a Pod may use any number simultaneously, the Mangue.io platform also inherited this capacity.
In its essence, a Volume is only a directory, possibly with some data that is accessible to the containers in a Pod. The directory is “local”, and its “content” is determined by its specific type of volume used.
On the Storage session, the user finds the menus related to the data storage structure persistent in Kubernetes. It is possible to browse through three different structures:
StorageClass
PersistentVolumes
PersistentVolumeClaims
StorageClass
StorageClass are responsible for creating storage classes of different times, it is possible to face as example the following scenario:
A user has two types of disks assembled in two different NFS servers and wish to use the disk with greater reading and writing potential for one type of application and the disk with less reading and writing potential for the other applications.
That way the user must create two different StorageClass, each one represents a NFS server: one for the disk that has faster reading and writing potential and another for the disk that has slower reading and writing potential.
When the user selects the Storage/StorageClass menu the Mangue.io platform presents the list of all the existing StorageClass configured in the cluster that was selected on the gears tab «Configuration Selection» of Mangue.io platform.
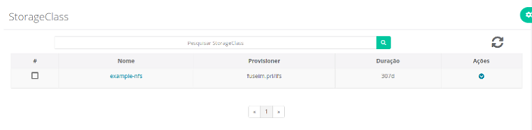
Below are described the columns of this list:
# actionable column: This column presents an alternative way to remove (erase) various rows in a single command. Each row is represented by a selectable icon
.When the user choses a line or several, the Mangue.io platform presents the icon(s) above this column, they represent the user’s actions to be executed once for all the selected lines.
In this case the «Trash bin» icon
is presented, which allows to remove all the items indicated by the user with a single command;Name: StorageClass name.
Provisioner: StorageClass provisioner name.
Duration: Describes how long ago the resource was created.
Actions: This column presents the
Actionbutton when clicked, presents the option to delete the selected StorageClass:
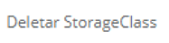
When selecting the “Delete StorageClass” the Mangue.io platform requires the confirmation of the action from the user.
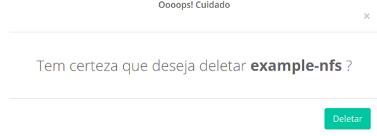
Aviso
It is important to highlight that this action when confirmed is irreversible. Any cluster workload that is associated with, or use, this StorageClass can present a fatal error (crash) in its execution.
PersistentVolume
PersistentVolumes (PV) are a part of the storage in the cluster that was provided by an administrator or provisioned dynamically using a StorageClass. It is a cluster resource, like a node. PVs are plugins of volume like the Volumes resource, but have a lifespan independent of any individual Pod that uses the PV.
When the user selects the menu Storage/PersistentVolume the Mangue.io platform presents the list of all the PersistentVolumes that exist configured in the cluster that was selected on the gears tab «Configuration Selection» of the Mangue.io platform.
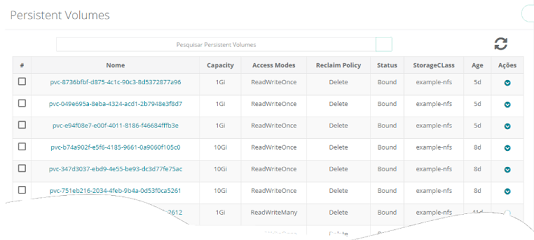
# actionable column: This column presents an alternative way to remove (erase) various rows in a single command. Each row is represented by a selectable icon
.When the user choses a line or several, the Mangue.io platform presents the icon(s) above this column, they represent the user’s actions to be executed once for all the selected lines.
In this case the “Trash bin” icon
is presented, which allows to remove all the items indicated by the user with a single command;Capacity: This column presents the size/capacity of PersistentVolume in Gigabytes.
Access Modes: This columns present the access configuration to this volume, these access modes may be three, they are:
ReadWriteOnce: The volume is mounted and may receive reading and writing instructions only in a single node.
ReadOnlyMany: The volume is mounted and has permission only of reading but of different nodes simultaneously, not being allowed writing.
ReadWriteMany: The volume is mounted and may receive reading and writing instructions simultaneously, but from different nodes.
Reclaim Policy: When a user concludes their volume, they may exclude the API PersistentVolumesClaim objects that allow the resource reclaim. The reclaim policy for a PersistentVolume informs the cluster what to do with the volume after it is released from its claim. There are currently three policies of reclaim:
Retain: The retain policy allows manual resource retrieval. When the PersistentVolumeClaim is excluded, the PersistentVolume still exists and the volume is considered “released”. But still is not available for
Delete: For volumes that offer support to the retain policy of exclusion, it removes the PersistentVolume Kubernetes object, as well as storage files associated with the external infrastructure (for example: a AWS EBS, GCP PD or Azure Disk volume).
Recycle: On this last option the retain policy for a PersistentVolume allows the cluster to do a basic cleaning.
Status: This column present the current situation (status) of the volume request, there are two status that may be presented:
Bound: When the bindings of the volume size correspond to the space designed in the node computing environment.
Unbound: When the bindings of the size volume do not correspond to the space designed in the node computing environment.
StorageClass: This column presents the StorageClass name which the PersistentVolume is associated with.
Age: This column presents the level (in days) elapsed since the creation of this PersistentVolume.
Actions: This column presents the
Actionbutton when clicked, displays the option to delete the selected volume:

When selecting the action “Delete Volume” the Mangue.io platform requests the confirmation of the action from the user.
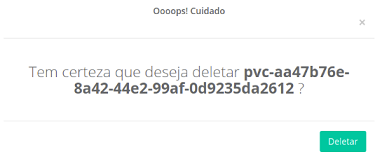
Importante
This action when confirmed is irreversible. Any cluster workload that is associated with, or use, this PersistentVolume can present a fatal error (crash) in its execution.
PersistentVolumeClaims
PersistentVolumeClaims (PVC) are a storage request by a user. It is similar to a pod. Pods consume resources from the node and the PVCs consume PV resources. The PVCs may request specific storage size and access modes (for example, they can be mounted ReadWriteOnce, ReadOnlyMany or ReadWriteMany).
The Storage/PersistentVolumeClaims menu presents all the PVCs present in a certain cluster namespace, the table shows information such as:
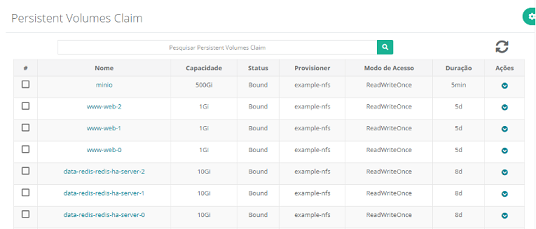
# actionable column: This column presents an alternative way to remove (erase) various rows in a single command. Each row is represented by a selectable icon
.When the user choses a line or several, the Mangue.io platform presents the icon(s) above this column, they represent the user’s actions to be executed once for all the selected lines.
In this case the “Trash bin” icon
is presented, which allows to remove all the items indicated by the user with a single command;Name: Responsible for identifying the PVC name.
Capacity: This column presents the size/capacity of the PersistentVolumeClaim in Gigabytes.
Status: Responsible for identifying the PVC state, generally may be the following states:
Bound: When a PVC was created with success.
Pending: When it awaits some instruction for it to be created with success.
Terminating: When it awaits some instruction for it to be deleted successfully.
Provisioner: Responsible for identifying which StorageClass that PVC is using.
Duration: This column presents the time (in days) elapsed since the creation of this PersistentVolume.
Actions: This column presents the
Actionbutton when clicked, presents the option to delete the selected PVC:
When selecting the action “Delete Volume” the Mangue.io platform requests action confirmation from the user.
Nota
It is important to highlight that this action when confirmed is irreversible. Any cluster workload that is associated with, or use, this PersistentVolumeClaim can present a fatal error (crash) in its execution.
Tasks
Mangue.io platform is a environments that communicates with the Kubernetes container manager via API-Restful, that way every time the user adds, or reconfigures some resource through the Mangue.io interface, the platform sends a “task” via API-Restful for the cluster Kubernetes for this task to be executed.
By the end of the task processing, the Mangue.io platform receives feedback from the Kubernetes Manager and presents it for the user on the interface table. The screen Tasks below displays an example:
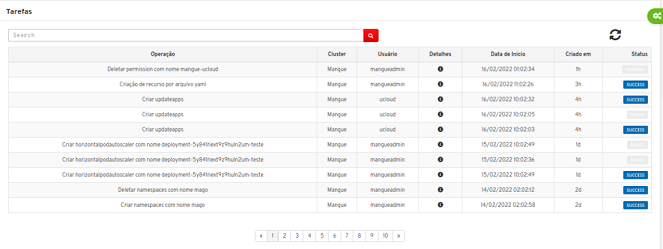
On the list is possible to find the tasks status regarding the cluster that was selected on the gears tab «Configuration Selection» from the Mangue.io platform:
Operation: On this column is presented a succinct description of the task that was executed by the user through the Mangue.io interface.
Cluster: On this column is presented the cluster identification in which the task occurred.
User: On this column is presented the user identification that logged in on the platform and requested the action on the Mangue.io interface.
Details: On this column is presented an icon of a letter “i”, on the lines in which the “status” column is with the status “Failed” the Mangue.io platform presents a pop-up with details of the task result. The user must position the mouse cursor over the letter “i” and Mangue.io presents a pop-up screen with the error message content returning for the Kubernetes for the Mangue.io platform. See an example below:
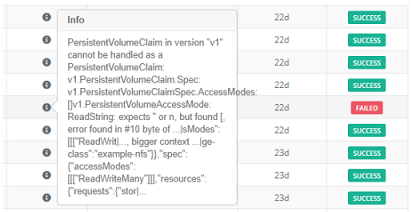
Start Date: This column presents the date and time in which the task was created on the Mangue.io platform. The format of the presentation date is of day/month/year (Brazilian default – DD/MM/AAA), for the time format is: hour, minute and second (24 hour format – HH:MM:SS).
Created in: This column presents the quantity of days elapsed since the task start date (previous column).
Status: This column presents the feedback content message of the Kubernetes Manager and presents this response for the user in three different status:
SUCCESS: Task sent for the Kubernetes and was processed with success.;
PENDING: Task sent for the Kubernetes and is being processed, until the present moment was not closed;
FAILED: Task sent for the Kubernetes and its processing generated error/failure while trying to execute it.
Right above the table, there are three elements with which the user can act:

Search action: In case the list presented on this screen is too long (occupying more than one page), there is a blank where it is possible for the user to perform a search for some part of the text present on the “Operation” column. Just inform part of the operation name and type enter, or click over the «Magnifying glass» icon
. As result of this search only lines that have the key-word appear.
Atenção
This search is sensitive in case of letters (uppercase/ lowercase), therefore, the search result for the word “Delete” is different from the search for the word “delete”.
In case the search does not return any incidence, the list is blank. To go back to the initial list, the user must erase any content/string of this blank, and click over the «Magnifying glass» icon (search for “blank” space) and the Mangue.io platform presents the complete list content before any search.
Update action: Just click on the icon
for the Mangue.io updates the interface with the most recent status of this task table.
Clusters Workloads
This menu option lists all the existing workloads in all the clusters integrated to the Mangue.io platform.
Initially, it is relevant to clarify what exactly is a workload. On the Kubernetes, there is no object, component or any type of construction called “workload”. Nonetheless, the term is frequently used as a general category for tasks and services that the user desires to execute in their cluster. It may be a synonym of microservices, applications, containers or processes. The workloads, generally, are processes of long duration, but it also may be of short duration on demand or jobs in lote.
Mangue.io platform may manage several components that the Kubernetes offers to generate and configure its workload. It may list pods and for the components that encapsulate pods, such as: ReplicaSets, Deployments, DaemonSets and StatefulSets. Next, details about the peripheral components, like Services, EndPoint and Ingress.
Regarding a great quantity of components, this list may be long. Below is presented an example of these components that are listed on the screen:
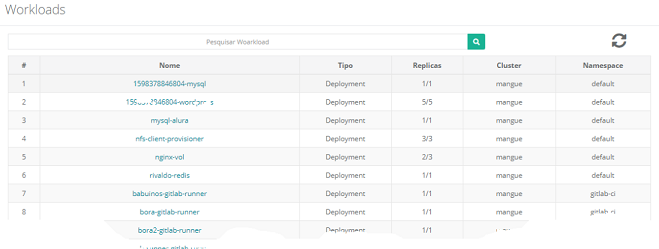
# actionable column: This column presents the workload sequential number on the displayed list.
Name: This column presents the workload name that was created during the inclusion process of this component on the Mangue.io platform.
Type: This column presents a specific type of the workload(s) component(s).
Deployments
Daemonsets
Horizontal Autoscaler
Pods
Statefulsets
Updates
Replicas: This column presents the quantity of active replicas that this component has in the present moment of the consultation.
Cluster: This column presents the cluster name which the component is associated with. The Mangue.io platform exhibits all the clusters with which have integration configuration.
Namespace: This column presents the namespace name the component is associated with.
In case the user needs to visualize all the detailed information of a component present on the list, just click with the mouse cursor over the component name and the Mangue.io platform presents the same information present on the Workload menu (example of information of a deployment below):
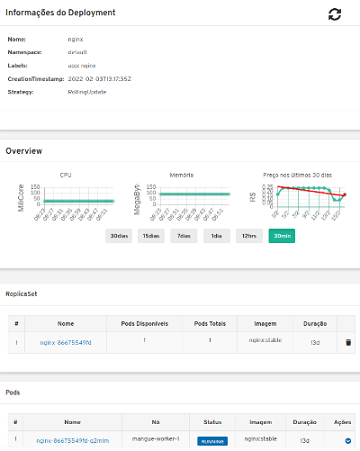
Conclusion
This document concluded the presentation and description of the Mangue.io, an environment management platform for multiple container orchestrators that delivers in a continuous, agile, secure and productive way, the applications directed to implementation, tests and updates with the downtime zero and deployments rollback. Ustore Team.
Ustore Team
Mangue.io User Manual - 4th Edition v.2 - Reviewed 27/06/2023